Holmes knows that the cultists plan to summon an ancient creature called the Leviathan, a process which must be stopped. The great detective and his companion Dr. Watson must fight their way through the light house and bring a little extra light to the world before the great Cthulhu is awakened.
Exploring the Pirate’s Lair
You will pass a good number of scaffolds on the way to the first room of the lair. This will be the still that may not have been in use for some time. Despite the lack of use, there is still a hipflask of rum that needs to be picked up. You will also need to pick up a piece of gate, and a funnel. Go back out to the scaffolding and find one near the building. You will need a ladder or something that will serve the same function to climb up the scaffolding.
There are two planks behind the boulder in the scaffolding area. You can click on them, but this reveals little relevant information. Climb up the planks until Holmes informs Watson that there is something there.
There is a hook holding a skeleton in the scaffold room. Select the lantern from the inventory and click on the hook. The lantern will dangle from the hook. Go back up the planks and use the piece of gate in your inventory as a ladder. The place where something is contains an empty flask and a barrel. These items can be combined to become a powder-filled flas k. Climb back down the ladder and retrieve your lantern.
There is a walled-in area in this pirate’s lair that will be your next destination. A good way to tell if you are done in the cave is if the planks and lantern break on the way in. If they have not, go back in the scaffolding and still areas to see what you have missed.
There are two ways to go, but Holmes and Watson will become separated in the caves. Holmes will make note of this and ask for matches. Above the area where he stops there is a hole. There is a room where the pirates congregated that is back and to the right. Go back into this room and get some bones. Dip the rag in alcohol to get an alcohol soaked rag. Combine this with a bone to get a bone torch. Now that you have a way to light your way through the dark, you can continue down the cave. Go back out and down the corridor. Take the right passage when you get to the end of it. Stop when you come to the red spot near a crevice on the ground.
A boulder blocks your further passage, but the inventory has the items to make an explosive device. Soak the reaming rag in oil to make a fuse. Combine it with the powder filled flask and place it on the boulder covering the hole. Light and stand back.
The Crank Machine Puzzle
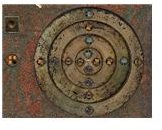
There is another skeleton here, as the pirates must have been busy. Take the red leather belt from it. The explosion will reveal another puzzle that must be solved before the player can continue. The puzzle is relatively simple to figure out, just remember that before you can proceed that all the lights must be lit. You do not need to manipulate the center button, but you will need to press the button on the top left. There is a lever that needs to be manipulated also, but it has been locked recently. On the ground nearby is a rock that could come in quite handy for smashing simple locks. Perhaps it is a good idea to pick it up and smash the lock with it?
Once the lock has been smashed and the door open, enter the next cave. The first and perhaps the most noticeable feature in the next room is a large hole in the ground. There is an underground river underneath the holes, but further exploration of each one would be useful. Use the torch on each hole until Holmes confirms that there is something in the hole. Select the red leather belt from your inventory and you will go down to a new cavern filled with water.
You will need to make another torch, but once the torch is lit it reveals another rock and a gate. By the rock is a wooden leg. Pick the wooden leg up and proceed to the gate. The gate itself is locked, but the key is in the inventory. It is in fact, the wooden leg in your possession. Use the wooden leg on the gate to move forward. The gate opens to reveal the throne where the pirates’ leader once ruled. He holds a saber in his hand. Take the saber and then proceed back out of the cave.
The Great Holmes Keeps the Great Cthulhu in his House at Ry’leh
The path ends at a ledge that descends into the underground river. Something needs to be found to build a bridge across, and Holmes will ask Watson to find a mast from one of the wrecked ships nearby. The game will pass control to Watson who must turn around and find a nearby log. (It is directly behind you, near the stone. There are also a broken cask and crank nearby.) Walk back to the ledge, and select the log in your inventory. Use it on the ledge to create an instant bridge. The metal rungs on the other side of the make shift bridge provide a way up into the lighthouse. An unhappy visitor and buckets of poison gas will be waiting to greet you.
You must let Watson in, but do not stay long in the lighthouse . There is a bucket outside of the lighthouse, take it. Open the door and go outside to the wrecked building where you found the barrel of fresh water. By using the bucket on the barrel of fresh water, a bucket of water is created. Go back inside the white house to neutralize the poison gas. This is not an easy process as the host, a man named Ashmat will be shooting at Sherlock Holmes. Doctor Watson will provide covering fire for his friend while he neutralizes the poison gas.
There is a lever on the left side of the circle of poison buckets. Pulling the lever causes a crate to drop on the lone gunmen, but he will ascend up the stairs shortly after this scene takes place. Proceed into the next room once the poisoned gas no longer poses any threat.
There is a landing at the top of the stairs. Climbing the stairs reveals an interesting picture as well as a white panel with a strange pentagram symbol on it. Pick up the panel and take it to the pool of blood at the top of the stairs. You will need to draw the symbol in this picture on this panel using the pool of blood on the landing. Advance toward Ashmat and observe as Holmes uses the unholy knowledge that he and Watson have collected. Ashmat collapses and no longer serves as an obstacle toward your final goal.
Climb to the top of the light house. A door might slow your progress, but an iron bar removes this obstacle. Dirty Somers and his Hindu companion await you there, but there is another door that requires the key. Somers only says that the key is within his Hindu friend. Pick up a piece of paper from the table and the Directive of Sect appears in your documents.
You will be moved back downstairs automatically and be given another quiz. The answer to the question about where the key is hidden is in the stomach. Doctor Watson takes the saber rescued from the pirate gentleman and impales the Hindu man to retrieve the key. Take the key and go back up the stairs. Use the key on the door and enter the final room.
Lord Rochester awaits you there, and hooded men are on their way. You need to turn off the lighthouse light. Turn towards the light source. There will be a blue and green bottle on the floor. The green bottle is found on the left side, and the blue bottle is found on the right side. There is an empty bottle on the floor, pick it up and select it from your inventory. Place the empty bottle on the bottom ring while you are looking in the direction of the blue bottle. Turn the wheel so the blue bottle is on top. Take the blue bottle and turn towards the green bottle. Place the blue bottle on the bottom ring and turn the wheel so the green bottle is on top.
The light house turns on and Lord Rochester disappears. Once Holmes and Watson are far away from this scene, Holmes summarizes what happened and the two are ready for a little rest before their next adventure.
References
-
Screenshots – Sherlock HOlmes the Awakened
Personal Experience
This post is part of the series: Sherlock Holmes the Awakened Wlaktrhough
Find out if the powers of the rational mind can stand up against represantives of irrational fear in this game from Focus Home Interactive and Frogwares Development studios. This part of the Sherlock Holmes the Awakend Walkthrough will take you through his adventures in London.
- Watson’s Nightmare Puts Holmes on the Case
- Sherlock Holmes the Awakened Walkthrough – Investigating the Cthulhu Cult near the Thames (Part 2 of 5)
- Sherlock Holmes the Awakened Walkthrough – Part 3 of 5 – Encountering the Cthulhu Cult in New Orleans
- Sherlock Holmes the Awakened Walkthrough – Part 4 of 5 – Fighting the Cthulhu Cult in Scotland
- Sherlock Holmes: Confronting the Cthulhu Cult in Scotland