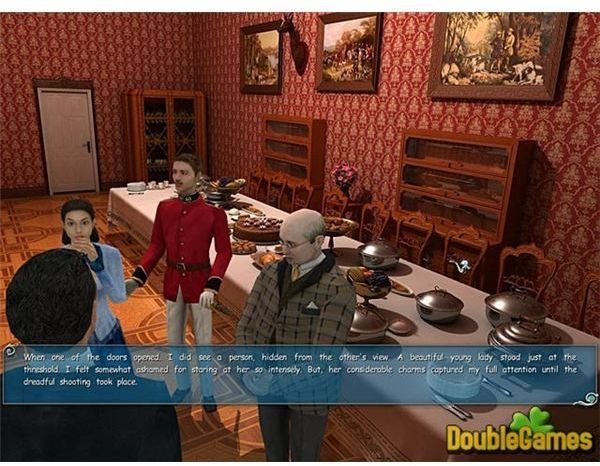
Coming back from New Orleans, Sherlock Holmes and Doctor Watson return to their native country with few answers and even more questions. A letter from Sherlock’s brother Mycroft will help the great detective and his medical sidekick solve this mystery
Mycroft Supplies Some Missing Information
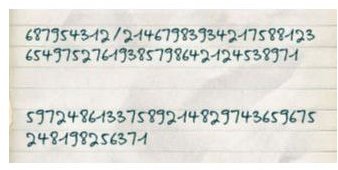
Holmes and Watson have left New Orleans with more questions than they came with and they have not uncovered the entire nature of the Cthulhu cult. Nor are the intrepid heroes even aware of the true nature of the cult they pursue. The boat ride back to London is a relatively relaxing time, but Holmes will be instructed to solve Davy’s Cipher. (It appears in documents.)
Do not worry about it just yet as you will be quizzed on this after you return to London . Each line of the cipher contains the number one through nine. Some lines are missing a number however, and you must figure out the missing numbers. The cut scene will return to London and Holmes and Watson will return to their familiar lodgings at 221B Baker Street. A letter from Mycroft will have arrived that contains news about the suicide of the Black Edelweiss Institute physician Doctor Gygax. There is also a little more news on the collection of the jewels.
It will soon be time to head out into London once again, but not before being called on to solve the cipher. The determined player may be able to solve this himself, but a person reading a walkthrough is likely stuck or does not have the patience to figure out the cipher and can read the answer here. It is 56436 6134.
Despite his best efforts, Holmes has not yet fully understood the material contained within the Accursed Book Text he found in the New Orleans swamp. Perhaps, he reasons, Mister Barnes the book seller will be able to sort out some of the material for him. Head out of Baker Street and go to Barnes’s Bookshop. Show the bookseller the two pages from the book that need to be translated.
The newspaper seller from the Baker’s Street Irregulars is back selling the copies of a Strand. Sometimes even the world’s greatest detective needs the help of the lowliest reporters. There are two stories of interest in the strand. One is about a wealthy heiress being relieved of jewels and other gems, and the other is about a string of missing boats occurring off the coasts of Ireland and Scotland.
Revenge of the Rats of Wharf 13
The wharf area provided the first clues about the Cthulhu cult and it would also be the perfect place to find maps of the Scottish coast, and perhaps, a boat that would be willing to transport you to Scotland. Use the map to travel to the Wharf and enter the Cursed Mermaid. The bar is relatively empty, except for the bartender who provided you with valuable information earlier. Talk to him again and find out what information you can about the coastline of Scotland. He will give you a key to the back room.
Enter the backroom and find a map of the Scottish coastline. The cipher you solved from Davy provides the necessary coordinates about where in Scotland you need to go to a place called Ardnamurcham. An additional conversation with the bartender reveals that the location on the map is above a location that was once used as a pirate’s bay.
You have learned all that you can from the wharf, but this part of your adventure in London is not done yet. Return to Baker Street and receive word from the newspaper boy that the bookseller has finished the translation of the text you gave him. The translation reveals a cult of worshipers planning to worship a beast called Leviathan sleeping in an ancient city beneath the waves. (This wording may seem familiar to fans of H.P. Lovecraft, but those who have only read Doyle’s works may have to press on through the game to find out what the worshipers of Cthulhu intend.) The Leviathan will be summoned when people from every nation of the world gather to recite an invocation. The task must be done when the stars are right and in a specific location in each country. Awakening sea monsters sleeping beneath the waves is never a good idea, even when the sea monsters may not be one of the Great Old Ones themselves. Homes needs to get to Scotland right away to stop the summoning of the Leviathan.
And I’ll Get to Scotland Before You
The boat will take the great detective and his sidekick to the Ardnamurcham Lighthouse. The waters off the coast of Scotlandd are as hospitable as you’d expect. The sea is stormy and choppy and Watson, for one, would be relived to get off the boat as soon as possible.
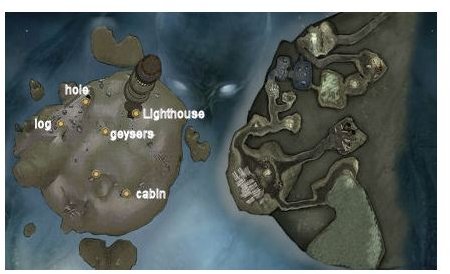
You will need to visit the lighthouse as soon as you get off the boat. There will be a series of stairs for you to climb on your left. You have a lantern in your inventory at the start of this part of the game, but it is not needed yet. There are two sphinxes that greet you at the top of the steps, or they might have been sphinxes once. Their faces have been grinded off so that their faces are smooth and black. Near these sphinxes is an iron bar. Pick up the iron bar, which you will need later.
There is a door to the light house here, but you cannot open it at this time. If you start heading back down on the stairs, there will be the remains of what might have been a house or a shed at one time on a nearby cliff. Head over to the shack to continue your investigation.
There are several items on the cliff, but the only one that is important is the worn rope. (Do not worry if you miss this, later, there will be another opportunity to pick another worn rope up.) Pick it up now or later and head over to the side of the cliff. While it may be tempting to explore the hulks of ill-fated ships that have wrecked on the shores near the cliff, you are looking for the pirate hide away that is supposed to exist underneath this light house. Use the worn rope to go down the cliff.
Was that the Face of Nyarlathotep?
When you have descended down the cliff, you will find three geysers confronting you. Holmes will say something that isn’t necessarily particularly helpful, but pick the geyser that goes through the center path. You do not need to measure the 30 paces that Holmes made in his earlier comment as the game will let you know when you have reached the intended path.
There should be a large rock in front of you. It is possible that there might be something under the rock. Use the iron bar in your inventory on the rock to look underneath it. Watson will remain behind, but do not get too attached to the iron bar, it will be lost after it is thrown down the hole. (You cannot stop this.) Now, there is still need for a device to pry things open, but the bar is missing. What would a pirate lair be, however, without a dead body to warn off unwelcome intruders? The dead body in this case happens to be holding a dagger. Take the dagger from the skeletal hand. There is another entrance underneath the piece of stone that sits to the side of the pirate . Use this dagger as lever to open it. The dagger will break, but fortunately you do not need it again.
This post is part of the series: Sherlock Holmes the Awakened Wlaktrhough
Find out if the powers of the rational mind can stand up against represantives of irrational fear in this game from Focus Home Interactive and Frogwares Development studios. This part of the Sherlock Holmes the Awakend Walkthrough will take you through his adventures in London.
- Watson’s Nightmare Puts Holmes on the Case
- Sherlock Holmes the Awakened Walkthrough – Investigating the Cthulhu Cult near the Thames (Part 2 of 5)
- Sherlock Holmes the Awakened Walkthrough – Part 3 of 5 – Encountering the Cthulhu Cult in New Orleans
- Sherlock Holmes the Awakened Walkthrough – Part 4 of 5 – Fighting the Cthulhu Cult in Scotland
- Sherlock Holmes: Confronting the Cthulhu Cult in Scotland