This is a follow up to my previous article about RPG Maker for absolute beginners. In this article, I explain how to add some much needed detail to maps as well as how to set up a starting point for the main character.
A Quick Introduction
This is a follow up to my previous article about creating your first map and project.
In this article, I will explain how to add details to your maps as well as introduce some an important function: the events. If you are a beginner, it is strongly recommended that your read the previous article (about creating your first map and project) before reading this one.
The first page of this article will tell you about adding up some details.
The second page of this article will tell you about using transfer points.
The third page will tell you about combining events together.
Adding Up some Details
Go ahead and select Tileset B, C or D. Remember that you can scroll down the upper left window to check out all of the available tiles.
Select some tiles you like and add some details to your island. You can even switch back to Tileset A to change the appearance of the ground if you feel that it is too monotonous.
Keep modifying your island until you reach a result you’re satisfied with:
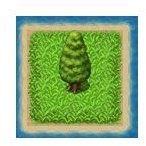
Keep in mind that Tileset A is mostly for creating the ground or some walls while the Tilesets B to E are for decoration. Elements from Tileset B will go “on top” of elements from Tileset A.
Below, the tree from B goes on top of the grass from A:
Creating your First Event
Now that you understand the basics about mapping, let’s explore a crucial aspect of RPG Maker VX: the “events”.
Everything that actually “happens” in the game is called an event. It can be a King offering you a perilous quest, opening a chest or a door or creating a save point.
Once again, look at the top window. Look out for the little EV icon.

The two buttons in the red rectangle are used to access the two main “modes” of RPG Maker. The icon on the left is used for mapping (what you’ve been doing up to now) while the button on the right is to access the Event mode.
The mapping mode can be also be accessed by pressing F5 on your keyboard while the Event mode can be accessed by pressing F6.
Access the Event mode and you’ll notice straightaway a grid appearing. This is a good way to tell that you’re currently in Event mode.
If you look carefully, you’ll notice a character standing there which has been there since the very beginning:
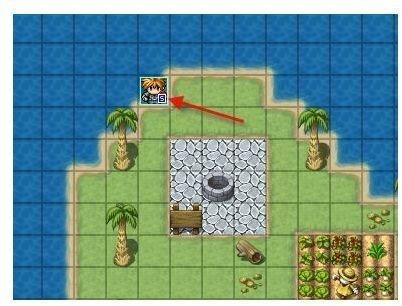
This is the starting point of the main character of your game. Once your game is launched, this is where the game will begin.
The character is currently in water which is problematic. Let’s move it on the island.
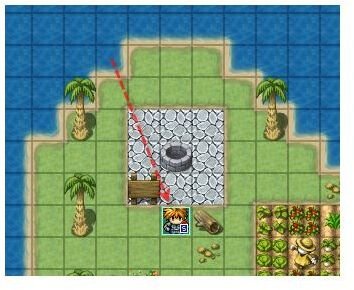
Left click and drag the character. You can now move the character somewhere on the island like so:
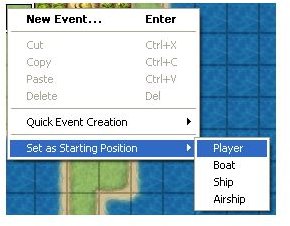
If you wish, you may also right click anywhere on the map (while in Event mode) and select “Set starting point”, as shown here:
Testing Out your Project
Once you’ve made sure your character is on land, launch the game to give it a test drive. Press F12 or click on the green arrow in the top window:

You will be asked to save your progress, do so. Once at the title screen select “New game” (it should already be selected) and press the Enter Key. You should now be able to move around your little island.
It’s pretty boring though as there’s nothing to do. In the next article I will introduce a few kinds of Event which will no doubt turn out to be very useful.
Using Transfer Points
This event allows you to transfer your character from one map to another.
In order to demonstrate how this event works, we’ll use a map from my own personal project: “Quatre”. “Quatre” (which means “four” in French) is essentially a game to learn the Japanese Kanji which I have been working on for a couple of years.
Let’s have a look at two maps.

This is the first map of the game which also happens to be the apartment of the main character (at the very bottom).

This is the second map of the game. This is the corridor right outside the main character’s apartment.
We’ll focus on the first map for now.
As you can see, I’ve already established the starting point and added quite a few events here and there.
At this point in time, I need to add a transfer point which will take me from the apartment to the corridor outside.
In order to do this, I will go at the bottom of my map, at the entrance of the apartment in “Event mode” (press F6).
Like so:

Before going any further, make sure to change the “trigger” to player touch as you want the transfer to happen as soon as the player occupies this square.


Now all you have to do is select the map you would like to transfer to as well as the exact location on that map, like so:

Before testing our new transfer point, let’s do something else.
Notice how the entrance is two squares large but at the moment only one square will transfer the player. There’s a really quick way to copy this event to the other square without having to repeat the previous process (which is time consuming).
Make sure the square on the right is selected (the one with the Event) and press CTRL+C (this will copy the event). Select the square next to it and press CTRL+V, this will paste the event like so:

Congratulations, you’ve done your first transfer.
Combining Events Together
More often than not, you’ll end up using different kinds of events together, so we had better experiment doing that right now.
Once you’ve gotten to the second map, select a square on your map which will serve as a transfer point. In my case, I will choose the elevator on the left hand side.

I want my character to have a selection of floors to choose from.
As usual, I’ll add an Event by pressing “Enter”.
Just like we’ve done last time, I’ll add a description which will introduce what the choices will be about, as well as some choices afterwards (for more information about using choices, click here and read page 2).
By using this window as a reference, go ahead and try using a combination of both choices and transfers.

In my example, you should end up getting two choices. Selecting “lobby” will transfer to yet another map while selecting “stay here” will only display a bit of dialogue.
Look at this screen to get a better idea:

Experimenting with choices and transfers is very important as this is something you’ll find in pretty much every single RPG game out there (including your own).
Review Exercise
As a review exercise, complete the following tasks (you should be able to do all of them without any help right now if you’ve been following the tutorial series).
- Create a new project.
- In that project, create at least 5 different maps.
- Make sure all the maps are linked together.
- On each map, add at least one description.
- In your whole project, add at least one dialogue with choices.
- In your whole project, combine two different kind of events together (description+choices or choices+transfer, etc…)
- Import at least one original monster into your project.
- Make sure every map has its own unique music theme.
This post is part of the series: RPG Maker for Beginners
This series will explore the basic functions of RPG Maker VX. Examples and screenshots are provided to facilitate understanding.
- RPG Maker VX for Absolute Beginners
- RPG Maker VX: Adding Details and Setting Up the Starting Point
- RPG Maker VX for Absolute Beginners: Adding Descriptions
- RPG Maker for Beginners part 4: Adding Music and Dialogue Options to your Game
- RPG Maker VX for Beginners part 5: Customizing your Title Screen and your Character