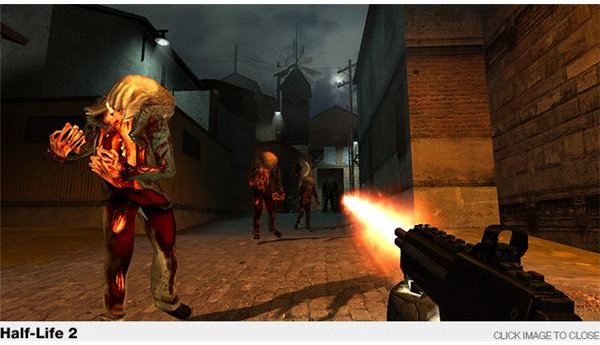
You are finally done with the massed zombie battles and you can get back to massed Combine battles. They’ve stepped up their attacks though, so your moves through the railyard won’t be easy. You will need to handle snipers and a full Combine attack before you can finally put Ravenholm behind you.
Snipers
Move to the right along the railroad tracks. Kill the one fast zombie and start watching the area in front of you for a blue light. You should see a sniper start shooting a few things in front you. He’s in the bridge that crosses the railroad, but he’s facing away from you. Pull out a grenade or pick one up from the crates ahead. Then just toss it up into his window to kill him.
Move forward but watch for the next sniper. Getting shot by them will take a quarter of your health and stun you, so you’re basically dead if you’re caught in their field of fire. You should notice him in the windows ahead as you approach a red tanker car. Stick close to the tanker car to avoid his fire. Walk ahead and stay low until you see the lumber car. Dash a few feet and crouch below the wood on the car. Then crouch and go under the traincar. Get to the end and dash out to get into the boxcar on the left. There’s a bunch of grenades and a clear line of sight from the opening in the car. Throw one into his window to take him out.
Raiding the Railyard
Keep moving and kill the three combine ahead. One of them will drop the AR2, which is one of the best guns in the game. It’s a good machine gun and a number of combine soldiers drop ammo for it. Follow the little path and watch for the scrapyard on the left. Kill the few combine inside the yard. There are a lot of explosive barrels around that should make short work of them. Grab the supplies out of the white van and head into the yard. Two more combine will run into the yard through an open door. Kill them. Go through the door to see a battle between the rebels and the combine.
Rescuing the Rebels
There are a few rebels at the far end of the warehouse about five Combine near you. Kill the five Combine on your side with the shotgun or the AR2. There are a few things nearby to use for cover. Any of the equipment nearby should be just fine as a shield. Once all five are dead, you need to head to the back fo the warehouse.
The level’s basically done. Walk up to the wounded rebel on the ground and wait for the leader to take you into the control room. He’ll turn on the radio. Just wait until Alyx is done talking. You now need to raid one of the toughest Combine prisons on the planet, but that won’t come for another two chapters. You can grab some ammo and health from the room while they’re talking. Go through the door he opens to end the chapter.
This post is part of the series: Half-Life 2 Walkthrough - Chapter 6: We Don’t Go to Ravenholm
This part of the larger walkthrough will cover your stay in Ravenholm. You will be facing a lot of zombies and a lot of headcrabs. You also don’t have much ammo. If you are finding the situation to be difficult, then read this walkthrough to find out how to escape.
- Half-Life 2 Walkthrough - Chapter 6: We Don’t Go To Ravenholm - Priests and Zombies
- Half-Life 2 Walkthrough - Chapter 6: We Don’t Go to Ravenholm - Cars and Laundry
- Half-Life 2 Walkthrough - Chapter 6: We Don’t Go to Raveholm - The Elevator and Beyond
- Half-Life 2 Walkthrough - Chapter 6: We Don’t Go to Ravenholm - The Church and the Cemetery
- Half-Life 2 Walkthrough - Chapter 6: We Don’t Go to Ravenholm - The Mines
- Half-Life 2 Walkthrough - We Don’t Go to Ravenholm - Snipers on a Train