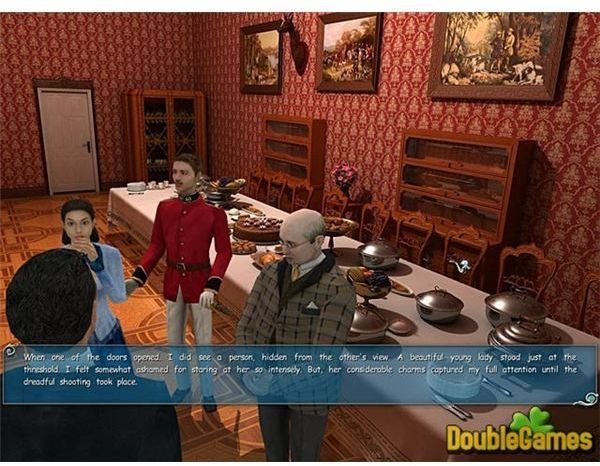
Holmes follows the request of the inspector on the case and decides to send Watson out to see what he can find. Watson’s style of investigation is far more gentlemanly than Holmes’s, but it seems, no less effective.
Watson Goes to Whitechapel
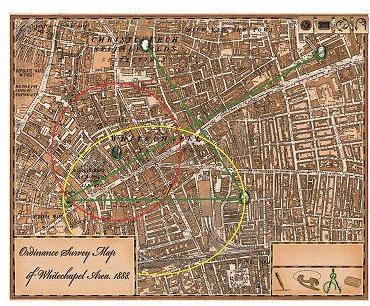
The policeman who walks into the Whitechapel station tells Constable Humphries that the Buck’s Row murderer has struck again at Cat Meats. The meat market is not in the Whitechapel District. It took place a quarter of a mile away. The location of the is 29 Hanbury Street. Use the map to get to the area. The game shows the time at 6:20 in the morning. As trivial as the detail seems, you must remember the arrival time.
Talk to the bystanders and policemen on the street before entering the building. Go out the door beside the stairs heading up and find the backyard of 29 Hanbury Street. The game follows the details of the murders attributed to Jack the Ripper fairly closely. The victim was a streetwalker who went by the name of Anna Chapman. Examine the blood on the fence, the wound in the stomach and the facial area of the victim. The cuts on the throat are jagged this time and go in roughly the same direction of those of the previous murder. You will find a bruise on the cheeks which let you know the hand used to strangle the victim. The tongue is swollen, as the previous victim’s was.
When you get all the clues in the area, enter the conclusion board screen. This time the killer was left-handed, and the position of the blood indicated the victim had her throat slit while standing up. As with the previous murder, you will have to reenact the murder. She was strangled with the right hand and cut with the left, but her throat was slashed before she was strangled. (The murderer in this case is clearly right-handed.) An envelope containing a pill lies near the corpse. Pick it up.
Watson Continues the Investigation
Holmes asks Watson to return to the Whitechapel after he reads another story in the Star. People in the Whitechapel had previously targeted the Jewish community for attacks. They thought Leather Apron was the murderer. The story in the Star puts and ends to the attacks. Return to the Cobbler’s House in Whitechapel. Ask him if the harnesses are ready. He gives them to you in return for the services you have provided. Take these prostheses and go to the clinic.
Doctor Gibbons readily gives you the cane, Select the pill from your inventory and use it on him. He tells you that such pills are often used to treat tuberculosis. Gibbons tells you something about the nature of the employment of Anna Chapman. Go back to the brothel. The brothel’s mistress tells you that Anna was a little older than most of the girls that worked under her. She tells you about a man named Squibby and a person named Bluto who were last seen at the Wasp’s Nest Pub. She ties the two to the Doctor Tumblety, the person for whom you have been searching unsuccessfully. She also asks to tell the artist that she has a surprise waiting for him upon his next visit.
The map now shows the location of the Wasp’s Nest. It is near where you found the Captain earlier. Walk inside and talk to the waitress and then the bartender. They tell you about a man hiding in the bar who may know the location of Tumblety. He also complains about a journalist who might not pay him anything. Walk over to the journalist. Talk to him to find out he is missing his red ink. Walk to the back of the bar and find a bottle of ink with the dishes. Return it to him and then go back to the bartender. You will pay him the guinea the journalist owes the bartender and the bartender will let you speak to Bluto as a reward.
The Troublesome Dr. Tumblety

Bluto reveals a more about Tumblety when you speak to him. Bluto seems to be more concerned about a man named Squibby, a fellow who ratted him out. He admits to working for the Yank. (The game has not yet made it clear whether Tumblety is a Canadian or an American.) Bluto also says he will not reveal more unless you can bring him a gas man.
Go to the police station and see if they can provide any additional information about Tumblety. Use the hint option to find out about some clues. Click on the waste basket to find discarded police reports. The reports are placed into your inventory. You must place them back together before you can read them..
Talk to the person giving testimony at the police station. He says that the body was not there when he went up to use the privy at 5:20 in the morning, contrary to the time of death given by Doctor Watson and the coroner at the scene.
This part of the game is essentially a jigsaw puzzle. In reality, it is two jigsaw puzzles with few graphical clues to go on. The pages contain the testimony of two individuals concerning the murder of Anna Chapman. Piece them back together. Watson announces that he is done here and should return to Baker Street.
Motives and Time Lines

Now that you have pieced together more of the murder, you must figure out more of the motives. Return to the motives board and figure out which ones you can eliminate. The yes options are cannibalism and human trafficking. All other options get marked as no. The game lets you know when you have the other motives and their possibility matched up correctly. Holmes then suggests that you make a time line to pin down the time of events of Anna Chapman’s murder.
Holmes and Watson arrived at the scene at 6:20. Place the time on the board. Place Watson’s estimated time of death at 4:30. Select the two police reports and the conversation with the witness in the police station as evidence. The time line shows icons by the relevant facts when each piece is selected. Move these positions into the appropriate place and the boxes turn green.
Holmes notices that the testimony does not match up with the time of the death given by the doctors and suggests that doctors may have erred in their assessment of the time. The night, as has been remarked on several occasions, was rather chilly. The victim likely lost body heat quickly. Put the time of the death at approximately 5:30. Follow the text in the documents and adjust the other times accordingly. The events are usually only a few minutes off, because they relied on a nearby clock to tell the time. The boxes turn green when you move them again. When every time is in its proper place, you get a message saying so and can return to the next part of the game
Dr. Watson Goes to Medical School
Holmes asks Watson to see if his medical colleagues if they know anything about a human trafficking. He says that he will go to Whitechapel to find out more information about Bluto and Doctor Tumblety, if possible.
Select the map of London from the options menu and select the medical college where Watson attended. A colleague of Watson’s named John greets you there.
John does not think a ring of trafficking in human bodies is possible, he does note that a number of unclaimed bodies have disappeared from the morgue lately. He finds it odd, but does not wish to discuss it unless Watson promises to treat the matter with discretion.
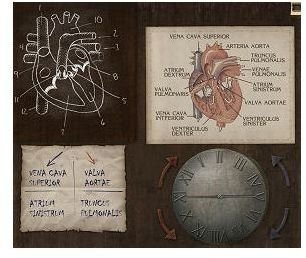
He suggests you look around. Go over to the right side of the room (assuming you are in third person mode) and use the hint feature to get an idea of which items to click on in this area. Get the screwdriver-like object from the experiment table and use it on the stuck wheel on the medical cart. Click on this again to get the piece of paper there. It contains a picture of the human heart. Click on the jar and you will enter the next puzzle phase.
Use the information below to get the magnet from the jar:
Turn the blue arrow to point to 1.
Turn the red arrow to point to 5.
Take the heart message paper with #6.
Turn the blue arrow to point to 8.
Turn the red arrow to point to 2.
The case opens.
Take the magnet from the jar. The note you find refers enigmatically to six. Look at the other side of the room. Each desk has a number. Go over to the desk labeled with the number six. Examine it. Watson notes that there is another magnet inside. Select the magnet from your inventory and click on the desk again. The next puzzle requires you to move one magnet over another without either magnet touching one of the black bars. The puzzle requires you to magnets in a certain way. Move the magnets about a third of the way down, half the way across the screen, and finally diagonally until they meet.
Open the case and get a coded message. Talk to John again about the possibilities and then head back to 221b Baker Street.
Holmes Goes Back to Whitechapel
Holmes should start his investigation at the Wasp’s Nest Pub. Talk to the bartender. He does not have much to tell you that you have not already heard, although he is grateful to have the journalist out of his establishment. Pick up the tongs on the counter. Talk to Bluto and find out that he left his sack in the building across the street from Finley’s boarding house. Go back and talk to Finley about the gas leak and how it started.
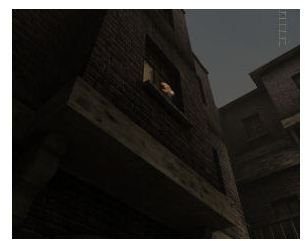
Look around the area outside of the boarding house. Find some lead pipes, some pieces of wood, a broken hammer, and a stick. Assemble the longer wooden sticks and boards to form the basis of the ladder. Combine the boards with the nails and then use the hammer on them. Get the rag from this area and use it on the barrel of water. Climb up the ladder and equip the mask. Search the abandoned building. The dead animals reveal that the gas leak occurred too quickly for the animals to escape. Find a welding tool and an iron bar. Use the iron bar to open the cabinet that contains the pipes.
Holmes finds the satchel behind the cupboard The leak must be repaired, but his makeshift mask will not keep him alive long enough. Go back out of the room and talk to Finley. He says that the tanners use such masks in their work.
Jump to the Cobbler’s shop. Try to talk to Abram. He refuses to talk to you, and Holmes says that he must find some way to earn the trust of the man. Use the map to go back to the Wasp’s Nest. The area of the loose floorboard you contained earlier contains a jewel with a letter of the Hebrew alphabet. You need to solve this slider puzzle to remove the jewel from the floor.
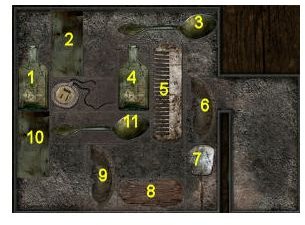
Move the 1 bottle up, the jewel left, the 3 spoon left, the 6 plate up, the 7 mirror up, the 8 wood right, the 10 plank down, the 11 spoon left,the 4 bottle down, the jewel right, the 11 spoon right, the 1 bottle down, the 2 plank down, the 3 spoon left, the 5 comb up, the 11 spoon right, the 2 plank down, the 1 bottle up, the jewel left, the 11 spoon left, the 4 bottle up, the 8 wood left, the 7 mirror down, the 11 spoon right, the jewel right, the 2 plank up, the 10 plank up, the 9 plate up, the 8 wood left, the 9 plate down, the 11 spoon left, the 5 comb down, jewel out.
Use the map to travel back to the cobbler’s shop. Use the jewel on him and he mentions that it belonged to someone who was attacked recently during the Leather Apron affair. Holmes asks if he has a heavy mask that prevents a person from breathing in toxic vapors. He does not have a tanner’s mask, but his cousin who runs a pet shop does.
The pet shop now appears on the map. Go out the door and enter the business run by Isaac. Isaac says he does have the mask, but he dropped it in the snake cage. He also tells you that the snake stick he uses to handle the snake is broken. Holmes mentions that the items he needs may be available in the cobbler’s shop.
Visit Abraham the cobbler again. Pick up tongs, rope, and a hook. Combine the three items in your inventory to get the snake hook. Go back to the pet shop and get a few cages. Put the large square one on the ground by the cage. Use the hook on the snake to remove it. Take the snake out and talk to the Abram Solomonovitch again. He agrees to let you have the tanner’s mask.
Holmes Fixes the Gas Leak

Return to the empty room above Finley’s boarding house. Note the cat on the windowsill. Go over to the cupboard. Place the pipes in the correct order and then place the gas gauge on the various holes. Rotate the top and bottom knobs as necessary to make sure there is pressure going to the bottom valve. (The bottom and top valves should read 0, the middle valve should read 50.) Use the welding torch on the pilot light. Move the torch over to the seams until they turn read. (If the author is wrong about the amounts, remember that you want to avoid a lot of gas leaking into the room.)
Fix the gas leak. When Holmes says it’s elementary, back out of the room and pick up the cat. Go back outside and get the rusted set of iron dishes. Go back to the Wasp’s Nest. Switch the silverware in the satchel with the rusted dishes. Give the package to Bluto. He tells you that Squibby is indeed in the police station.
Meeting Big Danny

You can travel to the police station, but you will not be able to get inside. Go back to the pet shop. Before you can return the mask to its owner, you will meet some of the Baker Street Irregulars in the street. They are looking for Pounce’s missing cat. Select the cat from the inventory and watch Pounce get reunited with his cat, Bertie. Listen to his story about a woman named Big Danny chasing the cat away.
Go back to the brothel to find more out about Big Danny and the type of tricks she turns. The madam also tells you of some perfumes she got as payment from a customer. The madam asks if Holmes can analyze them for her. Take the perfume bottles from the counter and bring them back to Baker Street for analysis.
Holmes says that he needs a book on perfumes to obtain the necessary information to analyze the perfumes. He says that the book shop near his Baker Street lodgings has just reopened. Use the mini-map to get to Barnes’s Book Store.
The new store clerk does not like the way the old owner organized the books. He says that you will need the Encyclopedia Spartaca, but he was not sure when the book was acquired. Take the labels from the counter and the note on how they should be arranged. The wrong options can be eliminated by trial and error, if the reader cannot follow the somewhat obscure clues given in this section. Talk to the book shop owner when you are done to find out the year in which the previous owner acquired the encyclopedia.
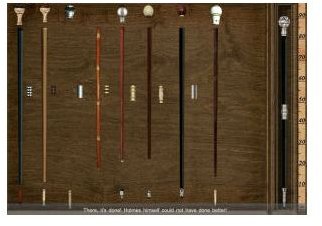
This portion of the game requires you to reassemble the shapes shown to you on each test strip. The size of each block gives an indication of each item. Start by clicking on the bases at the bottom and then match the other components to the shapes on the side. When you get a right, a green check mark appears underneath all three bottles. When you analyze all three, return to Madam Bella and get some valerian. If you have not already done so, use the atomizer on the bottle of perfume. Remember that Big Danny is allergic to cats.
Create a Diversion
Pounce’s cat is injured. Take him into the shop and see if Abram can do anything for Bertie. He says the cat is injured, and that he will need a book on cats. Get the book from the shelf. Read the entry on valerian that pops up in your inventory. Go back to the police station and head out to the end of Commercial street. Talk to Big Danny who will trick Holmes and take his money from him. Go back to the pet shop. Abram tells you that she used to perform in the circus arranging fights against men. Inquire about the health of Bertie. Abram tells you that the cat should recover, but that Bertie needs food. Abram tells you about a vendor who sells meat for cats who travels to Whitechapel Street this time of day. He also says something about his use of a peculiar “beep beep” call.
Buy the kebabs and you will head to Commercial Street automatically. Talk to Big Danny and give her the “perfume.” A cut scene shows the cats being let loose and mauling the poor woman. (Bertie is among the cats molesting her.)
Use the commotion to walk into the police station. Walk to the door in the back.
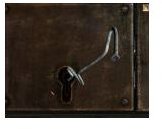
The Nail Lock Puzzle
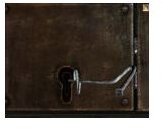
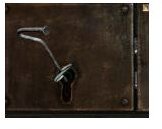
The nail lock puzzle can be difficult. You must turn the nail halfway to the left and release it. The second step is to take the nail all the way to the right and release it. Finally, move the nail a quarter of the way up the right-hand side. You move the nail by clicking the side opposite of the direction you wish to move it.
Open the door and talk to Squibby in one of the cells. Find out that he demanded the police put him in the cell for his own protection. He is worried about what might happen if the police release might happen if they release him. He ratted Bluto out, but he worries that other people might think Bluto is the murderer and that he should squeal on Tumblety for his own protection.
Return to Baker Street when you are finished with his portion and decode the message. The pattern follows a simple cipher but some of the Roman numerals have been eroded. The message should read: New Command: Subject Delivery 17 Wharfdale. Save your game and then have Watson locate Wharfdale on the map.
This post is part of the series: Sherlock Holmes Versus Jack the Ripper Walkthrough
The fictional detective tries to solve a series of very real murders. He will succeed where the police of Victorian London failed?
- Sherlock Holmes versus Jack the Ripper Walkthrough - Part 1 of 5 - Baker Street 1889
- Sherlock Holmes Versus Jack the Ripper Walkthrough - Part 2 of 5 - Watson Investigates Whitechapel
- Sherlock Holmes Versus Jack the Ripper Walkthrough - Part 3 of 5 - The Spiritualist
- Sherlock Holmes Versus Jack the Ripper Walthrough - Part 4 of 5 - Holmes’s Experiments and the Dutfield Murder
- Sherlock Holmes Versus Jack the Ripper Walthrough - Part 5 of 5 - Identifying the Perpetrator