Tired of the same old graphics in RPG Maker VX? This article explains how to modify your system graphics so that you can create your own, unique, original maps!
Exporting and Customizing your Tilesets
Using your own custom elements in maps is probably the best way to stand out among the thousands of RPG Maker projects out there.
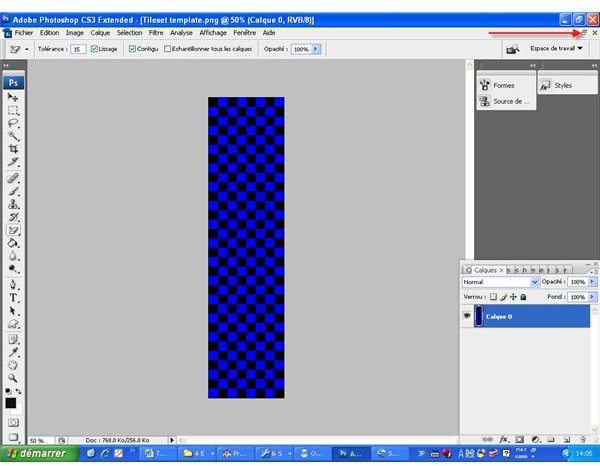
In order to do this, you will need a template (a thing that is used as a model for producing other similar examples). There are a variety of templates available on the internet but go right ahead and use this one. Simply click the picture underneath this text and it will enlarge the picture. Once this is done, right click the picture and save it somewhere on your computer.
This template will be useful later on when modifying the tilesheets in your game.
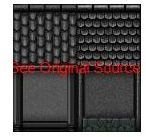
A tilesheet contains all the graphic elements for a certain letter in the siletset section.

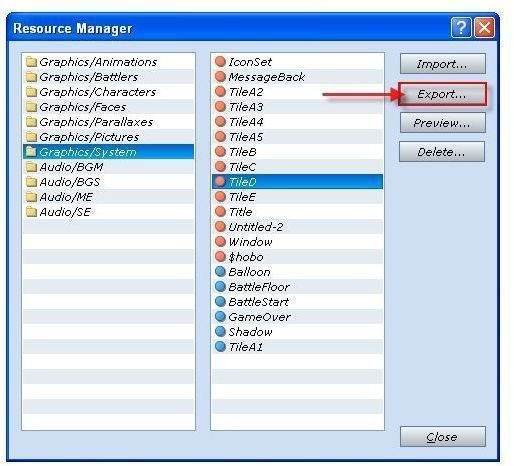
In other words, all of the letters form A to E have their own tilesheet. Those tilesheets can be exported and modified to suit your project. In order to do this, press F10 in the main mapping window, this will take you to the Resource Manager. In Resource Manager, click the line Graphic/System in the left window like so:
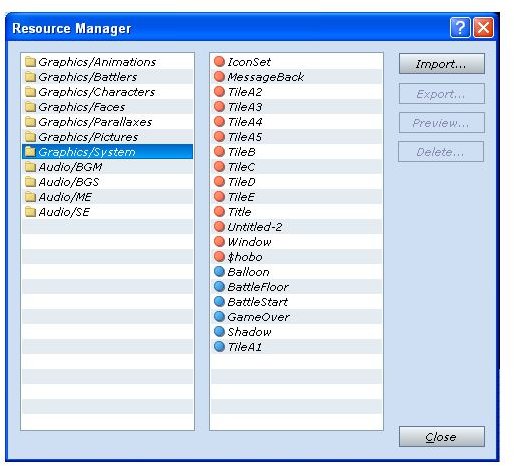
All the files available in that folder will show up in the right window. In a previous tutorial, I explained that files with a red dot next to them are files which have been modified while files with blue dots are original files (unmodified). As you can see, all of the tilesheets are there, from TileA to TileE.
You might have noticed that most of my tilesheets in my project are not original files. This is because I wanted to create my unique tileset for my game and decided to modify pretty much everything.
Let’s suppose that I wanted to modify tileD. Select TileD in the right window and then click EXPORT like so:
Once you’ve clicked “Export” you will have to save the file somewhere on your computer.
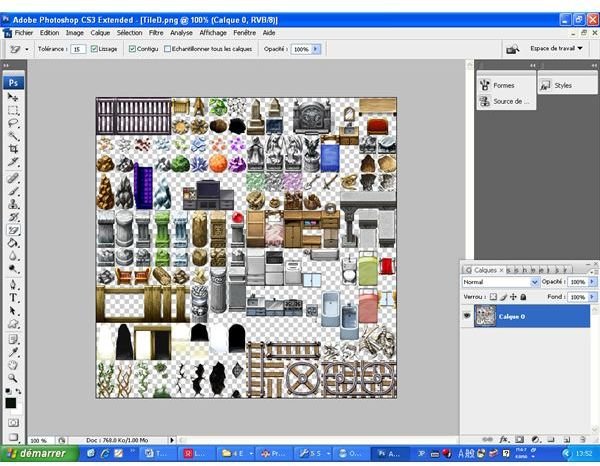
After your file has been saved, open it with Adobe Photoshop (or similar software like The Gimp ).
It should more or less look like this (mine has been modified so it will differ from yours).
You can now modify the elements in your tiletset. Make sure to save your file as a .png and not as a Photoshop .psd file.
When you modify your elements, you might want to use the template provided above to make sure that each element occupies its proper place on the sheet. This will be further explained in the second page of this article.
It is important that you keep the original title of the exported file, in this case “TileD”.
Once you’re done, head back to RPG Maker VX. Press F10 to return to Resource Manager and once again select Graphic/system in the left window (just like you did last time).
This time around, instead of exporting something (you’ve already exported the file and modified it), you will import your tileD.
Go ahead and click on import, you will have to browse your computer and select your newly modified TileD. Once you’ve selected your file, click OK. Your TileD will show up in the right window with a red dot next to it, indicating that the file has been modified.
Click “Close” to return to the main mapping window and check out your newly modified Tileset D (by clicking on the letter D in the tileset window). You can now map with a modified TileD. Repeat the process to modify each and every tilesheet until you’re happy with the results. You might be puzzled as to how to modify tiles in a tilesheet so read up the next section to find out some ways to do so.
Modifying a Tileset: Using the Template
Having a sound knowledge of Photoshop will turn out to be very rewarding to modify tiles as you can experiment around with filters and the like.
In this section, I will explain how to use template when modifying your Tilesheet.
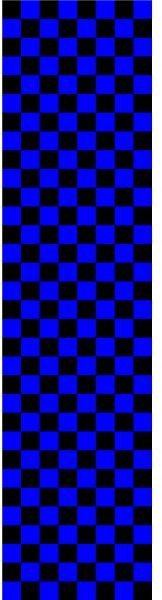
Using a template is very important. If you don’t use a template, it will be very difficult to determine whether or not each object is properly positioned on your sheet.
Open up the template in Photoshop. Like so:
(Note that you should have already opened the Tilesheet beforehand).
Once you’ve opened the template in photoshop, reduce its window (click on the highlighted button as shown in the sample above). Note that there are numerous ways of doing this, this article merely introduces one way.
You’ll then get both of your windows side by side like so:
At this point in time, what you want to do is drag the template layer onto your tileD layer with your mouse. In order to drag the template layer, you will need to use this tool:

Once you’ve moved the layer to the TileD window, this will happen:
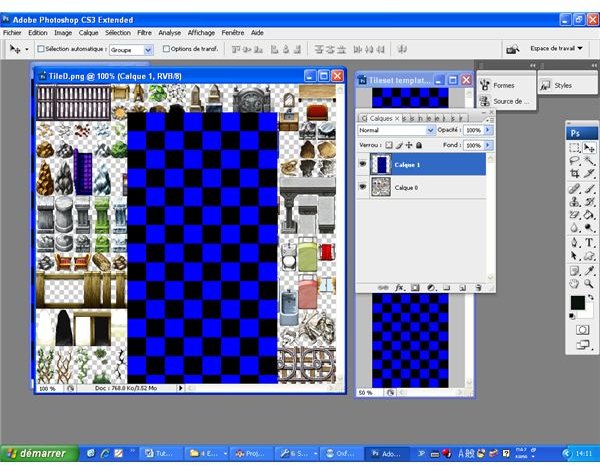
Go ahead in your “Layer” window and move the template layer in the background and move it around so that it “sticks” to the frame of the window, like so:

You can now easily make sure that all of your items are in their proper place on your tilesheet.
IMPORTANT NOTE: Once you are done modifying your tileset, always remember to either:
a) Delete the template layer
or
b) Make the template layer invisible (by clicking on the little eye in your layer window).
If you forget to to do this, the black and blue checkered sheet will appear on your tilesheet which means they will show up on your maps! Taking care of the template before saving is something which should become a habit.
This post is part of the series: RPG Maker for Beginner: Chapter 2
This is the second chapter of tutorials in learning how to use RPG Maker VX.