This is a complete step by step guide to the first-person shooter Bioshock for the PC. This first part explains the basic controls and keyboard shortcuts and will guide you through the first two levels step by step. This part covers Welcome to Rapture and the Medical Pavilion.
Bioshock
Bioshock is a first-person shooter set in an alternate history which casts the player in the role of Jack, the survivor of a plane crash who ends up in the astounding underwater city of Rapture. Using deadly weaponry and genetic enhancements known as plasmids Jack must explore and fight his way through the bizarre environment facing the mutants and mechanical drones within. The game features a well developed story line and combines elements of RPG gaming with first-person shooter action. Bioshock was highly praised on release for a beautifully realised artistic style, interesting game-play and varied AI opponents.
Before You Start
The developers released a patch for the PC version of the game so before you get started you should check that you have the latest version. You can find the patch at 2kgames.com . Note: If you bought the game through Steam or another digital distribution supplier then the game should patch automatically through that system and you won’t need to download the patch.
Controls
The default controls are standard first-person shooter; a complete list of controls is given below.
Movement
- W – Move Forward
- A – Strafe Left
- S – Strafe Right
- D – Move Backward
- C – Crouch
- Spacebar – Jump
Equipment 1
- Q – Next Ammo Type (Alternative control is middle mouse wheel)
- R – Reload
- B – Previous Ammo Type
- Shift – Weapon/Plasmid Selection Screen
- Z – Zoom Weapon
- Numbers 1-8 for quick weapon selection
Equipment 2
- Fire Plasmid/Weapon – Left Mouse
- Toggle Plasmid/Weapon Mode – Right Mouse
- Next Weapon/Plasmid – Mouse Wheel Up
- Previous Weapon/Plasmid – Mouse Wheel Down
- F1-F6 – Active Plasmid Slots
Miscellaneous
- F8 – Quicksave
- F9 – Quickload
- M – Mapscreen
- E – Use
- F – Use First Aid
- V – Hack
- T – Play Newest Unread Log
- H – Hint Screen
Walkthrough
This article provides an index for a complete walkthrough of the PC version of the game based on normal difficulty. The chapters are broken into individual articles listed below so you can skip directly to the area of the game which is giving you trouble.
Welcome to Rapture - Ocean
The game begins with a cut scene and a plane crash before giving you control as you tread water in the ocean watching the burning wreckage sink into the depths. You should swim forward through the opening in the flames and head towards the structure to the right of the plane’s tail section. Climb the stairs and go through the doorway across the room down the stairs and then enter the Bathysphere and pull the lever.
Bathysphere
As the Bathysphere arrives you’ll see a man through the window as he is viciously slaughtered by a Splicer, a human driven mad by ge. There is nothing you can do to help him. Just sit tight until you hear a man called Atlas talking to you on the radio. Step out of the Bathysphere as instructed and walk forward.
Lobby/Hallway
On your right you will see a Vita-Chamber. These are re-spawn points and if you are killed you will re-spawn in the last Vita-Chamber that you passed. Turn left and climb the stairs and then turn left again. You’ll see a Splicer drop down behind some wreckage. Don’t worry - Atlas sends a sentry bot that chases her away. Jump over the debris and grab the wrench that is lying on the floor ahead of you. Use the wrench to smash the debris blocking the door and crouch down to enter.
Lounge
Climb the stairs and kill the Splicer waiting at the top. Search his body with right click and the rest of the room for pick ups and then head round to your left and up the stairs. At the top you’ll find a Gatherer’s Garden. Grab the Electro Bolt plasmid and this will trigger a short cut scene. When you wake up use your new plasmid ability to zap the switch on the left of the door directly in front of you and enter the glass corridor beyond. When the tail section crashes into the tunnel enter the fuselage and follow the tunnel round and enter the next door.
Hallway
Search the rooms on your right and left for pick ups and kill the Splicer that appears. Open the next door and kill the Splicer waiting behind it. Try using the one-two strategy that Atlas suggests. Blast the splicers with an electric blast and then smash them with the wrench. It makes dealing with enemies far easier. Head up the stairs and kill the flaming Splicer who emerges from the next door. Go through the door and enter the only elevator that is open. Go up a level in the elevator and grab the pick ups on your left when you exit and then head right to sneak up on a Splicer.
Kashmir Restaurant
Kill the Splicer and search the baby carriage to find a revolver. Head through the next door and search the room for pick ups. Down the stairs on your right you’ll see a Splicer banging on a door, kill him and the female Splicer that emerges and search the room she came from for more pick ups. Come back out and kill the Splicers in the water with your Electro Bolt plasmid. Search the room for more pick ups and you’ll find an audio diary on one of the tables. Head back up the stairs and go right into the bathrooms, in the female bathroom on the left you’ll find another audio log and a Splicer will jump out of the closed stall. Kill them and head into the male bathroom, in the last stall you’ll find a route through to the next room.
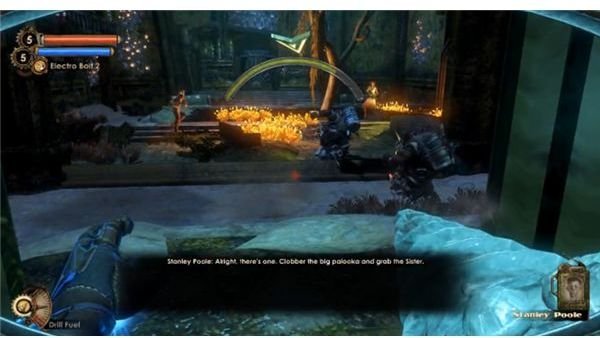
Footlight Theater
Walk across the lighting rig carefully and watch the Little Sister below, Atlas will explain all. Go down the stairs and watch through the window as a Big Daddy appears and kills a Splicer. Search his corpse and smash the padlock to go through. Follow the corridor round past the Vita Chamber and kill the female Splicer then turn left as you enter the room and kill a male Splicer. Follow the corridor round to the left and use your Electro Bolt plasmid to fry the Splicers in the water at the bottom of the stairs. Go down the stairs and collect pick ups before heading to the Neptune’s Bounty gate. The gate will slam shut and a number of Splicers will jump down into the water behind you, use the Electro Bolt plasmid on the water to fry them. Once all the Splicers are dead Atlas will pop up and direct you to the Medical Pavilion, when you go through a door ahead will slam shut and a final cut scene will play, eventually Atlas will get the door open and you can go through to complete the first level.
Medical Pavilion - Foyer
Head into the main room and turn left to find a sentry bot that is jammed in a doorway. Hack the sentry and it will fly up unblocking the doorway, the sentry will now follow you and assist you to kill enemies. Grab the pick ups in the room and go through the door that the sentry was blocking.
Emergency Access
You’ll find two Splicers round to your right and an audio diary on the desk ahead. The Splicers will be fighting so wait and then kill the winner. Head up either set of stairs and use the control panel at the top, a door behind you will open. Enter and kill the Splicer inside then go left through the next door to find a Machine Gun. Activate the control panel and head back through to the room with the staircase where a number of Splicers will attack you. Backtrack through the door where you found the sentry into the foyer and head up the stairs and through the newly open door, killing more Splicers along the way. As you walk along the hallway you’ll trigger another ghost scene. Head through the door marked Surgery.
Medical Pavilion
As you walk round into the main room zap the sentry gun in the middle with your Electro Bolt plasmid and hack it as quickly as possible. Do the same with the other sentry gun round to the right. They will now pick off the Splicers running around. Grab the audio log on the reception desk and any other pick ups and use or destroy the medical station (if you destroy it then it will drop a first aid kit). Head to the back left of the room to the sign that says Eternal Flame. The doorway will explode and a Molotov cocktail throwing Splicer will attack you.
Eternal Flame Crematorium
Grab the audio log under the painting on your left and enter the door behind the desk. Enter the main crematorium area and watch out for a security camera on the back wall, you can shoot it out or ignore it. Activate the crematorium and when the body is burned away the tray will slide back out and you can grab a Hacker’s Delight tonic. Head up the stairs and kill the Splicer at the top on the left and then crouch to climb through the small vent behind her. Search the office for pick ups and the Incinerate plasmid. Some Splicers will run into the hall outside, use your Incinerate plasmid to ignite the oil slick on the floor and burn them up. Backtrack to exit the crematorium back into the Medical Pavilion.
Twilight Fields
Look for the frozen doorway that says Twilight Fields and use your new Incinerate plasmid to melt the ice and enter. Go right and kill the Splicer and then use the code (0451) on the desk to open the door behind you. Grab the pick ups inside and head back into the main room. On the opposite side of the room, in the alcove on the left you’ll find another Splicer and a security turret will be revealed behind you, hack it and access the safe behind. Head back into the main room and go through the central door and follow the corridor round to the left, ignore the disappearing shadow for now and grab the Security Expert tonic. As you head back the shadowy surgeon Splicer will jump out to your left, kill him and go back to the Medical Pavilion. Go down the stairs on your left and use the Incinerate plasmid to melt the ice. Look for the doorway on your left that says Kure-All.
Kure-All
As soon as you enter turn right and zap the Rocket Turret with your Electro Bolt plasmid and then hack it or destroy it. Go through the next door and take out the security camera on the right, hack the safe and then smash open the vent and crouch to enter. You’ll find some pick ups and the Wrench Jockey tonic, grab them and go back to the Medical Pavilion. Grab the ammo round the shotgun before you pick it up, when you do pick it up the lights go out and you get swarmed by enemies. Once they are all dead the lights come back on, go through the windows to the next section taking out the turret along the way.
Painless Dental
In the next room you’ll find the Speedy Hacker tonic, just watch out behind you when you pick it up! Once you’ve cleared the room and grabbed all the pick ups smash the vent in the back wall and crouch to go through. Kill the Splicer in the next room, grab the pick ups and go through the door. Turn right and grab the pick ups before going through the next door.
Daddy Dental
Search the area for pick ups and hack the safe through the back before going through the glass door on the left. You’ll find an audio log. Look to your left and pick up the Telekinesis plasmid. You can use it to suck items towards you and then fire them, try it out on the tennis balls behind you. When you go back through the glass door a couple of Splicers will attack, kill them and leave the Daddy Dental area. Follow the corridor round to the left until you reach a locked door, there’s a broken window on the left of the door and you can use your Telekinesis plasmid to suck the key through and open the door.
Chompers Dental
Just inside to your left there is a security camera, take it out and then kill the Splicers inside. Go through the next couple of doors grabbing pick ups along the way and take out another security camera. Hack the safe and then go back to the Medical Pavilion and follow the arrow to the stairs. Kill the Splicers who chuck bombs at you (you can throw them back using the Telekinesis plasmid). Find the door that says Dr Steinman’s Aesthetic Ideals and enter, head along the corridor.
Surgical Foyer
As you come round the wall Steinman will run into the Surgery and blast the door shut behind him. Catch the bombs the Splicer throws at you with the Telekenisis plasmid and use them to blast the door open again. As you enter and follow the corridor round you’ll see Steinman escaping, he’ll set a Sentry bot on you, zap it and hack it or destroy it and then proceed. At the end of the hall there’s a security turret, again zap it and hack or destroy. Grab the Static Discharge tonic on the floor and go through the door on your right into a room with a security camera, an audio log and loads of pick ups. Head back into the hall, past the security turret and into the Surgery.
Surgery
You’ll see Steinman through the glass working on a body and ranting. Be careful because he’ll shoot you through the glass if you stand there. Enter the surgery and use your Telekinesis plasmid to pick up the exploding canisters and fire them at Steinman for maximum damage. If he stands on the oil patch ignite it and if he runs down to the water then zap it. Alternately you can shoot him, once he is dead grab any pick ups remaining and backtrack to the Medical Pavilion. Follow the arrow and kill the Splicers that attack and then take the detour as directed when the tunnel collapses.
Lounge
As you enter the lounge a cut scene will be triggered. You are then presented with the choice to harvest extra ADAM from the girl killing her in the process or to save her which will provide you with less ADAM but lead to better things in the long term. Spend your ADAM in the Gatherer’s Garden and go through the next two doors to the Medical Pavilion.
Medical Pavilion
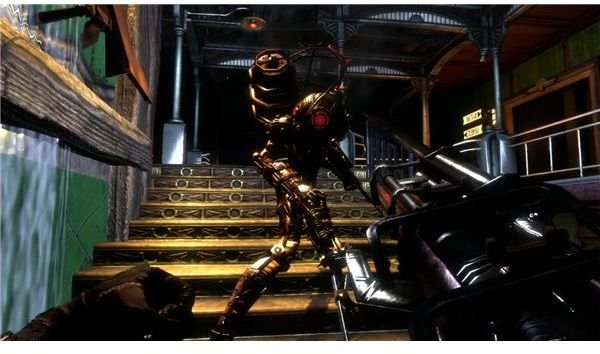
Now it is time to kill a Big Daddy. Try to stun him with Electro Bolt or using the electric ammo for the shotgun and then swipe away, use anything at your disposal to take him out. If you hacked the turrets you can get him to follow you into range of them and they’ll help you finish him off. Once he is dead, save or kill the Little Sister. Follow the arrow back to the Security Access, use the panel and access the Bathysphere to complete this level.
Return to Index | Next Level - Neptune’s Bounty
This post is part of the series: Bioshock Walkthrough
Get an expert walkthrough for Bioshock from level 1 to 15.