In our last tutorial we created 2 rooms, a hallway to connect them and I showed you how to apply textures to the walls, the floor and the ceilings. In this tutorial we are going to place lights so we can see where we are going, align the textures so they match up and player starting location.
Placing Weapons
You can put as much thought into the placement of the weapons you want in your level. The placement of the weapons you choose can drastically effect how the level plays out. For example, placing a rocket launcher in the middle of a large room will entice a player to seek out and attempt to pick it up, however it leaves them extremely vulnerable to attack. Since the room is empty and relatively large there will be no place for the player to hide or run once they pick up the weapon. This makes the placement of the rocket launcher both easily accessible and extremely dangerous to get. Any player that attempts to pick up the rocket launcher can be easily killed.
Now if you place the weapon in a well hidden area or in a spot that provides cover (behind a metal crate for example), it becomes easily accessible, hard to find and relatively safe to pick up.
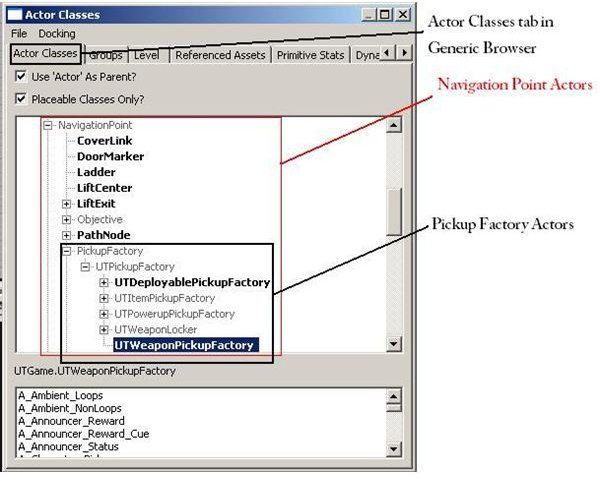
Once you have decided on a place to put the weapon, open up the generic browser. On the generic browser window click the Actors tab. This will show you a list of a lot of different actors that we can place into our level. Actors are objects that you place inside the level in which players can interact with, such as weapons, ammo, health vials and vehicles. For now, all we are concerned with is the NavigationPoint actors.
Click the small + sign to roll out the category. Inside this category click the + sign beside PickupFactory. In the PickupFactory category you see 4 more categories and one that is labeled UTWeaponPickupFactory which does not have the + sign beside it. Since we are placing a weapon, go ahead and click on the bold UTWeaponPickupFactory text.
Once you have selected that it is now time to place it into the game. You accomplish this by simply right
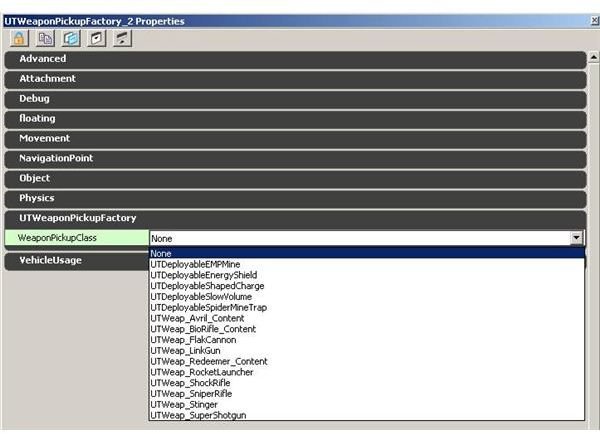
clicking on any part of your levels floor. Doing this will pop up a rollout menu, inside the menu click Add UTWeaponPickupFactory Here. You will notice that the actor has been placed in your level. Now all we need to do is to set the type of weapon that it will allow us to pick up. We do this by double clicking on the actor itself. A new popup window called UTWeaponPickupFactory_1 Properties will show us a complete list of all of the properties of the actor. Clicking on the UTWeaponPickupFactory will give us a list of weapons that we can add to the actor. Select any weapon that you like and the next time you run your game, the weapon you choose will be shown.
Placing Ammo, Armor, Powerups and Health
It would do us no good to have a weapon pickup actor if we didn’t have any ammo for it. Placing the ammo for it is done the same way as placing the WeaponPickupFactory, however, we must select a different actor.
If you take a look at the generic browser again you will see a category called UTItemPickupFactory which can be expanded to show us three new categories. Of the three new categories we will select the UTAmmoPickupFactory.
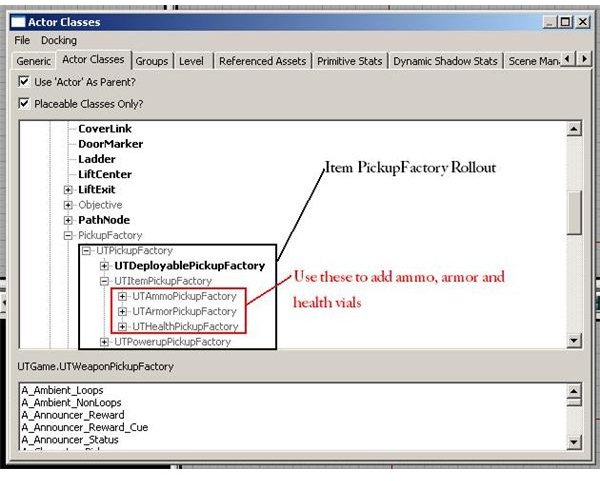
Simply click the UTAmmo to match the weapon you picked for the weaponpickup, right click the floor somewhere near the weapon and on the rollout click Add UTAmmo Here. Now that we have a weapon and some ammo we can start placing other items in our level as well. The process is the same for adding different actors and the three main actor types that you will be dealing with (other than the UTWeaponPickup
Factory) is located in the UTItemPickupFactory rollout. Part of learning to do this on your own is to just play with it. So follow the steps above and place health vials, armors and more ammo or even different weapons on your own.
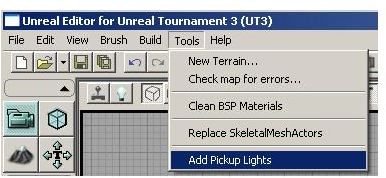
After you have placed all of the weapons you want, all of the ammo, health and armor we need to do one last step. In the main UTEditor window, click tools and from the drop down list click Add Pickup Lights. This will place small lights by all of the pickup weapons which gives them a small glow that just makes the level look a little bit more realistic.
Aligning Textures
Depending on the type of texture you used, you might have noticed that they look a bit off. In the level we did from the first tutorial you should notice the wall textures appear to repeat themselves.
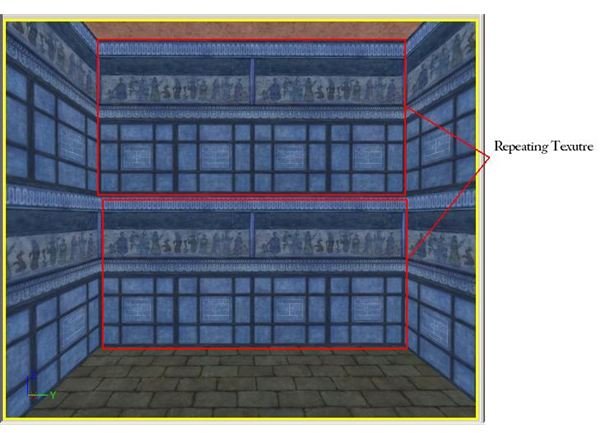
As you can see, it looks like the wall textures are stacked on top of each other…which doesn’t look natural. To fix this, begin by selecting all of your walls in one room. You can do this by holding down the control key and click on each wall. Once all of the walls have been selected, right click on one of the walls and click the Surface properties on the rollout popup.
There are two main properties that we are going to deal with here. The first is the scaling. In the scaling section, under the label Simple, click the down arrow to see a list of available properties for th

e scale of our textures, select 2.0. You will see 9 different numbers in which we can use to set the scaling. If you want you can just click on a random scale number and hit the apply button off to the right and it will update the texture in your perspective viewport. A general rule of thumb in choosing the correct scale is for every 128 units in size of the room, you increase your scale by 1 whole number. However, you can input a custom number in either the vertical or horizontal axis. Aligning textures can become the most tedious part of creating a level and making it look natural so pay close attention to detail and be sure to spend enough time getting familiar with the Surface Properties window. For this tutorial, we are not going to go into specifics about lining up our textures. If you need to move a texture to the right, to the left, up or down you will use the buttons in the Pan section. Practice makes perfect so get started and just play with all of the settings to get yourself familiar with them.
Adding Lights and a Player Start
If we want to be able to see anything in our level we are going to need to add lights. The unreal editor lets us do a lot of things with light. Sadly, that is out of the scope of this tutorial. Lighting in a level is a very touchy subject and some game designers have written entire books on how a level should be lit. For now, all you need to to know is that if you want to add a light, hold down the “L” button on your keyboard and left click anywhere on the floor of your level. Make sure the light is far enough up off the ground as well.
Adding a player start is similar to adding a weapon pickup. However, we don’t have to go digging through the actor classes in the generic browser. The editor already has the player start actor saved in our right click rollout. Pick a spot on your level, right click and on the rollout click Add Actor then Add Player Start.
Saving and Playing your Level
So now you know everything you need to know to create a very basic level. Before we can play test the level you have one last task to do, save your level. From the main UTEditor window click File, Save As and give your level any name you want just be sure to put the letters DM and a hyphen before your levels name. For example, if you name your level “test” you need to type in DM-test or you will not be able to play your level correctly. After you have saved click the “Play this level in editor window” button. This will pop up a window in which you can test and play your level.
This post is part of the series: Creating a Custom Level with Unreal Editor 3
In these Unreal Editor 3 tutorials I will go over all the basic information that you need to get started making your own levels with the Unreal Editor. These tutorials use the Unreal 3 Engine that comes with Unreal Tournament III.