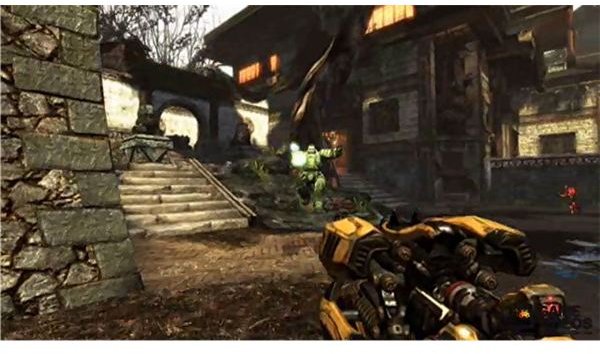
The Unreal Engine is included with all of EPICs games which includes the unreal series and the Gears of War series. This purpose of this article is to introduce you to the Unreal 3 Engine and to get you started in creating your own levels.
About the Unreal Engine
The Unreal Engine is a fantastic piece of software that is bundled into most of the games created by the company EPIC. It is basically the toolset that the company uses to produce the games they are currently selling. The unique thing about the Unreal Engine is that you can use it to create an entirely different game. The Unreal Engine has been used to create several games that you may be familiar with such as: Deus Ex, Brothers in Arms, Lineage 2, Tom Clancy Rainbow 6 and Splinter Cell series, Vanguard, BioShock, Mass Effect and many more. So as you can see you are able to use the Engine to create anything from a FPS to an MMORPG or simply a new level for the game itself.
Level Design
Before you even open the Unreal Tournament 3 Level Editor it is a good idea of have a general idea of what you want your level to look like. How many rooms do you want to be in your level? What type of theme do you want to use? It is going to be an indoor level, an outdoor level or a combination of the two? Are you going to allow vehicles in your level? How many players should the level be able to hold?
A good tip is to buy you some graphing paper and draw up a rough sketch of all this info. Draw squares for rooms and place symbols inside the room for the items or vehicles you think should be placed there. This will make designing your level go a lot faster and a lot smoother.
Getting Started
Once you have your basic level design thought out you should now start up the level editor. Starting up the level editor can take anywhere from a few seconds to a few minutes depending on the type of computer you are using.
When the editor loads you are presented with 4, rather large, windows that are called viewports. These viewports are what you are going to be using to navigate through your level in design mode. The viewports consist of a perspective view (or a 3d view), a top down view, a side view and a front view. While it is totally acceptable to only use one of these views, it is a good idea to get into the practice of using all of the viewports to help you place everything in your level on a more accurate level. You can tell which viewport is which by taking a look at the icons above each viewport. They are labeled P, T, F, and S which stands for each type of the respective viewport. So, a viewport with the icon P depressed means that it is the perspective viewport.
Navigation
Go ahead and left click in the perspective view port. Before you start making your level you need to be able to move around inside the viewport. Moving around is done by using the mouse buttons and moving your mouse. If you hold the left mouse button down and drag your mouse around you are able to move in a 360 degree rotation and can move forwards and backwards. Holding both mouse buttons at the same allows you to move up, down, left and right. Holding down the right mouse button only allows you to pitch the view at any angle. You should practice moving around the perspective viewport until you get the hang of it.
Moving around in the other viewports is really simple. You can hold the left mouse button and drag your mouse or you can use your scroll wheel to zoom in and out. If you use any of the other movements you will mess up the viewport, however, it can be easily fixed by clicking on the icons above the viewport.
Our First Room
Now that we have the basics of movement down, we can start building our level. The first thing we need to do is create a new level. Click file > New. A small window will pop-up asking you what type of level you want to make, additive or subtractive.
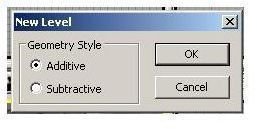
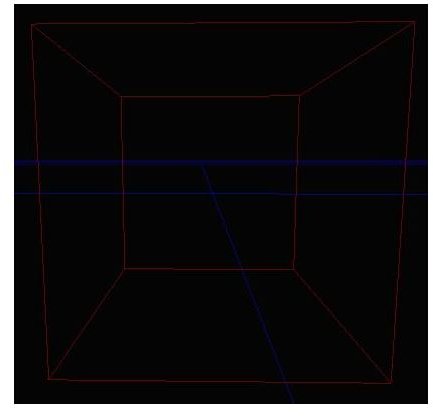
Since our level will be small and indoors we are going to use a subtractive level. Using your perspective viewport, move your view around until you see a red wireframe box. This is called a brush, which will determine the size of the room and its placement. Its default size and placement will we fine for now.
To the left of the viewports you will see a toolbar with a few icons. For now only concern yourself with the CSG: Subtract button. Go ahead and click on it once.
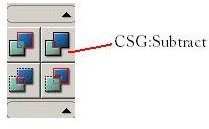
This carves out our first room which is depicted by a checkerboard type texture.
Adding Textures
The default texture for our room is a bit bland and simply won’t do. In order to change the texture of the walls, floors and ceilings we must first start by selecting them. In your perspective view port, navigate to the center of the room. Then select any one of the walls, it should turn a light blue color. Once selected, right click on the wall and click Select Surfaces and then Adjacent Walls. Doing this will select all walls inside that room.
On the top toolbar click the generic browser button to open the generic browser (if it isn’t already opened). This window in itself has a lot of info that we will not get into right now. We are mainly concerned with just browsing the textures.

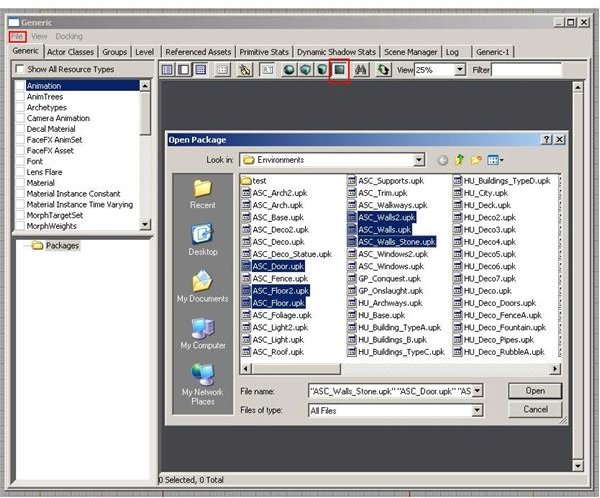
From the file menu go ahead and click File, Open. This will bring up an Open Package dialog. We first need to navigate to where all of the textures are. You can find all the available textures by navigating to C:\Program Files\Unreal Tournament 3\UTGame\CookedPC\Environments. From this window you can see a bunch of files with the .upk extension. For now, all we are concerned with is adding some floor, wall and ceiling textures to our generic browser. Holding ctrl on your keyboard, click ASC_Door.upk, ASC_Floor2.upk, ASC_Floor.upk, ASC_Walls2.upk, ASC_Walls.upk and ASC_Walls_Stone.upk and then click open.
In order to get a better idea of what all these textures look like, click the plane primitive icon in the generic browser.
Browse through all the different textures and click on one that you think looks good. If you take a look at your perspective viewport you will see that it applied the texture to your walls. Move the generic browser to the side so you can see both your perspective viewport and the generic browser. Changing the texture on the floor and ceiling is the same process. Click the floor until it gets highlighted in the light blue color, then navigate your generic browser for a floor texture and viola, you have a textured room!
Adding another room
Left click once anywhere in the side viewport. Click the red box and a movement gizmo will appear. Click, hold and drag the red arrow to the left or right. Make sure that it is far enough away from the room we just created to allow space for a hallway.
Once again, click the CSG: Subtract button to the left. This will create a second room with the last texture you used from creating the first room. Repeat the process above to add the textures to the room.
Adding the hallway
In order to create a realistic hallway we need to resize our brush. In order to do this, right click on the cube icon to the left. This will pop up the brush builder window. Click on the X, Y and Z properties and set them to the following (32, 128,128).

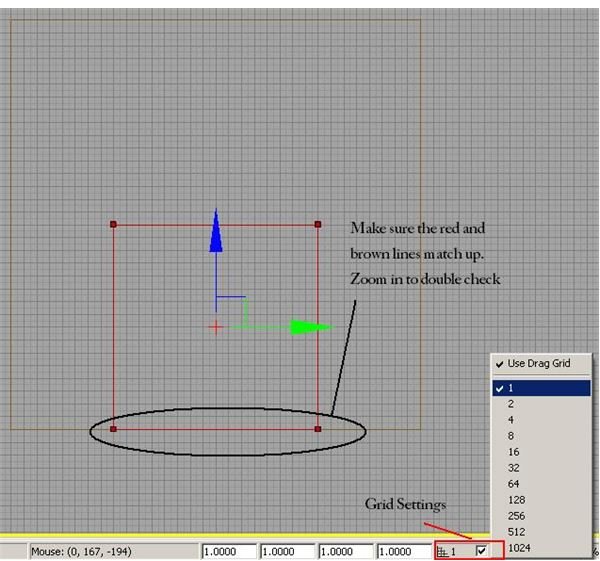
Now you need to line up the brush to fit in between the two rooms. If you are unable to line those up perfectly change your grid settings to 1. The grid settings can be found on the bottom right corner of the editor. You may need to zoom in quite a bit to ensure that the lines meet up exactly.
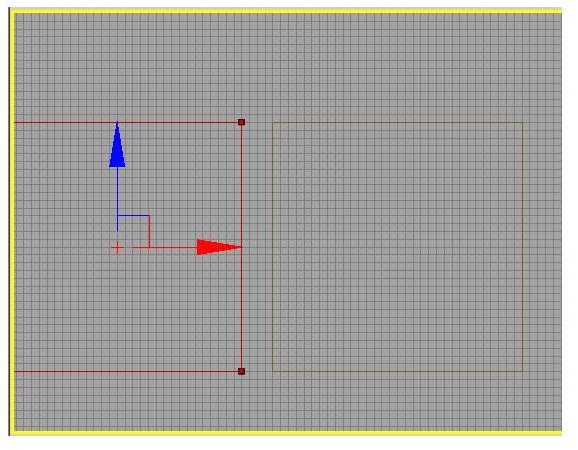
Once you have done this and lined them up perfectly in the side viewport, we need to bring the hallway down to the ground level. We do this by using the front viewport, so left click once in the front viewport. Click the smaller box and use the blue arrow on the gizmo and move the box down to match the picture below.
Once this is done you can click the CSG: Subtract icon again which adds the hallway in between the two rooms.
In the next tutorial we are going to place lights, align our textures, add a few weapons and a player start so we can actually see our level inside the game.
This post is part of the series: Creating a Custom Level with Unreal Editor 3
In these Unreal Editor 3 tutorials I will go over all the basic information that you need to get started making your own levels with the Unreal Editor. These tutorials use the Unreal 3 Engine that comes with Unreal Tournament III.