This Far Cry 2 map maker guide takes you through the steps of creating multiplayer maps you can use in Deathmatch, Team Deathmatch, Hunt The Diamond, and Uprising modes. Edit terrrain, add water and textures, buildings, explosives and weapons, the choice is yours.
The Basics
Difficulty:easy
Time required: about one hour
Game: Far Cry 2 (the level editor will install automatically with the game)
Resources you need: Official FC2 map-maping forum location
Make a Few Changes
We’ll begin taming Africa by using the Far Cry 2 editor, a wonderful feature that works beautifully for the job were about to undertake. This editor does have its limitations though: you can only make maps for the multiplayer modes; Deathmatch, Team Deathmatch, Hunt The Diamond, and Uprising. Keep reading to find out how to get things done in this Far Cry 2 map making guide.
The map editor here is similar to other height-based map editors. The tools located at the top of the screen raise and lower the terrain as you hold down the mouse button, allowing you to select the shape you desire. The tools to the right change the radius of the brush, its hardness, level of distortion, and other properties. Try a big brush to add a couple ripples and details to the map, and then complete the look using the Erosion, Noise, and Smoothing tools. Take your time and practice trying to make the look natural, rather than the creation of some chaotic deity.
If you want to put in lakes, rivers, and other water features, you’ll need to raise the water level. Find the cloud icon located on the tool bar, click it, and then move the
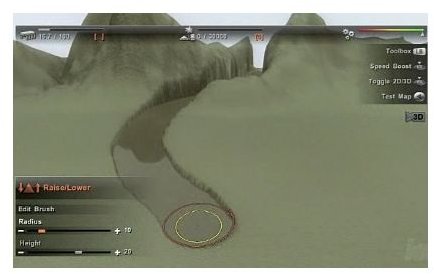
water slider until you reach the water level you desire. Don’t raise the water to much, but move the slider at least part way. You can now implement the terrain tools to carve out the areas where you want the land to be. This time we’re designing a peninsula land mass that will provide lots of space for the multiplayer action that will occur later.
There are only four textures for you to use, which isn’t as bad as it sounds. To assign a texture, double-click on a slot and select the texture you desire. The game will automatically update using the new texture if you change the texture, and you can overlap the textures and they will blend into each other.
Once we finish textures, it’s time to begin blocking out parts of the map. We used a central town with a roadway heading off of the map with natural looking trees. We started by flattening a suitable area for the town and then laid a few urban textures beneath it. You lay out a road using curves, and then draw it onto the map by clicking the road icon in the toolbar and laying out the points. The default starting
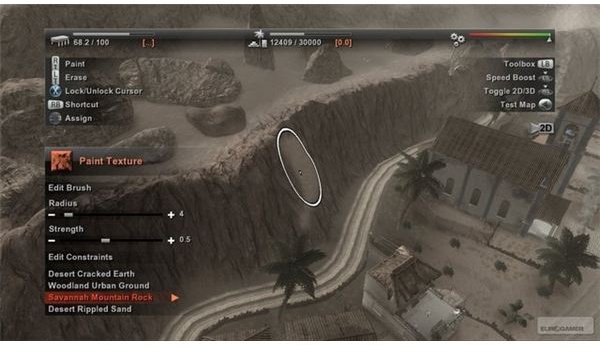
width of a road is about man-size, so you’ll probably want to increase that a bit, and add a few curves in the road for character.
Adding Things to Your Map
Once you have the basic town and surrounding terrain ready, it’s time to add things to your map. Click the Object button and a list of the available items will appear. The items are separated into categories that vary from simple signs to building blocks you can implement to build a complete fort. At first stick to simple buildings and structures, like churches and houses (look in the “Urban” folder under “Buildings”), and later you can let your hair down. One point: although the editor will normally map buildings to the land, you need to ensure the ground where you locate a building is flat; otherwise the building may float magically in the air.
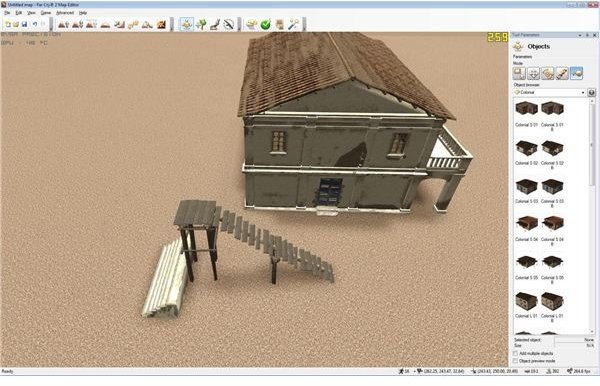
The buildings are put down without anything inside and you need to add the items you want. Use the Furniture category, Signs category, and, of course, Explosives and Weapons Categories to fill up the space the way you want it to look. Just pick up an item and click on the spot to add it. You can rotate objects by holding down CTRL, clicking the left mouse button, and then moving left and right to rotate in the direction you want. Use the included axies to position items precisely and map them to the ground level underneath.
You don’t need to place every tree by hand. Rocks, grass, and trees are arranged in Collections, each map can have up to eight types. Add them to the map as you did the textures; they won’t plant in roads, but will often take root in any structure they happen to run into. You can add large amounts of trees to areas of the map that players can’t reach and fill in areas that are a little bare.
Vehicles, Explosive Barrels, and Ammo Piles
You’re limited to a small number of vehicles, exploding barrels, ammo piles, and other physics objects, due to technical limitations placed on the mods. Feel free to add as many explosive barrels and other objects as you wish using the editor, but be aware that the map you’re creating won’t be available to use in real play if you go over the imposed limits. Don’t forget that you won’t be able to play until you create spawn points for Deathmatch players or specific team Spawn Points for the team-based modes. You can do this in the Multiplayer directory of the object browser.
The useful icons provided for each item make it easier to find everything on the maps. Just remember that to select something, you must open the Object menu, and click on the Move button
You can limit the combat area on your multiplayer map to a specific area if you want to. This boundary will be invisible, but a player gets a ten second countdown when they step out of bounds. Press F12 to view the boundaries on the map and select and drag the corners to change the boundaries. You can add or remove points if you don’t like the current layout or draw a boundary like you did the roads.
We’re almost finished once we get to this point. You should test your multiplayer map within the editor by tapping Ctrl + G, which you can do at any time. You should ensure your map will work in the multiplayer mode you made it for by making sure the general map criteria and requirements for the multiplayer mode are met. Just tap the icon in the toolbar for the mode in question and you’ll be provided with a full list. Once you have done this, save, and you’re ready to enjoy a little old-fashioned meets next-gen violence.
For more Far Cry 2 guides, be sure to check them out right here at Bright Hub.
Screenshots