So you made it through the game and you’re on to the first official Borderlands DLC - The Zombie Island of Dr. Ned. In this guide we’ll go over how to build your characters for optimum zombie killing potential, and how to get some of the trickier quests done.
When should I go to Zombie Island?
You can jump into the new content any time after level ten. Simply walk on up to a New-U station and quick travel right on over to Jacob’s Cove.
Optimally though, you’ll want to wait until you’ve completed the main storyline once through before going over there. The character builds that will most efficiently get you through Zombie Island really won’t be available until at least level thirty anyway.
You can go earlier or later in the game, but 30 just seems like that sweet spot. You should gain at least five levels while you’re there, so you’ll have a whole new maxed out skill by the time you’re gone. As a bonus, you’ll have a nice easy time with the beginning of playthrough two, since you’ll be leveled up further than the enemies.
One thing to mention though is that the content scales with you. If you’re level twenty, the enemies will be appropriate. More accurately, the enemies scale with your quest log, but that’s not likely to make a difference for most players.
No matter when you go, you’re going to have a blast on Zombie Island .
The Right Tool for the Job
Zombie Island is all about gun selection .
If there’s one thing you need in The Zombie Island of Dr. Ned, it’s fire. If you’ve got a decent fire weapon, the whole experience is
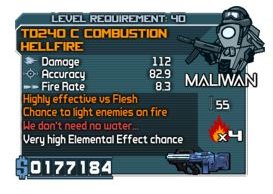
going to be a lot simpler. If you’ve got a Hellfire SMG or a Firehawk pistol, or even a Volcano sniper rifle, you’re going to have a much easier time.
Corrosive weapons are only good against a few enemies in the DLC, so don’t even bother bringing ’em. Your Pestilent Defilers will do you no good here.
Explosive damage is fine, of course. It’s not the most effective, but it works. There is one mini-boss that’s immune to other elemental effects, so if you don’t have a good pure bullet damage gone, bring an explosive with you.
The trickiest element to talk about is shock. Shock weapons are fairly effective against the zombie hordes. It’s doesn’t deal damage as fast as fire, but it deals it over a longer period of time. The problem with shock is that there’s one particular breed of enemy - the Tankenstein - that is completely healed when attacked by shock weapons. If you bring shock, be careful.
If you don’t have a fire weapon or explosive weapon with a x4 multiplier and at least a high elemental effect chance, there’s nothing wrong with bringing a gun that just shoots plain bullets. A headshot from a non-elemental shotgun or revolver will do the trick just as nicely as one that shoots fire.
In point of fact, there is one encounter in which having an elemental weapon could turn out to be detrimental, but we’ll get into that later.
Playing a Siren in Zombie Island

If you want maximum zombie devastation, take your Lilith. We’re going to switch things up a bit from Simon’s Gunslinging Build . If you’ve already played through the game once, you’re probably around level 30, so that gives you twenty-five points to work with. To truly dominate Zombie Island though, you’ll only need twenty.
The first five go straight into Spark. Fire damage is the key to killing zombies and we want as much of that as possible.
Since you’ve got ten points in the first tier, there’s no need to put anything into the second. You can pop the next five straight into Quicksilver. Now you’re shooting faster and with a better chance to do elemental damage. Can’t beat that, right?
Going down the tree a bit, you’ll want to pick up Intuition. The extra experience is a nice bonus, but it’s the run speed after each kill that you really want. If your phasewalk is on cool down and you’re surrounded by a mob of zombies, you need an escape route. And, of course, it’s going to help you kill faster in tandem with Phoenix.
The last five skill points you absolutely need to spend are in Phoenix. Every time you kill an enemy your Siren becomes wreathed in flames, setting everything around her on fire. When you’re running at high speed through a cave, not firing a single bullet and still killing every enemy in your path, you’ll almost start to feel bad for the zombies. Almost.
Mordecai: Zombie Killer

Mordecai, the hunter, is a zombie killing machine. With the right build, he’s right up there with Lilith in terms of zombie slaying speed but has the added bonus of getting to hang back a bit. Oh, and The Zombie Island of Dr. Ned is a great place to work on your headshots as you’ll soon find out.
Whether you’re using a sniper rifle, pistol or revolver, you can use the same build. It’s a bit contrary to the weapon strategies in Left 4 Dead , but I prefer to wield a pistol. Your focus here isn’t on damage, but on controlling enemy advances. To do that, we go straight down the rogue tree.
Put your first five points into Swift Strike. Since you’re going to be relying on Bloodwing a lot here, boosting his speed and damage output is a great way to go.
The next five go right into Out For Blood. Even the best hunters get surprised at some point, and you’ll be glad you have Out For Blood when you need it. And don’t forget, you can call Bloodwing back early if you need a quick pick-me-up.
Arial Impact is the skill that changes the game for this brand of hunter. When maxed out, Bloodwing will daze every single enemy he strikes. Zombies are fairly slow as it is, but once you’ve got them dazed they’re going nowhere fast. It’s important to start thinking of Bloodwing less as a damage dealer and more as a utility for slowing down anything in your path. You need five points in this skill, but no more. So if you’re using a class mod that enhances Arial Impact, you may only need to put a few points here.
The final five points that are mandatory for this build - afterwards, you can go down the sniper and gunslinger tree as you see fit - are in Bird of Prey. Fully maxed out, Bloodwing can attack six different targets. With a class mod, that increases to a maximum of ten.
Send Bloodwing out to daze the horde, then stand back and pop their heads off one by one. Not a bad way to go!
Bashing Zombies with Brick

Brick is an absolutely brutal Berserker. He’s got an amazingly strong ability with Berserk that not only deals massive amounts of damage, but adds damage resistance and health regeneration. While this gets a bit less powerful in playthroughs two and two-point-five, it’s essential for clearing the first time through.
How could that incredibly powerful ability get better? Well, start by putting five points into Endless Rage and make Berserk last 50% longer.
Of course, the next five should go into Iron Fist, which ups the damage of Melee attacks (including Berserk punches) by a significant 30%.
If that 30% isn’t enough, you’ll get an additional 60% bonus for a short time after killing an enemy by putting five in Heavy Handed. You’ll still have to take down the first enemy without the bonus, but you’re going to be fighting a lot of hordes over at Jacob’s Cove.
Short Fuse is the next skill to up. Five points in here will reduce the cooldown of your Berserk by a full thirty seconds. As soon as you come out of your extended rage, you’ll only have to wait a few seconds before going back into it.
We’re going to break off from Simon’s Brick build here as well. Unlike the other characters, you can skip the bottom skill in Brick’s tree. It’s an alright skill, but you’re regenerating health with Berserk as it is, so max out Hardened for a steep increase of 60% to your max health.
The strategy should be obvious. Find zombies, pop Berserk, kill zombies, repeat.
A Soldier’s Approach to Zombie Slaying
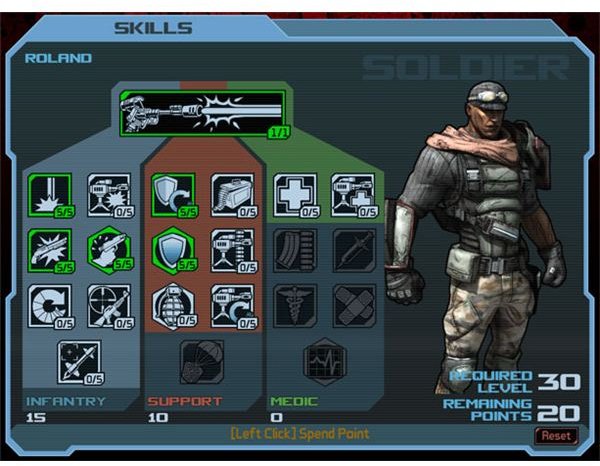
Roland is one of the most versatile characters in the game, but one of the hardest to build. His action skill isn’t the best, and some of his skills are pretty iffy. He’s great in co-op of course, but we’re not here to talk about healing your teammates or replenishing ammo. This is about massive zombie extermination. What’s the best way to remove a zombie’s head from its body? With a shotgun. Plus, admit it, they sound awesome .
The best zombie killing build for Roland is going to be a bit spread out, but it starts out down the Infantry tree. Five out of five in impact means your bullets (but not your elemental effects) will be doing 15% extra damage. Not a bad start.
Next, pop five into Scattershot. It was always an interesting skill, but thanks to a recent patch, it got a whole lot better. Your shotguns will do an additional 25% damage and have 25% less spread. Less spread means more pellets going straight towards a zombie brain.
Metal Storm is the last skill to grab from the Infantry tree. Killing an enemy will get you a 30% fire rate increase and 75% recoil reduction, which makes you significantly more accurate when firing quickly.
If you’re playing co-op you may want to jump to the medic tree at this point, but support is a better pairing with the Commando class mod. Besides, with five points in Defense and another five in Quick Charge, you’ll never need to worry about health regeneration anyway.
Braaaaaaaaaaaaains!
This is one of the most frequently missed quests in Zombie Island and if you wait until the end to do it, you’ll hate having to deal with it. Getting it nice and early will make the whole process a lot easier. And hey, there’s an achievementin it for you.
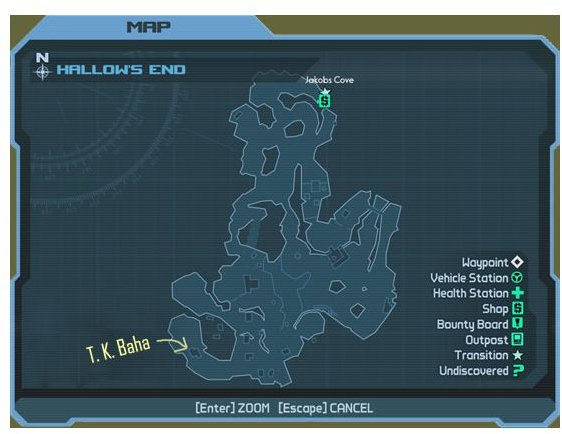
The first few quests when you reach Jacob’s Cove are self explanatory. You’ll swing on down to the town and then work on getting the gates open. Once you’ve got the preliminaries out of the way, you’ll get your first quest in Hallow’s End.
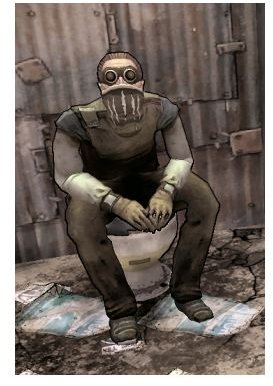
Go to Hallow’s End, but instead of working on anything else, go straight to the bottom left corner of the map. You’ll find your old friend T.K. Baha there, mumbling and zombified. He’ll give you a quest called “Brains” which involves you killing zombies and, like the Zombie Tycoon that you are, collecting their brains for T.K’s dinner.
Zombie brains are easy to come by, just kill a zombie with a head shot and out pops the grey matter. Do this 10 times then turn in the quest. Stand by as T.K. vomits up a nice item for you and then grab the follow-up quest “Braaains.”
You’ll end up doing several quests for T.K. leading up to the finale: “Braaaaaaaaaaaaains!”. To complete this one, you’ll need to grab two hundred and fifty zombie brains. If you keep doing these during your normal questing and make sure to return to turn them in when appropriate, you should be reaching the completion of “Braaaaaaaaaaaaains!” at about the same time you’re wrapping up the expansion.
Don’t forget, those brains will stick around if you leave them on the ground. So if you’re full up, go give T.K. his fill and then grab the ones you missed last time.
Taking Down Pumpkinhead
There’s always an enemy that just refuses to conform to the rules. In The Zombie Island of Dr. Ned, that enemy is Pumpkinhead. You’ll
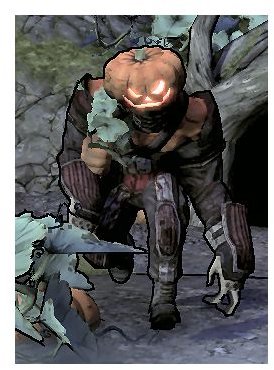
be assigned the task of eliminating this baddy early on, but you might be surprised how difficult he is to kill. It’s not the first time we’ve seen a pumpkin headed enemy in the game, but after this fight, you may hope it’s the last.
First off, Pumpkinhead is immune to all elemental damage except explosive. Those fire guns you brought will be useless here. If you can’t find a nice explosive weapon then straight out bullet damage is the way to get this done. If you’ve got something that causes knockback, like Sledge’s Shotgun, so much the better,
This fight is pure endurance. He’ll try and come close most of the time, though he’ll occasionally throw an explosive pumpkin. There’s no really easy way to do this. Shoot him in the head and do your best to avoid his ranged and AoE attacks. He’s got a lot of health so just keep shooting. Once he’s down, you’ve conquered one of the harder fights in the expansion.
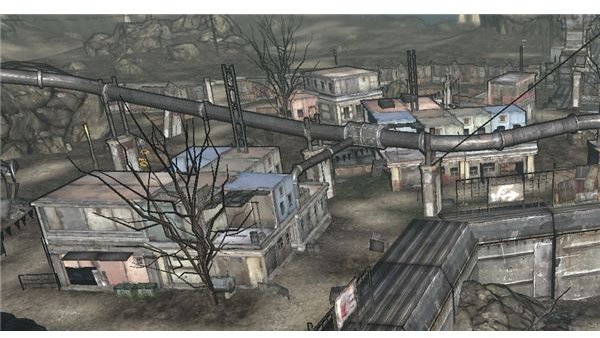
Clearing Out Dead Haven
Dead Haven is probably the most difficult zone to tackle. You’ll recognize it immediately as a zombiefied version of Old Haven from your first playthrough of the game. Just as Old Haven could be problematic if you weren’t prepared, Dead Haven can be incredibly trying.
To start with, Dead Haven evens out the competition. You’ll still see shambling hordes and occasional vile spitting defilers, but the Lance mercenaries have been turned into zombies too, and they’ve got guns. The Lance go down to fire damage just like any other zombie, but you’ll have to change up your play style to less of a ‘run and shoot’ approach and more of a ‘duck and cover’ tactic.
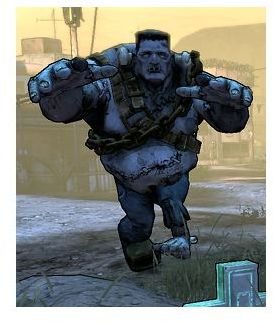
Dead Haven also has a large Tankenstein population, including a Tankenstein type boss named Franken Bill. If you’ve been using a shock weapon up to this point, you’ll have to holster it for Dead Haven. If you’re using Radiance as a Lilith, you’ll want to be extra careful too. Any shock damage that hits a Tankenstein causes it to heal. This is especially detrimental against Franken Bill, who has more than enough health as it is.
Sure, Franken Bill is a horrible creation, but Dr. Ned might say (if he’d been reading his Mary Shelly ) “It was the secrets of heaven and earth that I desired to learn.”
Finally, when it’s time to leave Dead Haven, you’ll have to call for a shuttle to come get you. This is an incredibly dangerous mission if you’re not expecting it. Once you make contact with the dispatcher and head to the retrieval point, you’ll face three waves of zombies, each stronger than the next. One important tip: don’t stand on the big red glowing indicator. The symbol isn’t telling you where to stand, it’s telling you where the ship will land. If you’re there when it lands, you’ll die instantly.
The Lumber Yard - Final Tips - Conveyor Of Death
If you haven’t yet earned Conveyor of Death, this is the time to do it. Conveyor of Death is a challenge worth a full five thousand

experience and all you need to do is kill twenty-five enemies without taking more than a seven second break between each kill. You’ve got opportunities all over Zombie Island to do it, but the best is in The Lumber Yard.
There’s a point in the Lumber Yard that opens up to a nice big clearing full of relatively safe zombies to kill. There are a few defilers in there, but it’s mainly nice and easy shamblers. Run around and gather them up. Get a big group of them following you and then turn and shoot, and don’t stop shooting. Get a bit of fire going on those zombies and watch them burn. Keep the kills going and you’ll have your Conveyor of Death challenge completed.
Once you hit The Lumber Yard, you’ve reached the end. Enjoy some hilarious dialogue from Dr. Ned and some great gags in the quest “Here We go Again”. The boss fights are simple, though watch out for a few stragglers that might still be sticking around after the credits.
At this point, you should have completed your zombie brain collection and racked up more than enough experience to enjoy your second playthrough of Borderlands with ease.
This post is part of the series: Borderlands Walkthroughs and Guides
For information on everything Borderlands, check out our series of walkthroughs and guides.