Perks are an essential part of the Modern Warfare 3 multiplayer experience. They give you added abilities in combat, or protect you from enemy air support, radar, and killstreaks. Walking into a match without the right perks can be the difference between life and dead, so choose wisely!
Perks and Their Perks
Call of Duty Veterans know and love Perks, but if you’re new to Call of Duty, or just want to know what Modern Warfare 3’s Perks are, this is the place to be. Perks are, if not the foundation of a good custom class, at least an essential part of it. This guide will tell you what each of the Perks do and what their Pro versions do. We’ll also tell you what you need to do to unlock those Pro versions.
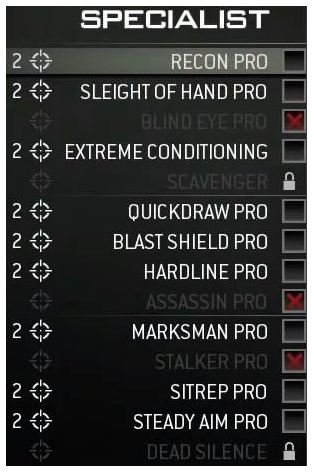
In Modern Warfare 3, as in each Call of Duty before it, you have three tiers of Perks to set. You can only have one Perk per tier set, unless you’re running the Specialist Strike Package. The Specialist Package removes your killstreaks, and makes them Perks instead. More on that in another article.
With only a select few Perks to choose from, and how great an effect they have on the game, choosing the right Perks is essential to performing well in multiplayer.
Blue Perks in Slot One
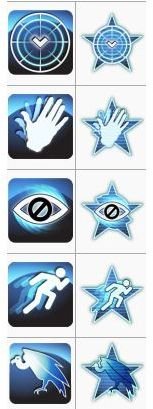
The Perks in Tier 1 are general utility Perks. Many of them are making their return from previous Call of Duty games. However, Sledgehammer has changed up the Pro versions somewhat, so you may be surprised at how different they can be.
Recon is unlocked as soon as you can create a class. It makes it so that explosions that damage enemies paint them on your team’s minimap for a short time. Flash and Stun grenades count. This means you can toss a flash into a room, and see on your map what corner the enemy is hiding in. It lasts for 10 seconds, and even shows the enemy as a red arrow rather than a dot - letting you know what direction they’re facing.
Recon Pro is unlocked by painting 120 enemies using Recon. It’s benefit is that it extends to bullet damage as well, making every hit marker paint an enemy on the map for 10 seconds. This is especially useful when an enemy runs behind cover, allowing you to see what corner they’re going to attempt an ambush from.
Sleight of Hand is a returning perk every Call of Duty fan should recognize. It’s unlocked at class creation just like Recon. It’s effect is simple: it reduces reload time by 50%. This is a huge difference for any weapon, and can be the line between life and death in a firefight. However, it can cause compulsive reloading in inexperienced players, which still leaves you vulnerable.
Sleight of Hand Pro is unlocked simply by getting a number of kills while using the Perk. Easy, right? The Pro version’s effect allows you to swap weapons 50% faster. Very useful if you’re running out of ammo or need to take down air support quickly.
Blind Eye is a new Perk that reminds you of Cold Blooded from previous games. It’s effect is to make you invisible to enemy Air Support and Sentry guns. It does NOT, however, protect you from UAVs. It’s unlocked at level 11.
To earn Blind Eye Pro, shoot down a number of enemy kill streaks - 40 to be precise. Sentry guns and SAM turrets count. Blind Eye Pro’s effect is to make your launchers lock on to killstreaks much faster, and give you added bullet damage against enemy Air Support and Sentries.
Extreme Conditioning makes its return from previous Call of Duty games and it is largely unchanged. All it does is allow you to sprint for a longer duration. It is unlocked at level 22.
Extreme Conditioning Pro is unlocked by sprinting 20 miles in-game, which is easy, but time-consuming. Pro allows you to climb over objects and up ladders faster. In the end it’s a useful Perk for mobility, and can allow you to chase down enemies when you’re out of bullets, but given the usefulness of other Tier 1 Perks, Extreme Conditioning is the least useful.
Scavenger is the final Tier 1 Perk, and it’s familiar to anyone playing the game. It’s unlocked at level 39. It makes it so when a player dies, they drop a blue bag for you to pick up. Picking up those bags gives you additional ammunition. It does NOT refill your grenades, unless the enemy happens to have the same grenades or rockets you do when they died. It will, however, refill throwing knives.
Scavenger Pro is unlocked by picking up 100 resupply packs. It allows you to start each life with additional magazines and more ammo by default. Because resupplying simply requires running over the blue bags, this perk can be upgraded in a minimal amount of time.
Red Perks in Slot Two
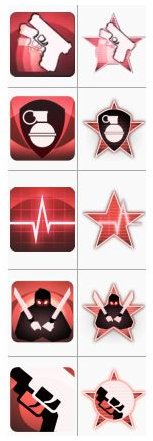
Quickdraw is unlocked at class creation. It allows you to aim down sights faster. Keep in mind that it may not work with sniper rifles.
To upgrade it to Quickdraw Pro, you have to kill 80 enemies within roughly three seconds of aiming down your sights. This is much easier than it sounds. Quickdraw Pro allows you to throw grenades faster, plant equipment faster, and in general recover from your actions faster. For anyone who has been killed while throwing a grenade, this can be a godsend.
Blast Shield is the second class creation Perk, and the one most new players will choose. It protects you from explosive damage, to a reasonable degree.
Blast Shield Pro is easy to unlock – simply survive 20 enemy explosions. This will probably happen within the first two or three games you play using the Perk. The Pro effect is to protect you from stun and flash grenades as well. This is exceptionally useful.
Hardline is a familiar Perk for veteran players. It is unlocked at level 15. It lowers the number of kills it takes to earn a killstreak by 1. It even works with the Specialist package, allowing you to earn a new perk with one kill.
Hardline Pro is unlocked by earning 80 killstreaks while using Hardline. The Pro effect is huge – two assists count as a kill towards your killstreaks, and deathstreaks require one less death. This can be invaluable for earning the MOAB or other high level killstreaks.
Assassin is the other half of the Cold-Blooded Perk. It’s unlocked at level 27. It makes you immunne to UAVs, Advanced UAVs, portable radars, thermal scopes, and heartbeat sensors. This is, arguably, the more valuable half.
Assassin Pro is unlocked by killing 20 enemies while their UAV is up. The Pro effect is worth it, however. It makes you immune to Counter-UAVs and EMPs, and removes the red name over your head when enemies target you. As a note: Assassin does not protect you against Recon or Recon Drone tagging.
Overkill is unlocked at level 47, and is returning from earlier Call of Duty games as well. It allows you to have a second primary weapon in your secondary slot, in place of a secondary weapon. The second primary cannot have attachments.
Overkill Pro is unlocked by earning 120 kills with your second primary weapon. It allows your second primary to use attachments. This is occasionally useful if you’re not using Scavenger and hate picking up dropped guns.
Yellow Perks in Slot Three
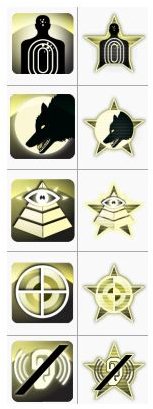
Marksman is a new Perk to Modern Warfare 3, open at class creation. It allows you to identify enemies at a much greater distance than you can normally. This means when you’re aiming down sights, you see their name pop up from essentially across a map.
Marksman Pro is geared towards snipers – to unlock it you need to earn 50 kills while holding your breath. The Pro version, then, allows you to hold your breath longer. Unfortunately, it’s nearly useless for non-sniper classes.
Stalker is also open at class creation and is also new to Modern Warfare 3 . It allows you to move at 100% move speed while aiming down sights. SMGs, Pistols, and Machine Pistols all do this by default, so don’t waste the perk slot on those weapons if you don’t need to.
Stalker Pro is unlocked by killing 120 players while aiming down your sights. The Pro effect is incredibly useful – it delays the activation of claymores, bouncing betties, IMS devices, and other trip explosives.
SitRep, returning from previous games, has much the same effect. Unlocked at level 19, it highlights enemy explosives in red, visible through walls. Very useful if you’re not using Stalker Pro or Blast Shield. It will also point out if an enemy care package is booby-trapped.
SitRep Pro is unlocked by destroying 50 pieces of enemy equipment. It makes allied footsteps nearly silent and enemy footsteps four times louder. It will counteract enemies using Dead Silence. A tip for unlocking it: at the moment, destroying your own Trophy System will do the trick. This may or may not be patched out eventually.
Steady Aim is a staple of Call of Duty Perks. Unlocked at level 30, it increases hip fire accuracy.
Steady Aim Pro is predictable unlocked via enough hip fire kills. It allows you to bring up your weapon faster after sprinting or knifing. Simple, to the point, and essential for SMGs and many Shotguns. You can even use it for LMGs if you want, though hip firing those is likely to get you killed more often than not.
Dead Silence is unlocked at level 55. It makes your footsteps and other noises four times quieter, and cuts Recon tagging to 5 seconds instead of 10.
Dead Silence Pro requires you to kill people at close range to unlock. It’s Pro Effect is to negate fall damage completely. Combined with Extreme Conditioning, this can mean great mobility around a map.
Suggested Perk Combinations
So now that you’ve seen all the Perks, how about a few hints for getting them to work for you? The following Perk layouts are suggestions for Perks that synergize well with each other.
The Stealth Package: Blind Eye, Assassin, and Dead Silence all work together to keep you invisible to enemy everything. Replace Dead Silence with SitRep if you want to be more aware of enemy explosives and care less about your footsteps being noisy. It’s a fair tradeoff, given how noisy the general Modern Warfare 3 maps are.
The Runner: Extreme Conditioning, Quick Draw, and Dead Silence are the best package of Perks for sheer mobility. Sprint for longer, climb faster, aim and toss grenades faster, and take no fall damage with Dead Silence Pro. Some maps you just want to run circles around your enemy. It’s also helpful for running objective modes, like Capture the Flag or Demolition.
The Vulture: Scavenger, Blast Shield, and either Stalker or Marksman. Scavenger assures you that you’ll always have ammo, and Blast Shield keeps you safe when you walk into a place someone recently died. Stalker helps you aim down sights, or Marksman lets you ID enemies from further away. Alternatively, replace it with Steady Aim so you don’t have to worry about accuracy – after all, you have plenty of ammo.
The Killstreaker: Sleight of Hand, Hardline, and your third perk of choice for your playstyle. Never be caught reloading, and put bullets into your opponents constantly. Couple this with a few low point killstreaks like UAV and Airdrop Trap, and you’ll have a virtually constant stream of them.
The Specialist: Start out with Blind Eye, Hardline, and SitRep. Hardline makes your first kill (or first objective capture, or first two assists) unlock your next perk: Blast Shield. From there set up Scavenger to make sure you don’t run out of ammo before reaching critical mass, and soon: every Perk will be at your disposal.
Do you like these suggested Perk layouts? Do you have a favorite layout you’d like to share? Tell us in the comments!
References
- Perk Information from User’s Own Experience
- Images Copyright Activision