Call of Duty 5 features 13 maps available for online play, and this article covers the Castle map. The premise of this map is that you are either attacking or defending a Japanese castle-like palace, complete with a garden and man-made pond running through it.
CoD5 Castle Map Guide
Call of Duty: World at War, also known simply as Call of Duty 5, currently has a total of thirteen multiplayer maps of varied sizes in which you can go head to head against online opponents. This guide will describe each map in detail, plus give you some pointers as to the best defensive locations and strike points. This is by no means a definitive guide, and I encourage you to find your own favorite spots within the map.
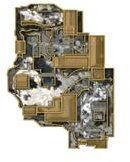
The Castle map is a good one for any numbers of players because the whole thing is on a hill and there are tons of elevated positions as well as narrow passageways, and there is only one main bottleneck on the whole map. The premise of this map is that you are either attacking or defending a Japanese castle-like palace, complete with a garden and man-made pond running through it. This is a medium size map and contains no vehicles.
If you look at the map, the actual castle portion of the map is in the upper middle right side, and this is where the bottleneck occurs. It’s a two-level building and serves as one of the connecting points between the top and bottom of the map, so there’s always a lot of people coming and going through the area. Not only are the passageways notorious for grenade spamming, but also watch out for guys with flamethrowers hiding around the corners.
If the enemy has the castle building occupied, I have found it is much easier to slip around and take it from the back entrance, but getting there may not be so easy. Watch out for snipers on that upper floor, too. If you play a sniper, always be mindful of enemies who throw grenades up there with you. The room is pretty small and a grenade going off in the middle of the area will take out most anyone inside. From a defensive position, I have found it more effective to stay out of that sniper area and instead wait in the short hallways behind it because enemy soldiers can enter via a ladder on the side of the room.
There is another larger building in the map, but I rarely ever see a lot going on there. It’s located in the lower right corner and seems to serve more as a spawn point than a combat area, though enemy soldiers will sometimes slip through. In this map, almost all of the action either takes place right around the castle, or out in front of the other building.
If you look right in the middle of the map, you’ll see a little bridge going over a pond. That bridge serves almost like a dividing line between friendly and enemy sides. Furthermore, at the very top of the map you’ll see a wall that provides excellent sniper cover, so trying to charge head-on in front of them will likely get you shot down.
This post is part of the series: Call of Duty 5: World at War Online Multiplayer Map Guide
Call of Duty 5 features 13 maps available for online play, and this series of articles goes over each map in detail, plus provides a graphic screenshot for reference.
- Call of Duty 5: World at War Game Map Guide - Airfield
- Call of Duty 5: World at War Game Map Guide - Asylum
- Call of Duty 5: World at War Game Map Guide - Castle
- Call of Duty 5: World at War Game Map Guide - Cliffside
- Call of Duty 5: World at War Game Map Guide - Courtyard
- Call of Duty 5: World at War Game Map Guide - Dome
- Call of Duty 5: World at War Game Map Guide - Downfall
- Call of Duty 5: World at War Game Map Guide - Hangar
- Call of Duty 5: World at War Game Map Guide - Makin
- Call of Duty 5: World at War Game Map Guide - Outskirts
- Call of Duty 5: World at War Game Map Guide - Roundhouse
- Call of Duty 5: World at War Game Map Guide - Seelow
- Call of Duty 5: World at War Game Map Guide - Upheaval