For gamers whose current graphics card may not be powerful enough to run certain games, there is a solution which can help squeeze a little more power from your video card: ‘overclocking’.
If you’re a gamer whose current video card is feeling the strain of playing certain games, or if you’re an enthusiast looking to get the most from your graphics, there is an alternative to upgrading your current graphics card - overclocking. The term overclocking relates to tweaking certain elements of your video card settings beyond which has been set by the card manufacturer and can yield a power boost.
Be warned however, that overclocking is a risky business and it’s easy to go too far and render your graphics card inoperable. This guide is designed to help you understand the overclocking process, but any attempt to follow these instructions is undertaken at your own risk and neither I, or Brighthub, can not be held responsible for any component failure as a result of using this guide.
Now that that’s out of the way, it’s time to consider a couple of things before you begin. Firstly, be aware that overclocking = more heat in your system so ensure you have a good cooling system in place in your PC and on your graphics card. Some cards overclock well using the standard cooling fitted on a graphics card, but it’s always a good idea to ensure that your PC is adequately cooled when attempting overclocking. Secondly, remember that not all graphics cards are made equal, and that while some will overclock really well, others will refuse to run much faster than their factory-set default, regardless of what you do.
All modern graphics cards contain a Graphics Processing Unit, often referred to as the GPU. This chip performs the graphics calculations within the graphics card’s RAM, which can vary in size and speed. Both the GPU and the RAM have a default clockspeed as determined by the manufacturer, and it is here where the performance of a graphics card be boosted by increasing the clockspeeds beyond the manufacturer’s setting.
If you look at your graphics card’s specifications, you’ll likely come across the terms ‘core clock’; and ‘memory clock’ and a figure noted next to each, measured in Megahertz (Mhz). The term ‘core clock’ refers to the speed at which your GPU operates – the higher the number, the faster. Similarly, the ‘memory speed’ is the speed at which your RAM operates.
In order to overclock your graphics card, it will be necessary to alter the speeds at which your graphics processing unit and RAM operate at.
RivaTuner is also available, is easier to use and supports graphics cards from both GPU manufacturers. For the purposes of this guide, we’ll be using Rivatuner. Get RivaTuner
When using RivaTuner, take care only to alter the settings as detailed here. Unless you are comfortable with doing so, do not attempt to alter the advanced settings as you may introduce problems.
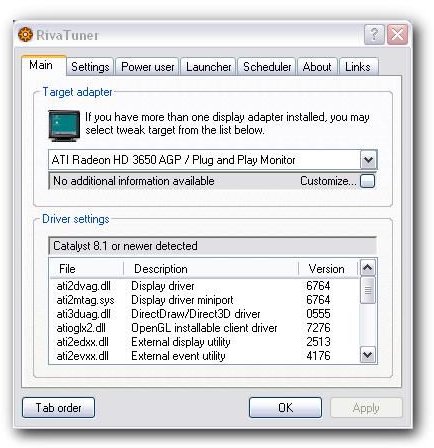
Once you have installed RivaTuner, run the software and you will be greeted by a screen similar to figure one, below. From here, RivaTuner will detect and display the graphics card, so from the main screen, click on the small flashing arrow to the right of the word ‘Customise’. When you do so, a small menu with five graphic icons will appear to the right.
Click on the first icon, which is labelled ‘Low Level System Settings’. This will open a new screen (Fig.2) which will show the details of your graphics card’s clock speeds. It is important to note that the speeds of your card may differ from the ones in the image. However, if your image resembles that of figure 2.1, then it’s likely that your graphics card has been locked by the manufacturer and cannot be overclocked – most ATI cards are locked to prevent tampering and require a BIOS fix in order to overclock them. Nvidia’s cards, on the other hand are much more forgiving and can be overclocked.
If you can access your system’s settings, then here’s where things get a little risky as you can now alter both the core and memory speeds. To begin overclocking, increase your memory speed slightly – no more than 5MHz at a time – to find the highest stable setting. With each increment, click on ‘Test’ then ‘Apply’, and then before you go any further, run a benchmarking test on your PC - something like 3DMark or Aquamark - and make sure that your system is stable. Unfortunately, this can only be done by observing the benchmark as it runs, so look for any anomalies, such as artefacting on the display (fig.3) or system crashes. If you experience any such glitches, turn down the memory clock one to the last stable setting.
Once you have ascertained the highest memory speed, do the same with the core clock until it too becomes unstable. Once you reach the highest stable core speed, you’ll be able to enjoy the added power you’ve given to your graphics card.
A further word of advice, is to regularly check the temperatures of both your PC and your graphics card to ensure that any additional heat generated by overclocking doesn’t adversely affect your system. Remember that heat can kill off other components too, not just your graphics card and your graphics card temperature should NEVER exceed 80C.
If you find that your new settings are causing problems with your PC booting, hold down CTRL while Windows is booting. This will disable RivaTuner from applying the new settings and you can then troubleshoot your overclock by decreasing the core and/or memory speeds.
It’s also important to realise that overclocking a graphics card invalidates the manufacturer warranty, so if your card malfunctions as a result, your vendor or manufacturer will likely refuse to take any remedial action.
Images