When you begin the adventure game Syberia, you’ll find yourself in a little town called Valadilene. There’s a lot to do here, so read on. This Syberia waltkthough will help you through the first part of Valadilene, including the hotel, the notary’s office, and the church and crypt.
Valadilene
You begin the adventure that is Syberia in a strange, sleepy little town called Valadilene. As you can tell from the opening cutscene, there’s something a little unusual about this place. Get used to it, because you’ll be spending a while here. This first Syberia walkthrough will help you through the first half of the Valadilene storyline, explaining how to solve any puzzles you encounter along the way.
The Hotel
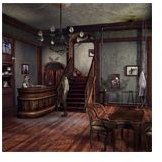
The game opens with you (Kate Walker, an American lawyer) inside Valadilene’s only hotel. The first thing you’ll want to do is grab the advertising brochure from the bulletin board by the door. Read it carefully, and you’ll learn a few important things about automatons. Then try to pick up your suitcase. Kate says she’s too tired to carry it—maybe someone can help her.
Go over to the reception desk and place your curser over it. When the curser looks like a magnifying glass, click to zoom in closer. There’s a bell to call the innkeeper, and if you’ve read the brochure you should know how to make it work. There’s a key on the desk near the bell—pick it up and insert it into the automaton. Now you can press the red button to call the innkeeper.
Talk to the innkeeper. When you speak with people in Syberia, it’s best to click all the dialogue options at least once so you don’t miss anything. So go through all the topics, although the crucial ones here are “Kate” and “Help.” After you choose “Help,” a small boy named Momo will interrupt the conversation and run out of the hotel. Then the innkeeper will take you to your room.
In your room, you’ll find a fax on the nightstand. Pick it up and read it. You should probably inform your boss of the contents, so take out your cellphone and call the preprogrammed OFFICE number. Your boss, Mr. Marson, tells you he’s sending you another fax, so leave your hotel room and head back downstairs to talk to the innkeeper. Choose “Mission” and he’ll give you the fax. Before you leave the hotel, go left past the reception desk to the table where Momo was sitting. Pick up the four cogwheels he dropped, and take a look at the pattern on the table. You might want to do a rough sketch of it on a notepad so you don’t have to come back later. Now you’re ready to go outside.
The Village and the Notary
Outside the hotel, you’ll find yourself on a long, mostly empty street. There are a few things you can do right now. Up the hill to the right there’s an old man on a bench, and to the left there’s a baker standing outside his shop. Talk to both men, then head left again until you find a gazette sitting on an empty bench. Take it and read it. In the same area, there’s one building you can enter (look for a set of stairs leading up to a door with an automaton next to it). This is the notary’s office.
The Village and the Notary Cont.
To enter the notary’s office, take fax #2 and put it in the automaton’s hand, then pull the lever. Enter, and use the door to the left to find the notary. Sit in the chair he offers, and talk to him for some important background information. Be sure to choose the “Mission” topic last, as this will end the conversation. Once the notary has retired, grab the key from the coat stand by the door in the reception room and then return to the streets.
Head back towards the hotel, and you’ll be interrupted by a call from Kate’s boyfriend Dan (get used to this). You can go back inside the hotel and talk to the innkeeper now for a little more information about the Voralbergs, but you don’t have to. Either way, your next step is to head up the hill to the right of the hotel and past the gates to the Valadilene church.
The Church and Cemetery
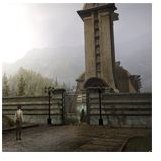
Mr. Marson will call you as soon as you enter this area—he’s not happy. Once the call is over, head right. This will take you to the back of the church, where there are some stairs you can use to get to the back entrance. Once inside, take a closer look at the crucifix on the wall. Click on it, and it will move aside to reveal a key you can grab. Check out the cabinet to the left of the crucifix, and try the drawers.
Use the key in the top drawer, and open each in turn. You’ll find four punch cards of different colors—take them all. There’s a trick to the drawer in the middle. When it’s open, you’ll see something suspicious at the very back. Turn the key on the side of the dresser while that drawer is still open, and the drawer will extend further to reveal a scroll you can read and a very important key.
Go back outside. At the side of the church there’s a locked door, and on the wall next to it is an alcove with a familiar-looking cog and four empty spaces. This is where those four cogs Momo dropped will come in handy. Hopefully you remember the drawing Momo made, but if you don’t it’s ok since the game will only let you put each cog in its correct position. Starting with the first empty spot above the permanent cog at the bottom, you’ll need to first place the tiny cog, then the medium cog, then the small cog, and finally the large cog. Pull the lever, and the elevator will take you to the top of the church.
There’s not much in this room, just an automaton pipe organ player. Take a closer look, and you’ll see a slot in his back. This is where the punch cards from the church go. Each, when inserted, will make the automaton play a different tune. The important card is the purple one—when you insert it you’ll get a cutscene and see a keyhole appear in the church crypt outside. The punch cards will disappear from your inventory once you use the purple one, so if you want to hear all four tunes be sure to use the red, green, and blue ones first.
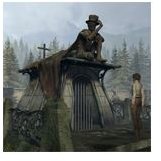
Take the elevator back down, and head left until you find the crypt. Insert the key from the dresser in the church into the keyhole in the automaton’s hat, and go inside. Click on Hans’ crypt to open it and find it empty, and pick up the news clipping and the voice cylinder. Read the news clip, then leave the crypt. You’re now finished with this area, so head back towards the hotel and check out the Valadilene Walkthrough Part 2 for what to do next.
This post is part of the series: Syberia Walkthrough Part 1
Syberia is often listed as one of the best adventure games ever made, mainly due to its engrossing storyline. This Syberia walkthrough will help you enjoy the story without getting too frustrated by the puzzles and occasional need for pixel-hunting.