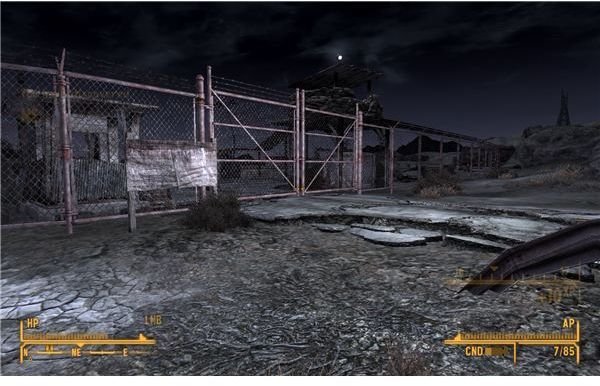
The Sink will be your new home in Old World Blues. If you want to make it the amazing science base that it can be, you’ll need to find all of the upgrades and holotapes to restore the personalities in the Sink. I’ll cover how to explore the Big Empty and get all of these tapes inside this article.
This is the general quest to find all of the tapes for the items in the Sink. Note that if you make this your active quest, it will highlight the locations of the tapes on your map, a few at a time. This is a fairly good way to track them down, if you haven’t visited the buildings before.
It’s a very good idea to get everything up and running as quickly as possible, because each of The Sink’s gadgets has a few neat options for players. Note that you will want to do the test run at X-8 before you explore too much, since you’ll want to have a way to disable forcefields before you explore too much.
The Auto-Doc and Y-17
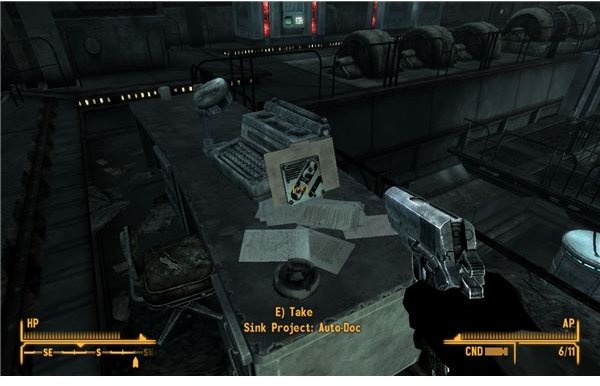
You can start off by getting the tape for the Auto-Doc. Those playing in Hardcore mode will need to make this a priority, because doctor’s bags are in short supply and a free option for healing your crippled limbs will be very nice.
You need to go to the Y-17 medical station for this one. The interior isn’t too rough. There are a few mister handies inside that are annoying, but they shouldn’t be too hard for you to kill. Just bring a nice weapon with an EMP bonus, or a rifle with good penetration. If you have any AP ammo, it’s just wonderful against them.
Once the interior is clear, the only remaining threat is a few lobotomites that may spawn in if you grab the unique glove that’s inside. Other than that, just look around. Christine’s old recon armor is lying by the auto-doc in the center. You can explore the jail cells to the right if you can bring down the forcefield. This will allow you grab one of Christine’s tapes.
The main attraction will be the tape for the Auto-Doc on the top floor by a computer. It’s not the only one that you should grab though. While you’re here, also look around for two upgrades for the Auto-Doc.
The desk in the back right corner of the first floor has a tape for the C-13 implant, which gives you a damage bonus against cazadors. There is also a tape for cosmetic enchancements on a file cabinet on the second floor.
That’s it for this area.
The Sink in The Sink
You can get the one for the sink inside your base by going to the marker for the Magnetohydraulics Facility. The tape is just sitting on a desk near the entrance. If you want, you can swim around and find some ammo lying around on the floor. There’s nothing truly remarkable though.
The Biological Research Station
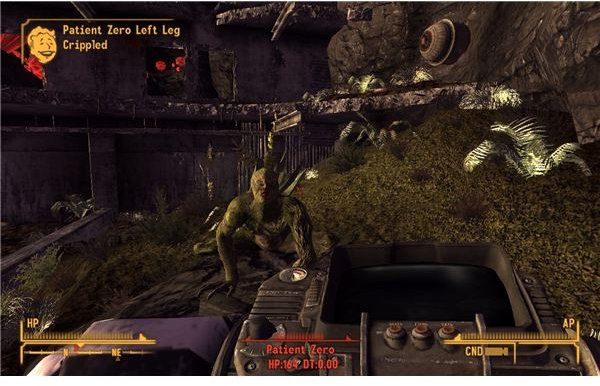
The Biological Research Station tape can be found by going to the X-22 Garden in the north canyons on the map. There are some spore carriers there, including the very tough “Patient Zero.” Just bring a good weapon, I assume that you have one by now. They can pack a punch, but it’s probably nothing that you can’t handle. Proton axes won’t have a big impact, so try to stick to guns and rifles and avoid melee combat.
The main thing is the tape lying inside the ruins and up a set of stairs. Look for a duffle bag, and then look around for a bag of seeds across from it too. This will come in handy and limit our repeat trips. This will also let you start growing plants in the Biological station right away, which means that you’ll have fruit and vegetables ready quicker.
Riches in Higgs Village
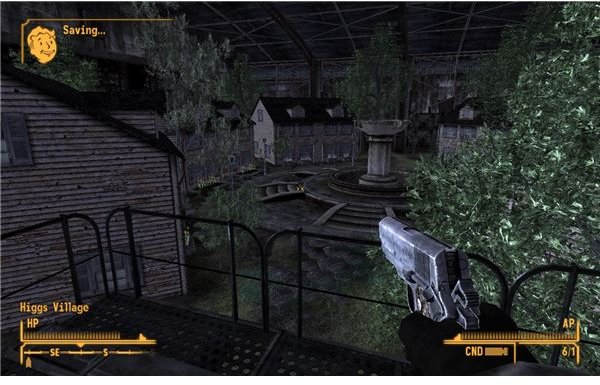
Higgs Village holds a ton of upgrades that we need. It’s more to the south of the map, and is contained inside one old building. Just watch out for any guard robots outside. Once you’re inside, it’s actually safe, so put your weapon away and just look.
The first stop is #00. You can get a new audio sample for the sonic emitter. The tape for the “Giant Tarantula” type is lying on top of a computer upstairs. You should also be able to find a recipe for a repair skill book between two broken terminals.
The next step is #101. Go upstairs to find Dr. Klein’s scrubs and gloves in his room, along with a tape for the Book Chute lying on his computer desk. The Book Chute is able to create blank books by cleaning any books that you bring it, and getting 25 blank books will allow you to create a skill book at the workbench, if you get the recipe for it.
House #102 just has a recipe for a Science skill book. Just go upstairs and look for it on top of some broken equipment.
House #103 will have gabe’s bowl in the backyard, if you need that for Borous’ quest. Anyone with Wild Wasteland has to watch out for a tiny deathclaw in the doghouse though. Inside, you can grab a recipe for the Medicine skill book in his bedroom.
House #104 is fairly barren, there’s just a Speech skill book recipe inside on an old radio upstairs.
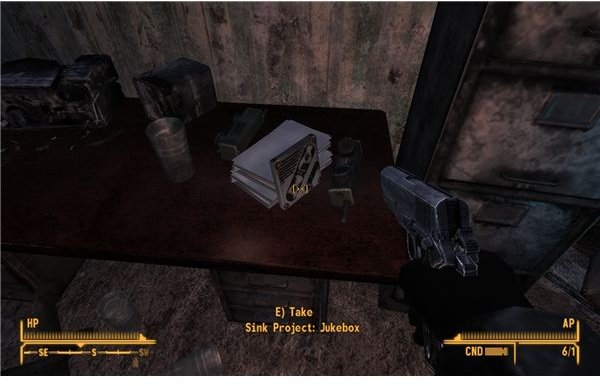
House #108 is probably the big one, as Dr. 8 will actually direct you here if you befriend him. Inside, you’ll find the vital tape for the Jukebox on a desk upstairs in the side room. This will let you finally change the tape for your sonic emitter, and get a bit better of a soundwave for the weapon. Being able to make enemies explode or catch on fire with a critical hit is fairly nice.
While you’re here, you should also grab the opera singer tape off of the end table by his bed.
That’s it for Higgs Village.
The Light Switches and Toaster
The tape for Light Switch 01 is just on a desk in X-2. You can just grab it when you go to get the antenna for the main quest .
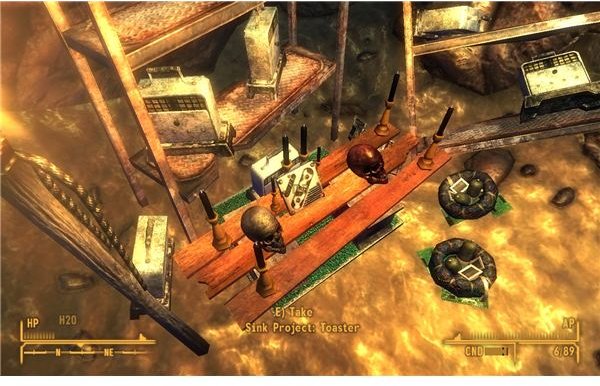
While you’re at X-2, go ahead and get the tape for the Toaster. Go up the steps and out the door on the third floor to reach the catwalk. Then follow the road over until you hit the graveyard, and a group of lobotomites. There’s a raised entrance to a cave, called The Cuckoo’s Nest. Walk up the slope to the left and go inside. There are a bunch of lobotomites inside, and it will be a fight at close range. I suggest using a proton axe to keep them at bay, since it’s fairly effective at close range. A good shotgun or rifle in VATS can work wonders too though. If you need space, move to one side or the other and use the tents for cover and obstacles.
Once the area is clear, look for the shrine with the toasters around it. If you have room, go ahead and grab a few, then take the tape. The Toaster will let you break down appliances for energy weapon ammo and scrap electronics, which is fairly handy.
You can get the tape for the light switch’s bitter rival, Light Switch 02, in the Big Mountain North Tunnel. It’s just a small cave in the ruins of a tunnel. The door to the small storage area just inside the main entrance is what you need. Go inside and grab it off of the shelf. The tunnel inside has another LAER in it, if you want one.
Muggy
The last and final tape is for Muggy, the cute robot in your bedroom. You can get this by going to the Securitron De-Construction site. Don’t bother to go in just yet, instead, look for the truck outside. Muggy’s tape is in the back. Muggy is somewhat useful, as he can break down tin plates and mugs into wonderglue and empty syringes. Coffee pots can also apparently be made into lead.
While you’re here though, you can go ahead and get Muggy’s great upgrade. Be ready to fight some incredibly tough securitrons inside though. Make sure that you have a rifle with a lot of penetrating power, or a solid energy weapon. I personally used This Machine and the Survivalist’s Rifle.
Move inside and watch out for the missiles and gunfire from the first two, then move up the steps. Your goal is one in a back section of the upper floor. It’s has a long binary name that I won’t type out, but it’s translates to “The One.” He has a ton of health and a lot of missiles that fire quickly, but you should be able to use the doorway for cover and put a few shots into him. After a magazine or two, he should die.
You can loot Muggy’s upgrade off of his body. This fight was well worth it though. Muggy will now be able to give you “electrical supplies.” This means that you can get 50 of each type of energy weapon ammo once a day, every day.
Upgrades for the CIU
After you get the first round of gadgets for the Sink, you’ll get a new quest “Influencing People,” which will have you hunt down their upgrades.
If you’ve been following my guide for Old World Blues, you should have a few of the upgrades already. This will just cover the facilities that you haven’t covered yet.
The game suggests that you start with upgrades for the Sink’s central unit. This will let you buy mods for a few of your weapons, which will be nice.
You might as well start out with the Signal Hills transmitter. It’s a big building sitting off by itself. Watch out for robots and lobotomites waiting outside though. You can get the upgrade for the CIU here. If you climb up the nearby hill, you can walk down onto the roof of the transmitter building to find Father’s Elijah’s lookout perch. You can get a letter, and a holotape that upgrades the LAER.
While you’re here, you should also grab the upgrade for the Auto-Doc. You can get a mod that enables it to do haircuts by going into the main building and grabbing the tape off the desk.
The Big Mountain West Tunnel holds another LAER upgrade. You can go inside and turn into the office to kill a few protectrons, including one unique one called the Custodian. The tape is inside a supply closet, sitting on a shelf. Just walk right inside and grab it.
In case you didn’t follow my advice in X-13 , you may need to go back and get some upgrades for the K9000 gun. Just go to the observation area above the test site and look for the marked terminals. There are two upgrades for the gun, and a code for the Y-7 implant hidden on the three terminals. It will increase the bonuses from food, which is fairly useless unless you just have caps to burn, to be honest.
The Auto-Doc
While we’re at it, we should finish beefing up the Auto-Doc. You should already have a few implants if you’ve been following my upgrade guide so far. The remaining few will also be a bit challenging, so I hope that you’re ready.
You can get the Y-3 implant, which is completely useless (it deradiates water in your inventory…for the cost I could buy a life’s supply of Radaway), by braving the Z-9 DNA preservation lab. This place is absolutely crawling with nightstalkers, including one very strong one called Shadis. On the bright side, there are a ton of nightstalkers eggs inside. I found dozens on the nightstalkers and in the nests. There are also several samples of “Nightstalker Squeezin’s” which is a decent enough healing item, that is also worth an incredible amount of money. Look for the green jars.
The tape is by an operating table in the back lab, close to where you kill Shadis.
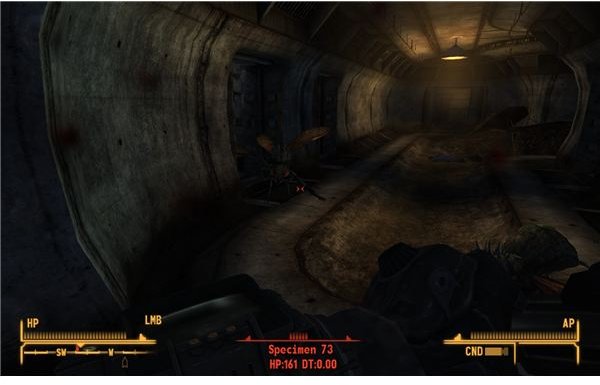
The M-5 implant will potentially be useful if you sneak a lot, as it gives you a twenty percent boost to speed while crouching. You can only get it by going to the Z-14 DNA splicing lab, which is full of large cazadors. This includes a unique “Specimen 73.” And again, this is all in a close space. The only right side is that you can’t be poisoned if you don’t have a heart. The protonic inversal axe is quite nice in the tight spaces. If you have a good rifle and can stay calm, then you should also be able to handle the three in the main area. The tough one is a pain, but VATS and a little luck makes it manageable. Make sure that you save frequently and bring stimpaks though. Note that you should also wind up with a few perks from killing the cazadors here, which gives a boost to damage against cazadors, so the trip will be worth it.
The rest are in the Y-17 facility, so go back there if you didn’t grab them on the first run through.
The Book Chute and Sink
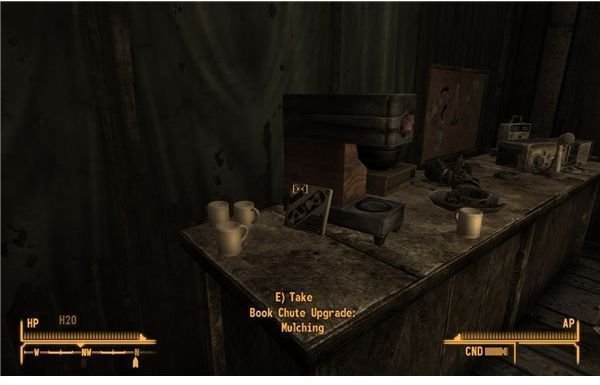
Travel to Little Yangtze, and kill the surviving ghouls and sentry bots around the base’s perimeter. The guard tower in the camp has a holotape for the Book Chute’s mulching upgrade. You can find it near the coffemaker by Elijah’s notes. This will let you chew up pencils to make lead and clipboards for duck tape.
While you’re here, also go ahead and look in the ruined building by one of the gates. You should be able to reach the second floor and find Christine’s sniper rifle. It does an incredible amount of damage and it is silenced, but it degrades at a fairly absurd rate. A good weapon to grab though.
You can get a slightly useful upgrade for the actual Sink by going to the marker at the Construction site. There are a few protectrons outside, but you should be able to just punch right through them. The holotape is lying by a skeleton on the ground. Just pick it up. After installing it, you’ll be able to fill empty bottles and turn them into purified water.
The Light Switches
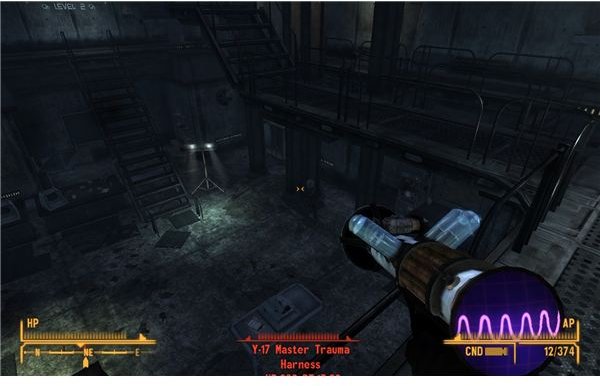
The last two upgrades are for the special lights that your light switches can turn use. The first, the upgrade for Light Switch 01, is in the X-12 center. You can use the sonic emitter to kill the force field (after upgrading it), and then fight the special Y-17 harness master in the basement. He can do a ton of damage, so use the objects around the room for cover and bring a rifle with a high damage per shot. Once he’s dead, another three basic ones will come in through the top. Just get behind a desk and snipe them.
The tape is at the bottom of the room, lying on a desk. You should also grab the K9000 gun while you’re here.
The final upgrade, the one for Light Switch 02, is available in the Saturnite Alloy Research Facility. It’s a large building filled with some angry robots, so bring something with EMP damage or high penetration. The tape itself can be found standing up in a marked cabinet. Just pick it up.
Go back and install all of these upgrades to finish up the quest.
Field Research
This one is a little bit shorter, and it’s the final quest in the line. You just need to pick up the sonic files for your sonic emitter and the seed packets for the Biological Research Station.
There are four sonic emitter files available. As I mentioned above, you can get Opera Singer and Giant Tarantula from Higgs Village. Gabriel’s Bark is inside X-8 in the cyberdog facility. You can get the file out of his hiding place in back, as covered in my walkthrough for the X-8 facility . The last one, Roboscorpion, is found when you kill Dr. Mobius’ giant scorpion at the end of the game. You can get tips for that in my guide for the quest “Old World Blues .”
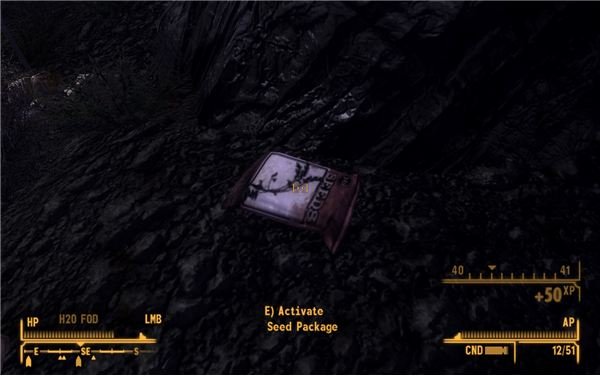
The seed packages are just lying around outside near the X-22 Garden. The first is actually inside the garden, and you probably grabbed it when you first got the tape for the Biological Research Station.
The other two are on the ridges around the canyons, usually protected by some spore plants and other random creatures. You can get up onto this level by walking up the hills by the Signal Hills Transmitter. There’s a few fallen towers that make bridges and let you cross the gaps. Grab both packs of seeds that are along this upper level and hand them over to the research station. The garden in the Sink should be full within a week.
References
All screenshots and information based on a playthrough of Fallout: New Vegas: Old World Blues
This post is part of the series: Fallout: New Vegas - Old World Blues Walkthrough
Old World Blues takes you to the Big Empty for some old world science and general B-movie craziness. This walkthrough will cover how to get the technology from X-2, X-8 and X-13, kill Dr. Mobius’ giant roboscorpion and how to find all of the personality holotapes for The Sink.