Bleed Me Dry is a fairly long quest that should net you a lot of money, some new opponents in The Thorn and finally a potential encounter with Red Lucy. If you want to go about the Mojave Wasteland and collect eggs, just look here for a detailed guide to this quest.
The Thorn
You can find Red Lucy in her little overseer spot at the center of The Thorn. The Thorn can be entered by going down the sewer entrance just outside of Westside and it should be easy to spot Red Lucy inside.
If you talk to her, you can either hit on her or just ask if she needs help. Either way, she’ll ask that you prove your worth and prowess by collecting some new eggs for her fights. Note that it’s a good idea to start this quest as early as possible and carry out the collections as you approach the various areas. The different creature nests are spread throughout caves and vaults across the Wasteland.
Bleed Me Dry - Giant Mantis Eggs
This is one set of eggs that you may already have enough of. Apparently getting twelve real eggs is enough, although I think it’s easier and makes more sense to get the set of quest eggs from Vault 22.
There’s a separate guide and quest for Vault 22, “There Stands the Grass .” If you can, try to do them together. If you’ve already done it, then just enjoy your quiet walk through the vault.
The nest is inside the cave that you pass through to get from level 3 to level 5. You will need the appropriate keycard from the Common Areas, which are unlocked through the Overseer’s office. It’s one possible way to reach the cave structure, Keely and the data.
Instead of going down all the way to the fifth level, take the side route and kill anything guarding the nest. It’s right at the end of the cave. You should be able to just pick up the full set as a quest item.
Take it back to Red Lucy and hand it over. If you have 50 points in Barter you can talk her up to 300 caps. If not, you have to settle for 200. Ask her for your next assignment to advance the quest.
Bleed Me Dry - Giant Radscorpion Eggs
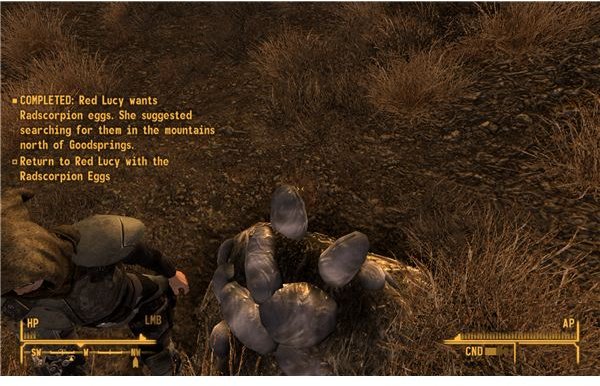
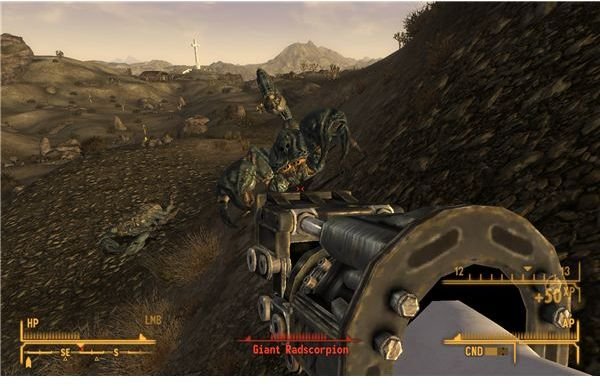
This assignment takes us back to Goodsprings. Unlucky explorers may have actually already found the nest. It’s just a marked spawn point a short distance away from the Goodsprings Cemetery. It’s set back among the hills. They’re giant radscorpions, so they should be easy to spot. If you have any type of rifle, you should be able to engage the radscorpions from a fair distances away and break their tails before they even make it to you. Remember that grenades can be effective if you lead the enemy a little bit. Thankfully there should just be a few pairs guarding the nest.
Once they’re dead, grab the eggs from the nest and take them back to Red Lucy. If you’ve got 60 points in Barter she’ll pay up to 400. It’s 300 without, although I believe she’ll volunteer a normal hunting rifle if you try to take the charity route. I’m not sure why you’d want that instead of caps though.
Bleed Me Dry - Fire Gecko Eggs
I
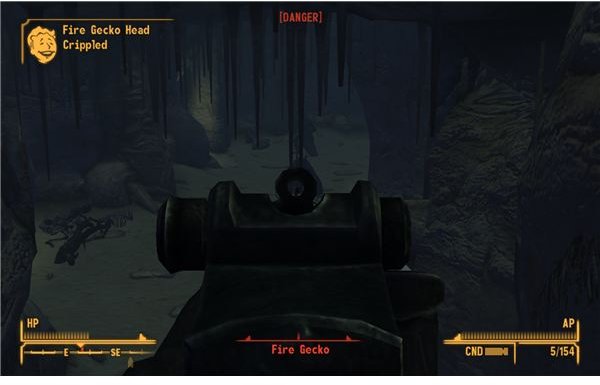
actually found this one quite easy. You just have to go to Bootjack Caverns. It’s a fair walk, but the area isn’t that dangerous. Fire geckos aren’t that bad, especially if you take them at a distance. Just use a rifle and cripple their heads as they try to rush you. They seem to stun easier and have very little natural armor.
The cave itself is laid out fairly normal. Just go inside and follow the curviving line to the nest in back. Grab the eggs and walk back to Red Lucy. With 70 points in Barter, you can talk her into paying 700 caps. Otherwise you’ll have to settle for 500.
Bleed Me Dry - Nightstalker Eggs
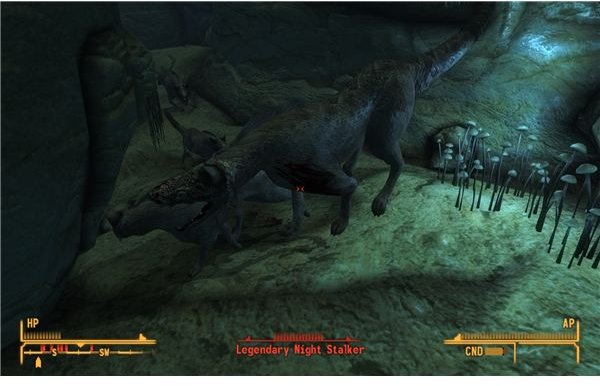
Once again, this actually seemed fairly easy. In particular, I found the walk to the cave to be much harder than the nightstalkers themselves. I had to kill cazadors and deathclaws on the way there. Be careful where you walk and be ready for the entire journey. Ironically, once you make it to the cave you’re fairly safe.
Go inside and use either path to enter the main cavern. The one on the left has a short drop though, so you may want to take the path on the right to avoid fall damage.
Nightstalkers are also easy kills for the most part. Use a decent rifle or shotgun to tear them apart. Melee weapons work incredibly well too, although you’ll want to bring a few stimpaks to compensate for lucky hits. The only really notable thing is that a legendary nightstalker is inside toward the back. He has a large pack with him and he is quite big. His bite does a lot of damage, but he doesn’t actually have too much health. Just fire a few extra bullets his way or use some grenades to thin the pack out. Either way, bring him down normally to open up the nest area.
There is one small nest you can loot next to the larger nest. Just grab some eggs to officially finish the quest. I will note that there are some bodies you can loot by a campfire. One has a hunting shotgun and another should have a hunting revolver. You should also be able to get the key to that very hard lock on the supply cache you passed on the way inside. There is an obscene amount of money in the average locked supply box inside. It’s not unusual to get 7000 caps and another grand in Legion and NCR money.
Report back to Red Lucy with the eggs. If you have 80 points in Barter you can talk her into paying 1000 caps. Otherwise it’s 700.
Bleed Me Dry - Cazador Eggs

This is where you officially start to hate the quest. There are so many cazadors guarding the path to the nest. The nest itself is actually in an open area and really simple to find. Start at Jacobstown and walk to the south until you reach a hilly clearing. Walk along the hills toward the nest and you’ll start to run into cazadors. They travel in small packs, so stay alert.
Cazadors are an aboslute nightmare for melee characters, but ranged characters (and people with Boone) shouldn’t have much of a problem. You just need to cripply a wing to make them fall to the ground and stay quite vulnerable for several seconds. Otherwise, just bring a lot of stimpaks and antivenom. You’re going to get stung a lot.
The actual nest is at the back of the path. There are at least six cazadors guarding it, although some of them may be young versions. Either way, just start firing and pray. Use grenades or even a fat man if you have it. Stay mobile and focus on picking them off one at a time and you should be fine.
Steal the eggs in back before the poison gets you, and take a moment to loot the Super Mutant Master that is lying dead by the nest. He should have some C4 and a Fat Man on him. If nothing else, it will pay for some of your stimpaks.
With 90 points in Barter, Red Lucy will pay 1,500 caps. Otherwise it’s just a thousand.
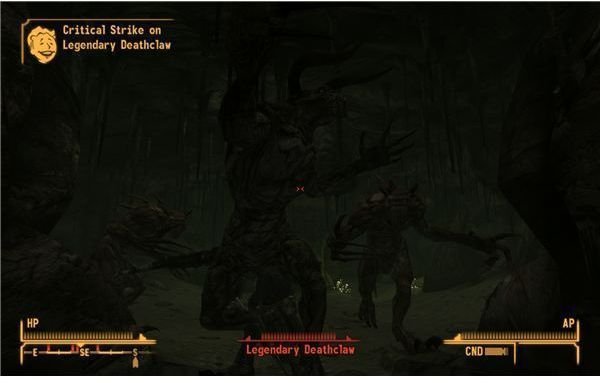
Bleed Me Dry - Deathclaw Eggs
As she mentions, you have two options for getting Deathclaw eggs. You can go to Sloan and face a slightly larger number of deathclaws and a formidable Alpha and Mother pair with six young ones. Or you can face slightly fewer adult deathclaws inside Dead Wind Cavern. Note that, even though she says Dead Wind Cavern is easier, it’s home to the Legendary Deathclaw. This is the strongest enemy in the game. It will kill just about any player in two hits, is incredibly resistant, is incredibly healthy and quite fast.
The only bright side is that you can actually avoid half of the deathclaws in Dead Wind Caverns. If you stick to the left, you should note a small slope down into a little cover. The Deathclaw Mother is inside with a few young ones. Fire quickly and gun down the mother, then pick off the babies. The eggs are inside. If you leave now, you’ll miss the unique grenade launcher “Mercy”, but you can probably run out before you trigger the legendary deathclaw in back.
There appears to be an o
ption to sneak in through the back of the Sloan Quarry to get to the deathclaw eggs, but it seems a bit more complicated and seems to border on exploits.
Regardless of your method, you’ll need to kill a lot of deathclaws and fight your way straight through to a nest. Bring a lot of medicine, your absolute best weapon (there is nothing stronger to save your ammo for, so weapons free) and remember that deathclaws are practically weaklings if you can cripple one of their legs. This keeps them from doing the jump attack and makes them limp along. If you are a ranged character, you should be doing this for every deathclaw that you find. Melee characters need to pray and bring a ton of stimpaks and some other chems. Buffout and Turbo are nice for turning you into a killing machine to out maneuver the deathclaws.
Once you get the eggs, walk back to Red Lucy. You’ll get 2,500 caps, the unique hunting shotgun “Dinner Bell” and Red Lucy will have you follow her back to her quarters and sleep with you. For practical purposes, this means you can get the “well-rested” perk from her bed.
That’s it for this long quest. You should be rich, covered in scars and addicted to every chemical in the game.
This post is part of the series: Fallout: New Vegas Walkthrough - Westside Quests
Westside is the small western suburb/slum of New Vegas. There actually aren’t that many things to do inside, but you will have the opportunity to work for Red Lucy at the Thorn, find a missing NCR soldier for the White Wash, track down some missing refugees in The Coyotes and find Vance’s gun.