Blitzkrieg is not a shooter or a grand strategy title, which sets it apart from the crowd in the saturated World War II game market. A real time strategy game heavily focused on small unit tactics and organization, particular features of Blitzkrieg maps prove a central focus for much of the game.
Blitzkrieg: Maps Set the Stage
The Second World War game market sees no shortage of entries. From first person shooters like Call of Duty and Medal of Honor to grand strategy games in the vein of Hearts of Iron and Panzer General , there are plenty of ways to fight the most terrible war in Human history all over again.
But as many games as are out there, not many actually focus on an integral part of the Second World War - small unit tactics and local operations involving platoons rather than individual soldiers or entire panzer divisions. Blitzkrieg is an exception, and the heart of the game is its focus on terrain and concealment.
Blitzkrieg maps will usually offer the player a series of key objectives that need to be accomplished to secure victory, and these invariably revolve around key terrain features such as heights, river crossings, and urban centers. The game does this exceedingly well, and it is not at all uncommon to see a game of Blitzkrieg devolve into a slugging match over a critical supply depot located on a hilltop that overlooks much of the battlefield.
Small Unit Tactics: The Heart of Modern Combat
Blitzkrieg is unlike your typical real time strategy game in that it is focused on realism as far as is possible in a game that intentionally falls short of the level of a simulation. As in the real world, a military commander can’t build a factory on the spot to churn out an endless series of tanks, as is typically seen in the Command and Conquer games. Instead, he or she is given a particular set of resources - infantry squads, tank platoons, artillery sections - and tasked with achieving an objective using these resources. Success may be backed with additional deployment of units to exploit any gains, but in general the commander has to make do with the equipment available.
And also true to the real world, Blitzkrieg equipment varies in firepower and the ability to withstand attacks between nations and between generations of units fielded by the same nation. An officer in World War Two fighting for Germany in 1941 could well have faced a Soviet town filled with heavy tanks that utterly outmatched his panzers. And a British lieutenant leading a platoon through the bocage of Normandy in 1944 could very possibly have stumbled into an ambush laid by the ferocious Tiger tank boasting armor almost impenetrable to anything in his arsenal.
Teching up wasn’t an option. Lives were at stake, and objectives had to be achieved - so commanders learned to innovate and use what they had to get the job done. Terrain dominated the battlefield as much as any particular bit of equipment, allowing a savvy soldier the ability to offset some of an opponent’s strengths and exploit his weaknesses. - Blitzkrieg maps are all about effective use of terrain.
Blitzkrieg Maps: Shaping the Battlefield
Blitzkrieg is a game that revolves around its maps as much if not more so than a first person shooter. Most real time strategy titles use the maps as a major component of the experience, true, but they usually come down to overcoming the same challenge in one way or another: chokepoints must be bypassed, defenses overcome, and the correct combination of units selected to get from your base to your opponents'.
Blitzkrieg isn’t just about swarming around overwhelming the opposition. A single 76mm anti-tank gun dug into a ridge can wipe out half a dozen tanks without taking damage because of the advantages in vision and firing range accorded by setting up shop on high ground. Infantry storming into an urban area can be quickly slaughtered in a crossfire. The specifics of terrain will govern where the player’s units are able to move without being destroyed, and what parts of the map are vital to victory. Blitzkrieg maps, even the randomly generated ones, can be utterly merciless in the advantages offered to one side or the other. Overcoming these advantages is the key to victory.
Blitzkrieg Map Tactics: First Step
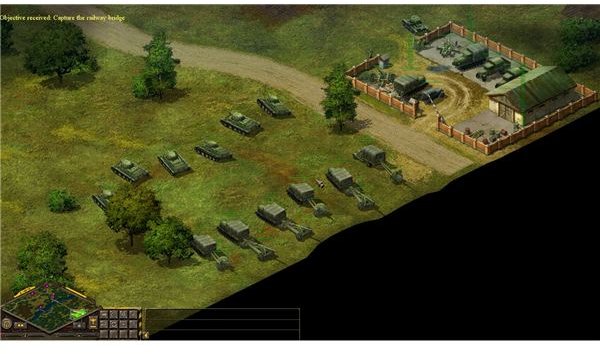
Upon beginning a game of Blitzkrieg, pause the action and look over the map. The general premise behind most of the randomly generated scenarios as well as the developer designed missions is that your three to six core armored units and three to six core artillery units are deployed onto a portion of the map alongside half a dozen squads of infantry, a couple anti-aircraft guns, and a sniper and some auxiliary vehicles to round things out. From there you’re tasked with several objectives: take a bridge, take a town, destroy an artillery group.
The map will tell you how to begin. You’ll need to deploy your units into a defensible formation that will also let you begin bombarding likely enemy positions with your artillery. Clearly the objective areas will house the main body of the opposing forces, but the map will be littered with clearings, fields, hills, and villages or other encampments. Many if not all will hide some enemy units, and if you blunder along as if this were Total Annihilation you will be decimated.
Blitzkrieg Battlefield Preparation: Scout and Smash
Dig some trenches, position your tanks and anti-aircraft units to cover approaches to your base camp, and get your artillery unhooked from their trucks. And after that, its time to shape the battlefield to your liking - so send your scout or a recon aircraft over to the nearest rise, clearing, or village and start looking for bad guys waiting to hurt you.
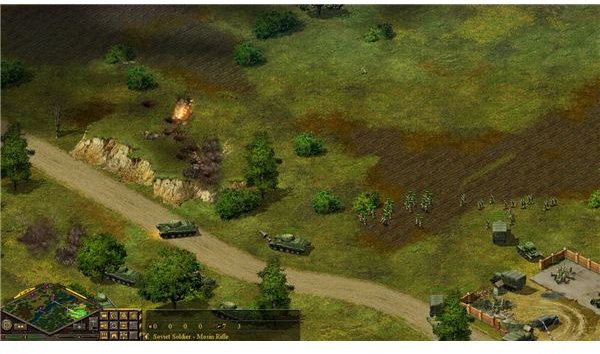
Shaping the battlefield is simple in concept - your objectives will probably be major sites like bridge crossings or enemy encampments. But the terrain on a given Blitzkrieg map will govern your approach to these objectives and how badly you get chewed up while moving into position for an assault. Any rises in the terrain need to be scouted and probably scorched with artillery. Your opponent will almost certainly have taken any high ground and garrisoned it, and just one tank dug in on a hillside can ambush and annihilate half your forces before you can pull back.
For the Grand Finale: Assault the Objectives!
Blitzkrieg map tactics vary depending on the specifics of the terrain faced, but the principles of assessment and then battlefield shaping will carry you far. Once the enemy is routed off any hills and minor villages, you’ll be able to move your forces around to probe for weaknesses around the objectives themselves.
Here again terrain will play a key role. When getting close to objectives you’ll want to take advantage of any cover to get as close as possible without being detected and attacked. Blitzkrieg map cover varies along with the terrain type, but in general most areas will have line of sight blockers like trees, rocky outcrops, and unoccupied buildings. Use these to close the distance unmolested by enemy fire. In addition, many objectives will be overshadowed by some high ground that you will want to avoid. If you have a choice between assaulting over flat ground with cover you can use or rough, hilly terrain that can’t be easily taken before assaulting the objective defenses as a whole, choose the former.
Final Note: Beware Choke Points
A choke point is a familiar feature of virtually any game genre. Anywhere you are forced to approach your opponent where your freedom of movement is restricted is a choke point. In RTS games like Supreme Commander sheer brute force can break through, because you can always build more units and try again. Not so Blitzkrieg - as in the real world, a small, determined force can severely maul a much larger force at a choke point as long as ammunition holds out.
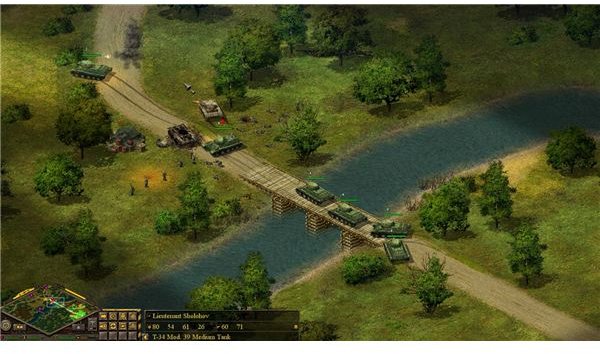
Needless to say: avoid attacking through choke points at all costs. They mostly occur on your average Blitzkrieg map at river crossings, and in an era of armored warfare bridges are often the only way to cross major rivers that otherwise obstruct an advance.
Unfortunately, they often have to be seized no matter the cost. Here again, take advantage of what the map gives you: scout thoroughly, bombard with artillery and aircraft as much as possible before sending in ground units, and when you do attack, hit from as many directions as possible.