Whether you’re working for Bhelen or Harrowmont, you’ll need to head on down to the Deep Roads and start cutting a path through to Branka’s last position. We’ll start with clearing out Caridin’s Cross and breaking a path through to Ortan Thaig.
Brief Intro
Well, we’re going into the Deep Roads for a long time for this one. No matter which side you picked, you’ll need to go down into the Deep Roads and see if you can find Branka to gain her support for your side.
Once again, there’s a lot of loot down in the deep roads so you should sell whatever you can before you go. When you’re ready, move on over to the spot past the doors to the Diamond Quarters. You’ll see the mine guards there. When you approach it, the angry dwarf you met earlier, Oghren, will stop you. He demands that you take him down into the mine to find her.
You’ll get a chance to rebuild your party around him if you want. I actually didn’t bother including him. I already had Sten as a damage dealer and my warden as a tank, so I didn’t really want another warrior. I believe that you’ll only lose access to a few historical cutscenes. I certainly didn’t miss them. He will force his way into the final battle, but we’ll cross that bridge later.
If you’re following Harrowmont’s path, then this is your first chance to go into the Aeducan Thaig. You can clear that if you want. I wrote about that back with Bhelen’s First Task, so just look back if you want some help.
Our main goal is to clear Caridin’s Cross. As you first enter the area, you’ll seee a little group of hired goons waiting for you. It should just be two fighters and an elven mercenary. This mage is just able to annoy you by healing the goons, so don’t worry too much about her. Just grind through the goons and you’ll be be fine.
Clearing Caridin’s Cross - Part 1
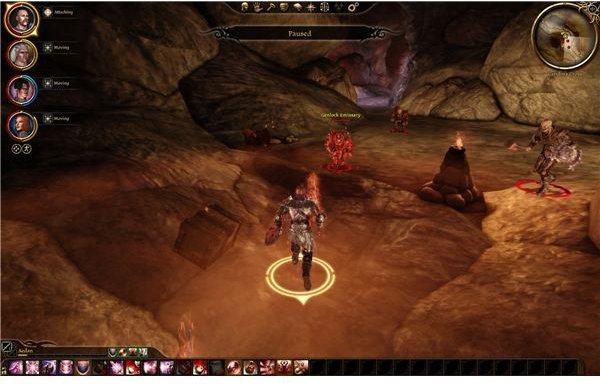
I suggest we go to the right tunnel first. There’s one on the left a little further down, but we can clear that later. We’re going to grind through the whole area anyway though, so it doesn’t really matter. This right room is just full of darkspawn. They are very spread out though, so they aren’t much of a threat. Kill the first small grouping of darkspawn near the entrance and then move past the bridge area. There’s a tripwire here, so be careful of a weak character hitting the trap. There are more genlocks and hurlocks ahead. The big danger is the hurlock emissary in back, so just rush him. As long as no one gets ground down too much you should be fine with the first half.
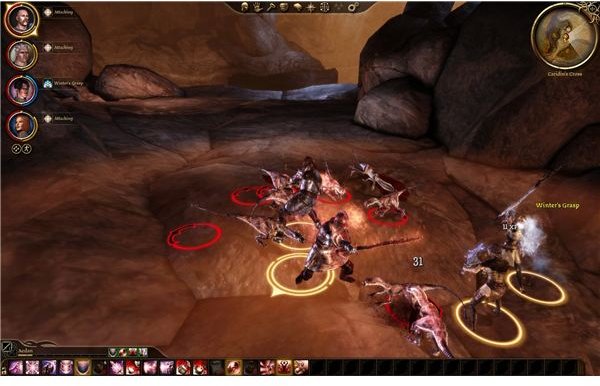
Take a moment to heal up and loot. Then cross the big bridge. There are four leghold traps on it and another five genlocks should spawn behind you. You should run back and deal with them at close range. Disarm the traps and attack the genlocks at the end of the bridge. Three shrieks will attack. This goblin looking things aren’t much of a threat by themselves, so just handle them.
Rest for a moment and then push into the next area of the camp. There is another group of genlocks and an ogre. The ogre shouldn’t be much of your threat to a well constructed party. You should be able to get a quick stun in and finish off the fight quickly. The area should be clear once you’ve killed the last of them.
Loot everything and make sure you check the firepit and the rubble before the bridge. These will net a codex entry and the start of the Drifter’s Cache quest. We need to find three other piles of rubble to unlock that one.
Move out to the remains of the road. There should be a bronto and a few more enemies. They shouldn’t be any real problem. Just pin in the bronto and kill it. Then grind through them. Push forward a little further and you should find three genlock runners. These are just more annoying rogues. In my fight, one ran off to join the emissary a little further back in the tunnels. Nothing comes of it though. Just kill anyone who sticks around.
Advance into the tunnel and then rush the emissary. He has nowhere to run in these tight quarters. You should have no trouble killing him and then finishing off the rest. Make sure that you grab the part of the Topsider’s Blade from his body. Move to the next group of darkspawn. There’s a large alpha ogre waiting for us. This one is tricky. The biggest problem is that your rogue isn’t safe to backstab. It can kick anyone who’s behind him. The only way to beat this one is to just keep healing and try to stay alive long enough to bring him down.
Clearing Caridin’s Cross - Part 2
Advance a bit further and you should get back to the road. You can turn off at the next tunnel and kill some more genlocks. They should be pushovers. There should be another bloody sack though, so keep an eye out for it. The big fight will be with the deep stalkers in back. There are only two to start with, but a lot more will spawn. The first wave is easy. Just cut the little ones down quickly. The second wave will have two leaders with it. Remember that these guys can use overwhelm, so make sure it’s your tank that engages them. The rest should be easy to handle.
The third wave will be against the matriarch. Once again, just have the tank draw her attention and let your rogue get in some good backstabs. Once the matriarch dies, the last wave will be easy to kill. You can then loot the sarcophagus for some gold and a little loot. The big prize is in back though. Follow the ledge over to a little nook. There’s another pile of rubble here for the Crossroad’s Drifter quest.
Go back out to the road and advance further. There’s a Glass Phylactery here if you want to fight a revenant. It’s your call though. Remember to save first. The end of the road has a lot more darkspawn. There’s an emissary waiting for us too. You should be able to just rush the emissary and kill him. If you can do that, the genlock archers will die quickly. There’s a lot of traps though, so be careful. There’s another bronto and a few more archers down the road. They will probably rush you near the end of the fight. It’s no problem though, as long as you aren’t too hard.
If you can’t do this, then you can draw the emissary and two genlocks down to an ambush with a little baiting. Then you can grind through the rest easily.
Loot the area and look at the rubble pile to get the third note on the Crosscut’s Drifter. We’re almost done. Go down the road to the last unexplored tunnel. There’s a fair amount of deep stalkers in here. I hate being repetitive though. Basically they’ll spawn in groups when you enter the caverns in this tunnel. Just stay close to one another and cut them down.
Leaving Caridin’s Cross
The important thing in here is the bloody sack with the head in it. This should finish the collections for the Asunder quest.
Once we’re done, you should move on over to the exit on the left. Right next to the exit, there’s the final rubble pile. This should spawn the Drifter’s Cache on your map. It’s back by the alpha ogre we fought earlier. It’s also marked on the mark, so just had on over. We need to go to the south exit anyway, so it’s not out of our way.
The south exit on the map will be labeled as Ortan Thaig. That’s our way out. Go through this exit to unlock it on the deep roads map. Note that you can flip it back to the world map and go to camp if you have injuries or want to do some selling. You can then just go back to Orzammer and use the mine entrance again.
This post is part of the series: Dragon Age: Origins Walkthrough - Orzammar - Part 1
Orzammar is a huge city with a whole lot of quests. This first part of the guide will cover the beginning of the main quest. This should take you through the first task for Harrowmont and Bhelen, clearing out the Carta Hideout, and your first trip to the Deep Roads. If you need help, look here.
- Dragon Age: Origins Walkthrough - Orzammar - Finding Orzammar
- Dragon Age: Origins Walkthrough - Orzammar - Bhelen’s First Task
- Dragon Age: Origins Walkthrough - Orzammar - Harrowmont’s First Task
- Dragon Age: Origins Walkthrough - Orzammar - Killing Jarvia
- Dragon Age: Origins Walkthrough - A Paragon of Her Kind - Caridin’s Cross