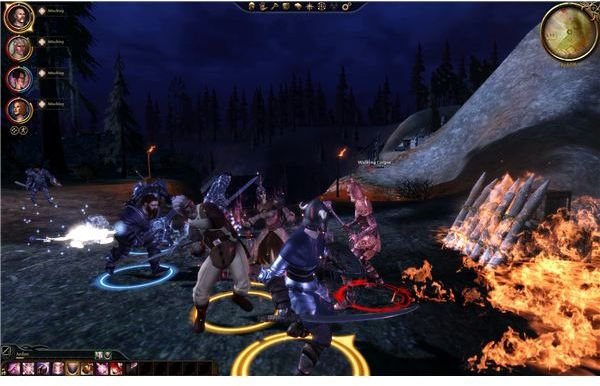
The undead hordes are coming from the castle. We need to help the knights and the militia hold off the attack and defeat all of the corpses if we want to survive and clear out a path to Redcliffe Castle.
Introduction
This isn’t actually a very bad fight. This is also coming from a guy who got his butt kicked by the mercenaries in Lothering a few minutes ago, so that should tell you something. If you followed my guide, then you should have plenty of help. This one is a two part battle and we’ll be fighting walking corpses the whole night.
Protecting the Windmill
We start off at the windmill for the attack along the castle road. To start with, we have a lot of knights along with Berwick, Dwyn, and his thugs. They will have little trouble surviving. If you set up the oil trap, then the barricade will be on fire. This fire works both ways. If you or a foolish AI wanders into it, then they will take a lot of damage. This can actually really hurt the knights and make this much harder than it needs to be. The secret seems to be waiting a bit back with the knights and letting the walking corpses come to you. If you don’t fight near the flames, then they’ll stay back and only activate once the walking corpse is close to you.
The problem with this fight is that it’s a bit buggy. There should be a fairly steady attack. I’ll ballpark it at about 20. They’ll wander in down the path and should be in perfect range for an archer in your group. They should then wander through the fire and lose about 1/3 of their health. At that point, you just have to surround and pound them. It’s actually pretty easy, except for the occasion when a small group comes through at about the same time. Then you’ll have to use a few of your talents and better spells.
If the battle by the windmill isn’t ending and you don’t see any more walking corpses on the slope, then save and run through the fire quickly and climb the slope. There might be one or two up here that aren’t coming down. Just kill them up here to trigger the next part of the fight.
Saving the Militia
The militia are pinned in and being attacked from the direction of the lake. You need to follow the archer down the path with your party and get ready to jump right into the fray. You’ll arrive with the battle already in progress. You need to get inside that barricade and split up to kill off the first wave. Look for a few walking corpses that might have yellow names. These are a bit stronger and a real threat. Focus on them until the barricade is cleared.
Aiding the Militia
From that point on, things get a little tricky from a guide standpoint. We have a fair number of militia fighters, but they aren’t as strong as the knights. They are generally in better archer positions though. Lloyd will also be here, but he really likes to run out of the barricade and get himself killed. He’s portrayed as a cowardly jerk, so no real loss. The battle gets a little random besides this, though. Ideally, you need to save them all. You’ll get a nice helmet if you do, but it’s not worth the pain of a few reloads to get it perfect. It’s much easier to keep all of the nameless NPCs alive if you have a mage in your group who knows how to heal. They can heal allied NPCs, so just pause occasionally and check the health of the militia. You can just hold down TAB to do this for the big group.

Other than that, it’s just like the first fight. You need to keep your group in the rough center of the little fort and attack the walking corpses as they come into the fight. The militia are pretty good with their bows, if you can keep them alive. This means rushing to the aid of an archer who comes under attack. The swordsmen can hold their own for a brief bit, but archers are in real danger.
The good thing about the fight is that you should be able to keep everyone in your party alive. I only had to keep an eye on Sten and make him drink a poultice once. You might have to watch your mages though, since running out of mana isn’t out of the question. Talents should be safe though, since the walking corpses trickle in and give you plenty of time for cool downs to wear off.
Once you’re up a bit in level, you can do a lot more. This should be enough for handling it on a first playthrough though. Just like before though, the fight with the walking corpses might not end. This means that a walking corpse is stuck somewhere. Just walk out a bit to either trigger the script or find it. Then kill it to end the battle and get a loading screen.
You should receive your rewards here too. Any survivors can be seen around the village and talked to for a little debriefing. Your next stop is the castle. Talk to Bann Teagan when you’re ready to charge the castle.
This post is part of the series: Dragon Age: Origins - Redcliffe
Redcliffe will be one long battle for you wardens. You’ll have to defend against a siege of undead, storm the castle, and then deal with the desire demon causing all of the trouble. If you need any help with the Redcliffe side quests or main quest, then just look here.
- Dragon Age: Origins - Redcliffe - Preparing the Village
- Dragon Age: Origins Walkthrough - Redcliffe - The Attack at Nightfall
- Dragon Age: Origins Walkthrough - Redcliffe - Odds and Ends
- Dragon Age: Origins Walkthrough - Redcliffe - Taking the Castle
- Guide to Dragon Age: Origins Quest: “Redcliffe - Conner’s Demon”