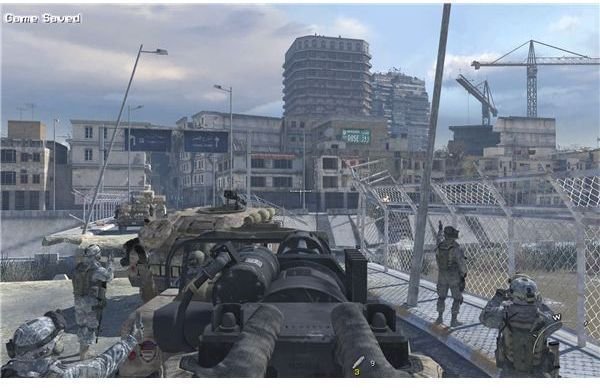
Five maps released for Modern Warfare 2; three new, two only new for players new to the series. Are you new to the maps, or do you just want to know what might be happening where you’re not looking? Maybe you want to figure out an alternative playstyle? Well, Look inside for tips and strategies.
Call of Duty: Modern Warfare 2 Map Pack Overviews
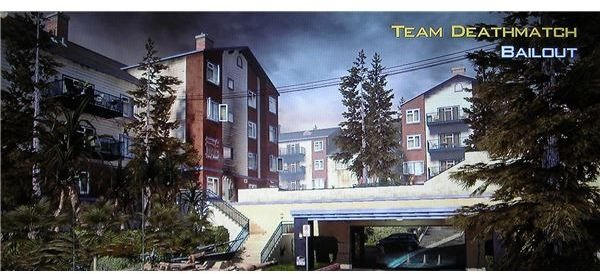
One of the three new maps released in the Stimulus Package for Modern Warfare 2 is Bailout. Themed around suburban america, based off part of the single player campaign, this map is generally divided into two styles of combat. Explosives and sniping takes place in the wide open middle sections of the map, while the ring of buildings on the outside brings close quarters weapons into play.
New Map: Bailout
One of the three new maps released in the Stimulus Package for Modern Warfare 2 is Bailout. Themed around suburban america, based off part of the single player campaign, this map is generally divided into two styles of combat. Explosives and sniping takes place in the wide open middle sections of the map, while the ring of buildings on the outside brings close quarters weapons into play.
Domination A is probably the easiest point to hold. Set in a corner next to a wide open parking lot, anyone sitting on it to capture it is a prime target for a tube. They have some small cover from bullets and may be able to survive with a riot shield and blast shield, but chances are they’re likely to die. This makes A the more advantageous place to spawn.
Domination C is in an underpass, and anyone spawning there has to climb up stairs or run up the sloped road to get anywhere. Uphill fighting all the way. Most players will either run up the road to the building containing B, or they will run to hide in the building between A and C. Defenders of C will have to overlook the incoming road, the house between A and C, and the swimming pool area where B lets out. Thankfully, one building gives a talented sniper plenty of windows to oversee that whole area.
Domination B is the most heavily contested point, and for the most part will be the deciding factor of the game. It’s on an open ledge, allowing players from the house across the road to tube or snipe anyone in the open. On the other hand, it has plenty of cover that lets you hide from most assaults and hopefully capture the point. Be wary, though, because the point itself is likely to be constantly exploding, with bullets sprayed through the air.
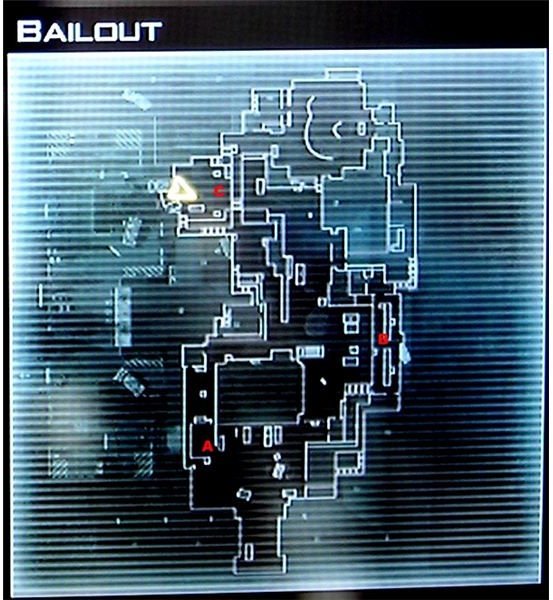
Domination on Bailout is somewhat balanced. The constant fight over the B point allows one or two players to sneak around and capture A or C. However, because of the layout of the map, C is less prosperous to have. Spawning at C, many players will run for A and try to take it while the A team rushes for B. Most of the time, the team holding C is probably going to lose.
New Map: Storm
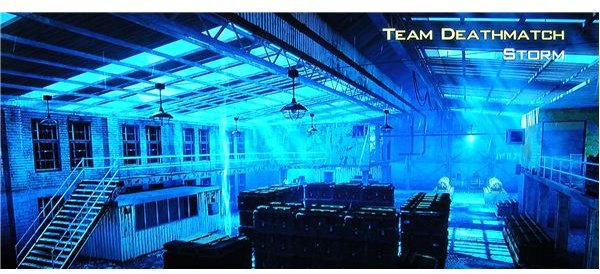
Second of the three new maps in the map pack is Storm. Storm is a reminder of the enclosed spaces of Scrapyard, with the rainy atmosphere of Underpass. Thankfully, it lacks the mist that makes Underpass a haven for thermal snipers. The main draw of Storm is the central warehouse, which contains the B Domination point, has multiple entrances and exits, and several catwalks to be watching.
The Domination B point is where most of the fighting will take place. There’s not much of a roof, which allows killstreaks some room to work, though helicopters have a harder time shooting inside. The most dangerous weapons are the SMGs and assault rifles, that will accurately pick off anyone in the warehouse without being too slow to evade death. Given it’s location in the center of the warehouse, with only minimal cover, the B point is also prime for explosives.
The Domination A point is easier to defend off in one corner of the map. It’s relatively out of the way, and to access it, players must cross one of several long open sight lines, where snipers can easily pick them off. Above the point is the famous mannequin room, filled with person-shaped objects that are easy to hide among. The open roof nearby is easy to shoot from, but just as easy to be killed on.
Domination C is much closer to B, and thus involves much more fighting. It’s also the primary place to become spawnlocked. If you hold C, you HAVE to hold B, otherwise you’re unlikely to make much headway. A is harder to spawn lock due to it’s distance from the center and from the other spawns, but C is right in thick of it. The corridor from C to the upper right corner is easily covered with nearly any gun. Meanwhile the other exits can be covered from the building in the lower left corner. This leaves the exit into the B area, just as easily covered with a shotgun just inside, claymores, or even a prone sniper.
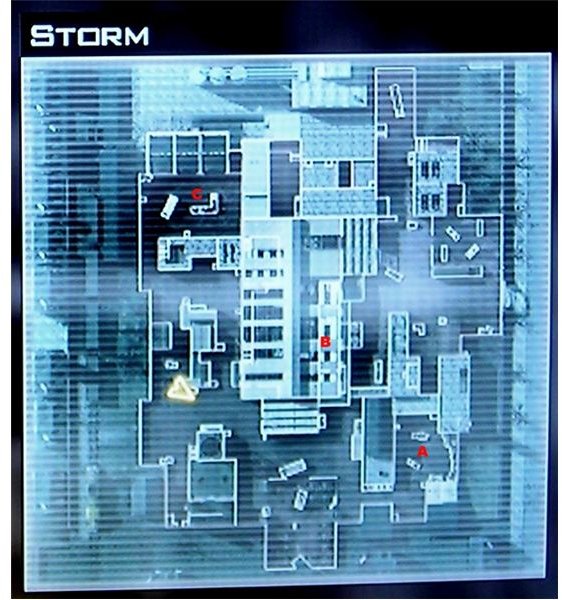
Storm in Team Deathmatch has an interesting spawn; the small indentation in the lower left is the border of the map, but players actually spawn to the left of it. Once they drop down into the map they never spawn there again, and it’s impossible to get back up. The position isn’t very tactically relevant, save for the occasional camper, however. There’s no cover and not much in the way of lines of sight to kill from. Not to mention that the closed space of the warehouse makes blade running viable.
New Map: Salvage

Third of the three new maps in the stimulus package is Salvage. Much like Derail in weather and color schemes, Salvage shares little with it’s wintery cousin. The map is, for the most part, a tight enclosed space that focuses on mid-range and short range battles, with only a few small lines of sight for snipers. The fighting tends to be rather spread out for this reason, though the players spawning at C have a slight advantage.
The Domination A spawn is distant and has few swift access points to the other locations. The corridor from A directly through the center of the map may seem like a good idea, but it’s easily covered by a tuber or a sniper from the house on the left side. Most players spawning at A will split off to run to either B or C. This means the fighting will depend on where the other team chose to charge.
The players that spawn at C will be able to take it easily, but it’s just as easy to lose. For most of the early game, defenders will only have to watch the gate to the A area, which is a single doorway and an easy choke point. However, the near-constant flurry of
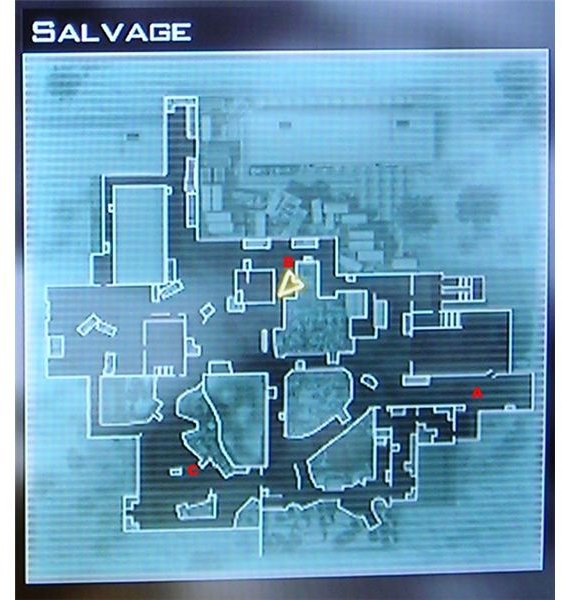
flashbangs, stun grenades, tubes, and bullets makes cover necessary, which allows players to push through. Flanking later will cause a problem, where one player with a silenced gun can decimate the defense and take the point nearly single-handedly.
The B point consists mostly of a couple of tight corners, ideal for bounding frags around. It’s easy to defend with a shotgun, but hard to race back to if you die. B is most likely going to be the most contested point in the map. For this reason, unless the A team is spawnlocked early on, the battle will be hard fought. All that makes Salvage possibly the most balanced map. Killstreaks have open sky to work with, though, so be cautious when something’s in the air.
Returning Map: Overgrown
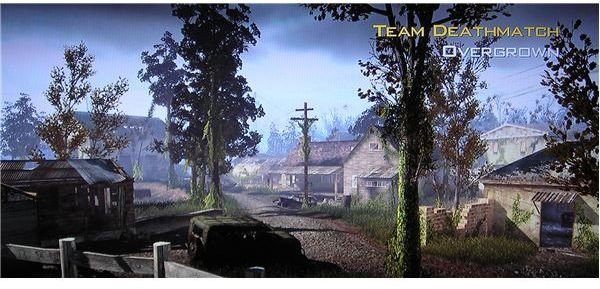
First of the two returning maps from CoD4 is Overgrown, everyone’s favorite sniper hangout. For the most part, the map plays the same, though explosives take a much larger role due to their prevalence in this particular iteration of the series.
The Domination A point is on the small wooden bridge, and unless you’re prone while taking it, a sniper spawning near C can fairly easily peg you. However, the spawn puts you closer to B than the players that spawn at C, so if more than one or two people rush B they can take it before the C players have a chance to defend. From A, players can rush the barn and use tubes or snipers to oversee the C point, while others rush into grandma’s house to root out defenders. A skilled team can make a push through A and take C while the C team takes B, leaving the map evenly divided by the middle.
The C point is relatively open, at least on the A side. It’s easy to tube and easy to snipe, and the many windows in grandma’s house allow an assault rifle to shine just as well. Of course, players will love climbing onto the roof, just like always. Unless their team is good at supporting them, however, being on the roof means being a sitting duck .
The B point is more contested than the other points, but also somewhat easier to defend. When it comes down to it, it has three entry
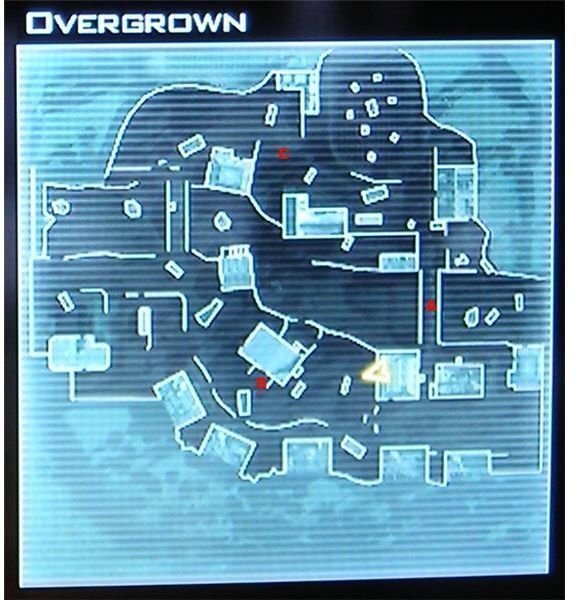
points; the two bridges and the center doorway. A couple of players holed up in the building over B will be able to defend the point with relative ease, allowing the rest of their team to put pressure on the other points.
Unlike other maps, this one doesn’t have an easy way to spawn lock the opposing team. Nothing so glaring as A on Terminal, or behind the caves in Afghan. Also fortunately, whoever ported the map over fixed the glitch where players could get beneath the creek and camp without worry.
Returning Map: Crash
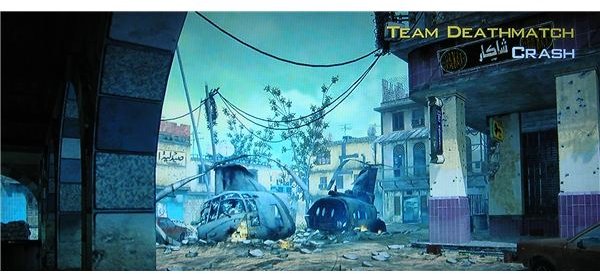
Second of the two returning maps from CoD4 is Crash, and it’s probably the most absurd to play. Unfortunately, against a good team, the players that spawn at A will lose. This is due to the spawn system and the limited access from the A point.
The A point pretty much has three exits; the long alley down the bottom of the map, and two slightly branching paths through the blue bombed out building. All of these exits are easily tubed, and the alley can be sniped easily as well. The players that spawn at A cannot afford to stand and take it; they need to rush B and/or C to try to force the spawns to flip before they get pinned.
The B point is in the wreckage of the plane and will pretty much be covered in smoke and constantly exploding for the duration of the game. The first team to take it is probably not going to lose it for that reason. It’s incredibly open and easy to defend with explosives. Smoke, a riot shield, and blast shield all working together are basically the only way to capture the point.
The C point is slightly out of the way. It’s easy to get to via the alleyway from A, but that alleyway is easily covered. The route through the three-story building is likely to be covered as well, leaving a twisting path through the center of the map as the only route. On the other hand, the players at C are more likely to be focused on spawn-trapping their opponents at A than they are to be defending C,
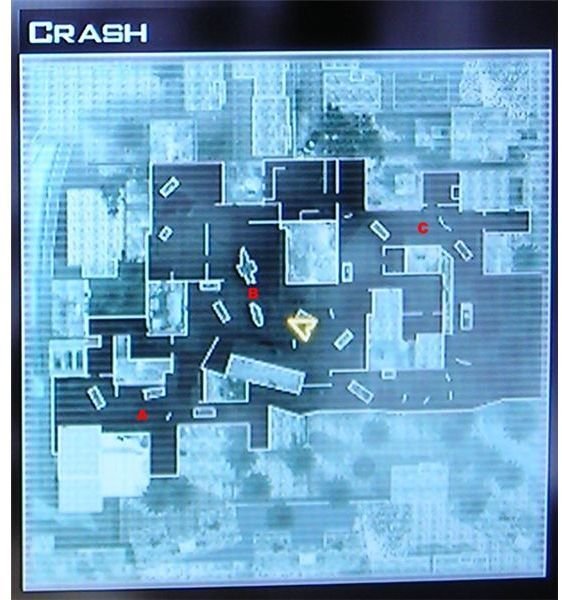
so a skilled player can probably capture C on their own. A swift action at the beginning of the map, to flip the spawns, can turn the tide of the game completely.
For those players who love to snipe from the top of the three story building, don’t. Not only are there numerous counter-sniping spots across the map, but the chain-link fence that surrounds the top will block explosives like RPGs and tubes. That means a single danger-close RPG impacting the fence can kill anyone on top of the roof unless they’re back in the far corner.
Like this article and want more info about Modern Warfare 2? Try checking out this guide to titles and emblems!
This post is part of the series: Modern Warfare 2 Map Packs
Reviews and guides for various Call of Duty: Modern Warfare 2 map packs.
- Stimulus Package: Modern Warfare 2 Map Pack Review
- Call of Duty Modern Warfare 2: Second Map Pack Overview
- Call of Duty: Modern Warfare 2 Map Pack Strategies
- Call of Duty: Modern Warfare 2 Map Packs: Are They Worth It?
- Call of Duty Modern Warfare 2 Resurgence Map Pack Review
- Call of Duty: Modern Warfare 2 “Stimulus Package” Map Pack