How to Set Up a World of Warcraft Authenticator
World of Warcraft hackers and phisherman have gotten much more creative in the last few years. Practically any long-term player of the game can attest to the frequency with which they receive incredibly well-done fake emails pretending to be from Blizzard, demanding an immediate log in to repair some damage done to the account or confirm some change that they didn’t actually make.
These emails contain links to fake login sites that look exactly like the real one, and if you’re not careful, you end up giving your account name and password to a scammer looking to quickly log in and strip your characters of gold and valuable items.
Blizzard, fortunately, recognizes the threat these scammers pose to the safety and security of their game. Which is why they’ve created the option for players to select a dual-verification login. With this extra security step, provided by a Blizzard Authenticator, it becomes nearly impossible for anyone to access your account without permission. You’ll also receive an in-game Corehound Pup pet, which is only available to those who have authenticators attached to their account.
If setting up this type of security is something you’re interested in, but you’re not sure to get started, this guide is for you. Below, you’ll find step-by-step instructions for adding the authenticator to your account and using it to log into your World of Warcraft account.
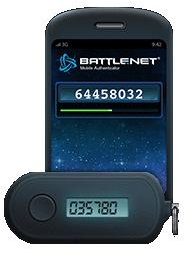
Battle.net Authenticator
There are two versions of the authenticator: the mobile version (available as a smartphone app) and the keychain version (available for $6.50 from the Blizzard Store). The smartphone app version is free to download and use, while the physical authenticator item will set you back a few bucks.
To get the smartphone app, search for it by name in your phone’s mobile app marketplace and download it to your phone.
Whichever authenticator you choose, the steps for setting them up are the same.
Connect Your Authenticator to Your Battle.net Account

To connect your authenticator to your account, you must first go to the battle.net site and log in.
After you enter your username and password, you’ll be taken to the Account Management page. In the top right corner, just above the list of your game accounts, is a link to Security Options. Click on it to continue.
On the next screen, you’ll be asked to choose between the Authenticator or Mobile Authenticator and the Dial-In Authenticator. For the purposes of this guide, you’ll want to choose the first option to continue.
Next, you’ll be asked to choose between the Authenticator or Mobile Authenticator. Choose the first option for the keychain version and the second option if you’re using the smartphone app.
For the keychain version, you’ll be asked to enter the serial number from the back of your authenticator and the code generated when you press the button on the authenticator. Once you’ve entered both, click on “Attach” to complete the process.
Battle.net Mobile Authenticator Setup
For the mobile app, you’ll be asked to send and respond to a verification email. Press the button to send the email, then check your inbox for the message. Click the verification address in the email to open a new tab where you’ll be able to continue the process.
In the new tab, you’ll have the option to download the iOS, Android, or Blackberry versions of the app, if you haven’t already done so. Once you’ve downloaded and installed it, press “Continue” to move on.
You will need the serial number from your specific authenticator app. This should appear when you open the app for the first time, or you can open up the “Setup” menu from within the app. Enter the serial number (don’t forget the letters at the beginning) and the code currently being displayed and press “Add Authenticator” to move on.
If everything was entered correctly, your authenticator should be set up and ready to use.
Use Your Authenticator to Log In To Battle.net
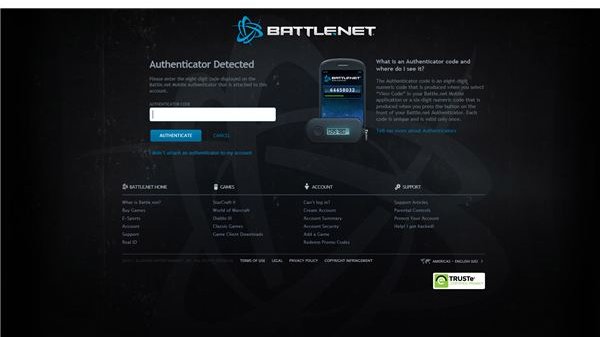
You will now need to enter the code currently displayed on your authenticator any time you log into battle.net or any other associated sites. You won’t be able to make changes to your account or post on the forums until you’ve logged in with your new credentials.
The process is fairly easy. Simply use your username and password like always, then enter the authenticator code on the screen that appears afterward. Once you’re in, the site functions as normal.
Use Your Authenticator to Log In To World of Warcraft
The process of logging into WoW works about the same way. Load the game the same way you always have, enter your username and password, then put in the code from your authenticator when prompted to do so.
It’s just one extra step, and it can be a bit tedious if you don’t have your authenticator handy, but it’s a small price to pay for knowing that your World of Warcraft account cannot be compromised.
References
All references from author’s experience.
Images from battle.net.
This post is part of the series: WoW Account Management & Security
A must read series of articles covering how to keep your World of Warcraft account secure and deal with other account management issues.