Wireless Network Adapter - Bringing Wireless Gaming To Your Xbox 360
Take Your Gaming Online
With today’s generation of gaming consoles, playing online is almost mandatory. There are so many benefits to gaming online that not utilizing wireless functionality is almost criminal. Thankfully Microsoft has provided an adapter that will allow you to free yourself from wires and still game online with everyone else. It’s called the Wireless Networking Adapter, and setting it up is fairly easy. Let’s walk through the steps then and get you gaming online immediately.
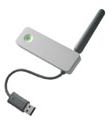
The Wireless Networking Adapter Stats
The Wireless Networking Adapter (WNA) is a bit costly (coming in at around $100), but the benefits in terms of online gaming capability make it worthwhile. Your only other option is to buy or make a long ethernet cable, which might not be feasible or cost effective. The adapter works well however, so it’s worth the purchase. The adapter is dual band, working at 5Ghz and 2.4Ghz. It’s compatible with wireless A, B, and G home networks, but if you have a wireless N network infrastructure, you’re out of luck. It uses the USB port on the back of your console, so there’s no need for power cords. It also works with Windows Media Center, so you can stream music and video through your console if you like. Although it won’t be covered here, there is also a separate stand (named appropriately Wireless Networking Adapter Stand) with a 6 foot USB extension cable you can purchase that will allow you to position it farther away from the console in order to lessen the impact of interference.
Physical Connections
Connecting the adapter to your console is fairly simple. On the back of your console (on the right side as you’re facing it) are two slots for the adapter to hook into. The adapter snaps into place easily, and it should sit fairly tight against the console housing. The USB cable then plugs into the port right below it. If you ever need to take the adapter back off, you’ll notice that you can squeeze the tabs on the sides of the adapter and then just pull. Be careful with the antenna, as it’s designed only to swivel straight up and not move side to side.
Connecting To The Network
Before you proceed to this step, you need to have some form of network infrastructure in place. If you aren’t already running a wireless-capable network, you’ll need to purchase separate networking hardware with wireless capability and connect it to your home network. If you’re unfamiliar with this process, you can find more information here.
Once you have your home network set up, it’s time to add in the console. You will need to make a note of a few things in preparation, such as:
- The workgroup name of your home network (802.11g/b networks only)
- The SSID or network name of your home wireless network.
- The security level of your home network. The WNA supports the use of WPA and WEP security. You can read more about these security standards here, but it is advisable to use WPA and most current network hardware should support it.
- An understanding of how you will deal with IP addresses and DNS. Although you do have the option to put in a static IP address for your console, it may be easier just to let your ISP or network hardware provide the relevant data. You can read a basic tutorial on this information here.
When you turn on the console, you’ll need to go to the System area. You will want to be using the dashboard for this, and make sure you don’t have CDs or games in the CD tray. From here you can enter the following network settings:
- Workgroup name (of your home network) - This applies only if you are connecting to a 802.11b or 802.11g network.
- Wireless Network network name (SSID) Wireless
- Security Setting (i.e. WPA or WEP
- Wireless channel (if you are trying to link two consoles together wirelessly)
Once you have inputted in these settings, you can test things to make sure it’s working fine. The WNA should show a steady green light if the console is connected to your wireless network, a steady red light if it’s waiting to be connected to the network, and a blinking red light if there is hardware failure. Once you are green, you’re ready to enjoy the fun of wireless console gaming.