Step By Step Guide on How to Make Maps for World in Conflict - Preparing the Ground for War
Map Making - The Basics
**
It is easy to make maps in World in Conflict. It takes about a half hour to complete a single map without any special skill.
Aside from a copy of the game you will need the following items from the World in Conflict website under the “Download” section:
- WICEd, the World in Conflict official editor
- The most recent World in Conflict patch
- Master list of maps and mods
Map Making
World in Conflict needs to be updated up to the latest patch for WICEd to install. Once this is done, open WICEd and select “New Map”. Now, you can take a look at all the sky and ground themes that you have available. We’re going simple for now, with a rural American Midwest themed-map, so select “clearsky01” and “greenhills”.

Name your new map something without any spaces in it and then select “Create”. The editor will ask you about two Generate boxes at this point. Check both, and then go have a coffee. This process will be time consuming, so be patient. Once the generating is finished, you should be viewing the empty terrain of your new map. You can move around your new map by holding down the right mouse button, while you move the controller toward the part of the map you want. You can rotate the camera by pressing and holding the middle mouse button and scroll the wheel to move up and down.
At this point you can begin playing with the terrain. You’ll find six buttons in the toolbox called “Terrain.” For fast and dirty editing the best thing to use is the “Pinch” tool. Choose the “Pinch” tool and move some terrain around to see how it works and feels in your hand. Select the brush size you want to use from the drop down list located at the top left and then start changing the terrain. If the terrain texture isn’t what you want for the terrain you’re making, don’t worry about it for now, we’ll take a look at that part later. You can make steep terrain, but don’t make it too steep. If you want to smooth it out a little, go over it with the “Smoothing” tool.

At this point, were going to make a road to fight over. Select the arrow in the toolbox to open the “Object Editor” window. Once the window appears, click the little road icon in the middle of the window. Under the Available tab below, there will be a list of road types. In this case, choose “Countrysideroad”, and then position the blue dot on the terrain where you want the road to begin, and then left click. A starting point will appear, then you move the mouse to make a section of country road and then left-click to create.
Play around with this until you understand what you’re doing. Notice how the ground automatically flattens to account for the road you create. Once you have the roads the way you want it to be, click the arrow in the toolbox to turn off the make road mode. To confirm your road, select the “Lock Road” button in the Object window, and then answer yes to the question that appears. Once you have the road in place, don’t alter the land beneath or near the road now, or the road will be misaligned, and vehicles will run off the road.
Now, choose the house picture in the Object Editor. You will see a long and disorganized list of objects for your map. Select something that is appropriate and left click on the spot you think the object should go. If you want to turn the object before you put it down, press down the left Ctrl button and left click. Should an error message show up, just move onto the next object on the list. If you’re placing down a building on the map, make sure at least one door to the building is left unblocked. When constructing a multiplayer map, don’t choose anything from the Dummy, Single Player, or Civilians folders.
Getting the Ground Ready

You can choose all of one kind of object using the buttons beneath the “House” icon. Once an object is in position you can move or turn it by choosing the arrow tool and clicking it. Once this is done, you can rotate it or move it by holding the Ctrl and Alt buttons. You’ll need to flatten the land before placing a building down. Choose the “Set Height” tool and smooth it over the terrain where the building will go until the dots turn green.
If you want to add trees, click the tree image in the Object Editor. The editor has a default tree which is available immediately, but you can switch to whichever one you like. You place trees as you did other objects, accept that you can use the brush tools to place large sections of trees all at once. Place large sections of forest that are thick and dense, but resist the temptation to overlap the sections too much.
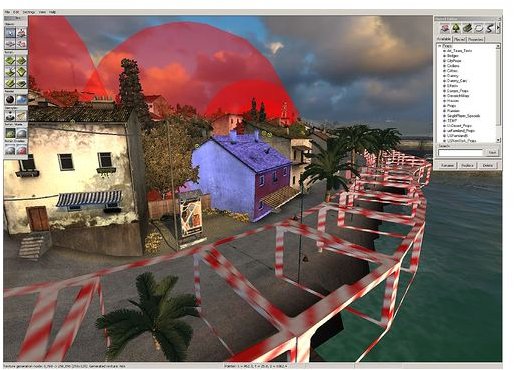
The textures of the objects and terrain that you have added will need to be updated. Choose the black render ball in the toolbox and the texture generator will appear. Your map is one large grid of tiles, and you can choose all or just a couple tiles to update at a time. The default setting is set for all the tiles to be done at once. In the ground render window, select all the check boxes and move the slider up to “medium”. Once things are ready, press “render,” and then have another coffee.
After your coffee, the terrain should have nice shades inside and outside the playing area, and the objects will have shadows to look at. You added a Command Point to your map, but you’ll certainly need more. Select the joystick icon in the toolbox and an overview map will appear. Right-click over the point you have recognized as strategic on the map and choose “Add Command Point”. A yellow circle will appear, right click over this circle, and then easily add two or three Perimeter Points. You can move Perimeter Points and control point around the map and place them where you want.
You also have the ability to move the deployment zones around and do the real designing part of the map construction. Placement of your control points is vital to the combat and entertainment level of your map. Deployment zones should be placed a good distance from your Command Points. You can also choose the game mode and the factions involved in the battles. If you want to edit Command Points or name them, do so in the Object Editor.
Once you have decided it’s time to take any of your World in Conflict maps into battle, go up to the file menu and select “compile.” A window will appear, just press “compile to SDF.” The editor will now get your map ready to be used in battle. This will take a few minutes, but when the editor has completed the job, you’ll have a file labeled with the name you gave your map in the format “thenameofyourmap.SDF” in the World of Conflict folder in your documents. The map should be available for use in the multiplayer map list the next time you load the game. The next part is the trial and error part. Play your map and make notes on what’s working and what isn’t, and then fix the problems.
References
- Screenshots created by Sheila Robinson.