Starcraft 2 Campaign Walkthrough: Covert Missions
The Devil’s Playground
**
Mission Objectives
- Main: Gather 8,000 Minerals
- Bonus: Locate Tosh’s Miners
- Bonus: Kill the Brutalisk
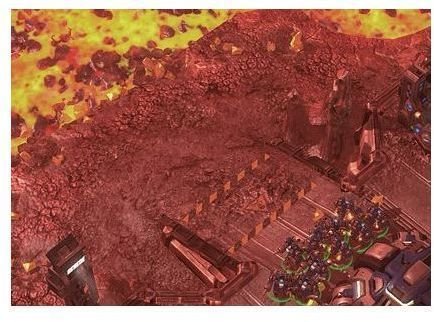
This mission has two gimmicks. The first is the lava. The lower areas of the map will occasionally be filled with magma, and anything on that level will be destroyed. The second gimmick is the mineral collection required to win. You must gather 8,000 minerals, but anything you build counts against that. The less you build, the quicker you’ll win.
The early game will focus simply on the production of SCVs, Marines and Medics. You’ll need to SCVs to mine, obviously, and the infantry to defend your base from Zerg attacks. The Zerg are never that aggressive in this mission, to be honest, but you’ll still want two bunkers on each choke along with some extra infantry for defense.
Early in the mission Tosh will give you some Reapers. These are infantry units that move quickly and can jump up or down cliffs using jetpacks. As you can imagine, they’re pretty useful on this map because they can cover a lot more ground when the magma is low. In fact, Reapers should be the focus of your offense once you’re given the ability to build them. A little later Tosh will ask you to rescue some miners at the north of the map. They’re cut off by a very small Zerg force. Go save them with Reapers to gain access to a free Command Center and some more SCVs. Use the command center and SCVs to mine minerals when your main base runs out (and it will). Oh, and make sure you lift the command center when the Magma rises!
At this point you’ll have steady income. Contine buildings Reapers and explore the map. You’ll occasionally come across small forces of Reapers who will join your army, making it even larger. In the south you fine the Brutalisk. He’s a super tough Zerg that can kill units in one hit, but he is super slow, so you just need to kite him. Once you’ve reached 8,000 minerals the mission will end.
Welcome to the Jungle
Mission Objectives
- Main: Gain Terrazine (7)
- Main: Protoss can’t seal 7 alters
- Bonus: Find Protoss Relics
Time is of the essence in this mission. You need to gain seven units of Terrazine gas which can be obtained by mining it with an SCV at one of the alters on the map. Each alter will give you one unit. However, the Protoss forces on this planet hold Terrazine sacred and don’t want you to take it, so they start sealing alters. If they seal 7 alters you won’t be able to obtain what you need and you’ll lose the mission.
As a result, this mission is basically a race. You will need to quickly build a small, mobile Marine/Medic force. Supporting this force with Goliaths is also a good idea. You’ll face a lot of Protoss air units, so avoid building units that can’t shoot up. The basics of this mission are simple - move you with a small force, secure an alter, and mine from it. However, the Protoss will counter-attack, so you absolutely must protect your SCVs. The key to this mission is to not allow yourself to be paralyzed by a fear of moving out. A twenty-strong infantry force with a few Goliaths will be sufficient to take on most Protoss opposition, and it is a good idea to build up to three of these armies so that you can secure multiple alters at once.
The bonus objective asks you to secure three Protoss relics. The first is near your main base to the north. It is undefended. The other two relics are in Protoss bases at the far north of the map. Securing these can be difficult, but it is far from impossible. You’ll simply need to build a larger army and bash your way inside. Once you have gathered 7 units of Terrazine the mission will end.
Breakout
Mission Objectives:
- Main: Destroy the prison base
- Main: Tosh must survive
- Bonus: Kill Guards at Block A
- Bonus: Kill Guards at Block B
This mission is all about controlling Tosh. Raynor will be send in forces to attack the prison in waves, but they won’t be able to prevail alone. You have to use Tosh to turn the battle towards your side.
Most of this mission is linear. The beginning has you move north to take out some prison base guards in the form of Marines. This is easy, because Tosh can cloak and the Marines have no detection. Pick off the first few groups of Marines and take out any bunkers you see as well.
The first challenge of the mission occurs when you come to a group of Marines next to a turret that can detect you. This situation can be resolved by using Mind Blast to stun the Marines and then taking out the turret. With it gone, the Marines won’t be able to see you, and you can take them out easily.
You’ll move on to find another turret, this time with a siege tank nearby. In this case you’ll need to use the Psi Shield ability to absorb the Siege Tank’s shots while you destroy the turret. After this you’ll come to a choke point that is heavily defended. There is a path to the side, however, that you can use to walk around it and snipe enemies from outside the detection range of the nearby turrets. The waves of forces sent in by Raynor will help finish of this defense. If Tosh is ever heavily damaged you can heal him by placing him next to one of Raynor’s medics. She’ll stop and heal Tosh.
The rest of the mission follows this same pattern. The bonus objectives focus on letting some prisoners out of two cell blocks. These prisoners will take up arms and help you. Cell block A will require that you use Psi Shield to absorb some blows and take out a siege tank. Cell block B can be defeated by careful positioning.
Once you’ve reached the end of the map you’ll come to the good part - you get to drop some nukes! Sneak onto the cliffs surrounding the main prison base and make it rain fire. Raynor’s forces should be able to handle the rest.
This post is part of the series: Starcraft 2 Walkthrough
A complete walkthrough of the Starcraft 2: Wings of Liberty single player campaign.