RPG Maker VX: Custom Tileset
Replacing the Old with the New
In a previous article, I introduced the basics for creating your own custom tiles for your game. In this article, I will give in-depth explanations as to how to proceed. I would recommend reading the previous article first in case you’re new at incorporating new art to RPG Maker VX as I will go straight to the actual creation in this article.
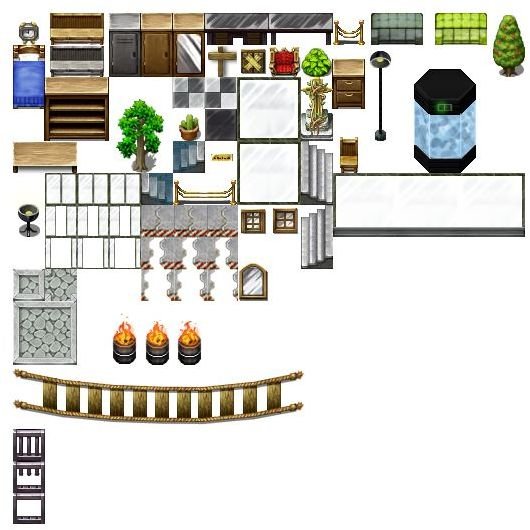
To give you a better idea as to what can be achieved with a bit of time and practice, here’s a sample of tiles I have created by rearranging the default tiles of RPG Maker VX.
Creating Original Art
The problem with most games is that they end up using the default tiles included in RPG Maker VX. The constant repetition of projects using the default art makes it difficult to differentiate projects.
Projects which use their own art are usually more attractive and more likely to catch the eye. Only the thing is that, creating art which will fit in harmoniously with the VX “style” is very difficult and only the most talented artists succeed at doing so.
The best solution lies in rearranging the already existent tiles to create new, unique art. Although this does require some creativity and some artistic skill, it is definitely much more accessible to just anyone.
The process of dissecting already existing art and reassembling it into new creations is known as “Frankenspritin****g” (like the monster).
RPG Maker VX Custom Tileset Tutorial: Step #1
First thing you will need is your template. Click here to download the template (linked images in articles are formatted and thus become useless in RPG Maker VX).
Step #2
Once this is done, load Photoshop (or Gimp if you’d like a free alternative) and go ahead and open up your tile C graphic sheet.
After that, look out for the bookcase and select it with the “Rectangular Marquee Tool” (or simply press the shortcut “m” key).
Look here to have a better idea as to how to proceed:

You have now selected the object you would like to modify.
Step #3
Right click your selection and a submenu will appear. Choose “Select Inverse”, it will be the second option from the top.
Once you’ve done it, press the “delete” key on your keyboard. Everything but your selection should be gone. You will now have free roam to work without having the rest of the art getting in the way.
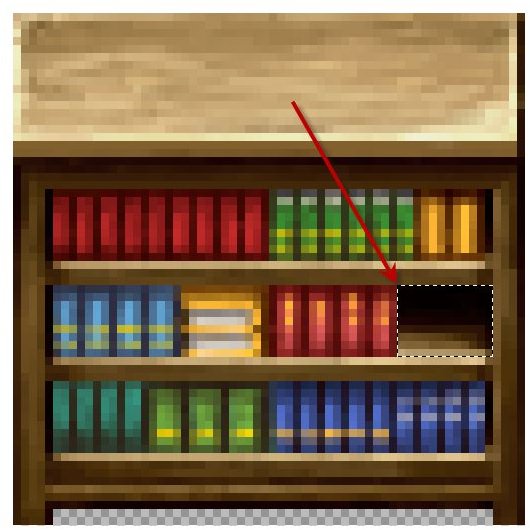
Step #4
Look closely at the second shelf of the bookshelf, on the right hand side. You’ll notice an empty area (no books). In case you have trouble seeing in great detail, press CTRL+ to zoom in on the piece of furniture. Select this empty area with the Square Marquee Tool (same tool as before) like so:
Step #5
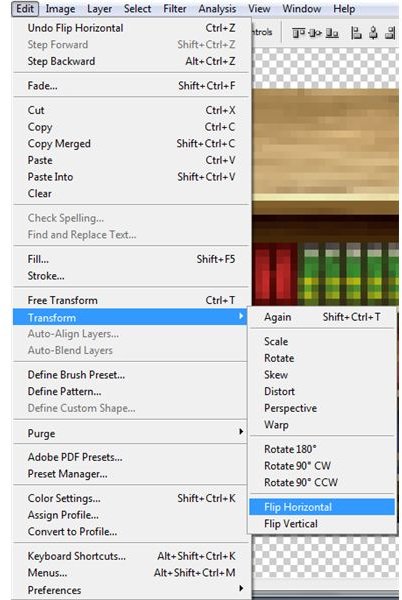
Press “V” on your keyboard, this will activate the “Move Tool”. While holding down the ALT key, move the selection all the way on the left side of the same shelf.
Then, go in the EDIT menu, and select Transform, Flip Horizontal, like so:
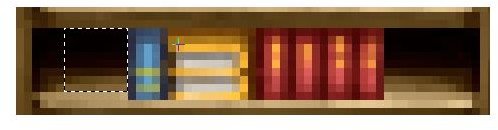
This will flip your selection so that it creates the other empty end of the shelf like this:

Step #6
All you have left to do is to change the appearance of the middle of the shelf.
Deselect your current selection (CTRL+D). Then go ahead and select the empty area (either side is ok) without the left or right corner.
Make your selection something like this:
Using the Move Tool (“V” on your keyboard), hold down ALT and cover the entire area filled with books.
Afterwards, zoom out (CTRL-) until your image is back to its original size (100%). If you feel like some pixels are too apparent, go ahead and touch up those areas.
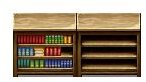
Once your shelf is empty and looks good in its original size, select it and replace the other two shelves of the bookshelf.
And that’s it! You’re done (default art on the left, new art on the right)!
Another good way of ending up with your very own RPG Maker VX Custom Tileset is to select various parts of different items and combine them into one new object. Pay close attention how the tree and the bush were created in my sample at the very beginning of the article. Start experimenting and before long you’ll end up with a unique RPG Maker Custom Tileset which is sure to catch the eye of potential players!
This post is part of the series: RPG Maker VX Tutorials
The continuation of our RPG Maker VX guide right here at Brighthub.