How to Build a Cheap Gaming PC
Introduction
Gaming computers can go out-of-date very quickly, and you can’t always upgrade your existing system to the latest and greatest. Fortunately, it is possible to build a great gaming PC for around $500; a computer which you can add better parts to if you want as you get the money.
In each category below is one main part that you will need for the project. A little description of the part is needed as well as some tips on what to look for when you’re out shopping. A link is also given to one of many products that will work for your gaming PC. All of the parts in this guide will work together, so you can build it directly from this guide. All of the links are to either Newegg or TigerDirect, although there are many other websites out there to get great deals.
Processor
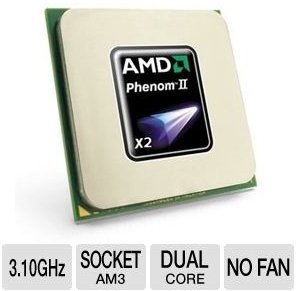
Basically, you need to first choose whether you want to go with an AMD or an Intel processor, since this will also determine what kind of motherboard you will need. Intel chips are usually used in gaming machines, but AMD has made a lot of headway in this area in recent years. AMD will also be less expensive for similar performance. The AMD Phenom II X2 550 is a fast, dual-core processor at a great price for only $70.00.
The processor will come with a heatsink/fan. The heatsink will have a thin layer or really cheap thermal compound on it. I always remove that and replace it with Arctic Silver thermal compound, which offers much better transfer of heat, and therefore more protection from overheating. It is currently selling for only $9.99.
Motherboard
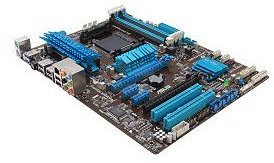
The motherboard is one of the most important parts, as everything you are able to add to your computer will be dependent on whether or not the motherboard can support it. The motherboard I chose was the ASUS M5A97 R2.0, for $89.99. When looking for a motherboard, make sure it has the following features:
-
ATX - You want an ATX one, not MicroATX. That determines the size of the board as well as the size of the case you can get. I would stick with ATX.
-
Socket - Make sure the socket size on the motherboard is the same as the processor you picked out. On some websites, you can buy these as a combo. In this guide, the processor is an AM3 socket, which will work with both AM2 and AM3 motherboards.
-
Memory - Beware of some really cheap motherboards that only support really slow memory (like PC5300 or PC4200). For a gaming rig, you will want your motherboard to be able to use DDR2 1066/800. It should also support dual channel memory.
-
PCI-E 2.0 - The motherboard should also have at least one PCI-Express 2.0 slot available. You will not be able to do SLI or Crossfire, but you will still be able to use a very fast graphics card.
Power Supply

This is a part that you don’t want to spend a lot of money on, but you need to make sure that you have enough power. I chose the Antec Continuous Power ATX12V for a few reasons. First, at $64.99 it was a good deal for a 550W power supply. I trust the name Antec (as well as Thermaltake), which to me makes a big difference as I’ve read that some of the really cheap ones can have some power surge issues. I can’t afford to take that risk.
Video Card

Make sure that the video card you buy is PCI-express 2.0 and also supports at least DirectX 10. This is a part that you don’t want to skimp on! This is the life and blood of your gaming experience. I chose the PNY Quadro NVS 310 GT 512MB, which is reasonably priced at $109.99, and supports DirectX 11. This will provide great graphics for the value.
Memory
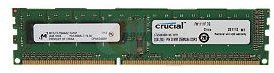
Assuming that your motherboard supports 1066/800Mhz memory, I would go with the 850 right now unless you just kind a killer deal on the faster 1066 memory. In this way, you can always upgrade to the faster memory if the funds become available. I am very picky about the brand of memory that I use in my computers. I usually stick with Crucial or Corsair, not that there aren’t other good brands out there. For this machine, I went with the Crucial 2GB 240-Pin Desktop Memory Model for only $11.99. I’m going to start out with 2GB and then save money to add more memory, 1GB at a time.
Hard Drive
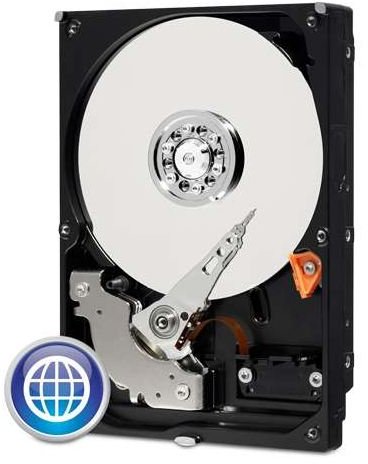
Buy a hard drive with the largest capacity that you can find and afford. I would recommend sticking to Western Digital or Seagate, as they are known to be the best. I used to recommend Maxtor, but in the past year, I’ve had two of their drives die on me (they stopped spinning), so I can’t in good conscience recommend them anymore. Stay away from Samsung and Hitachi. I chose the Western Digital 320GB HD, which cost $66.99. You will be able to find an even better price if you can find one of these online.
CD/DVD Burner
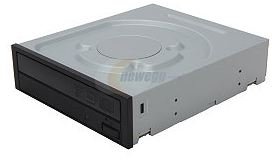
These are so inexpensive, and any model will do. Here, I chose the Sony Optiarc High Speed DVD RW Drive, which is $34.99. Many are available for $17-25, so if you want to save even more money, I see no harm in going with an off brand. I stuck with the Sony because I’ve had really good luck with these burners.
Sound Card
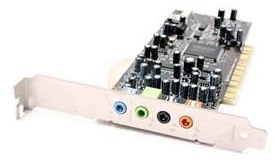
For some gamers, the onboard sound that comes on the motherboard may not be enough. If you have just plain 2.1 channel speakers, I probably wouldn’t spend the money on this unless you just have some left over. If, however, you using a gaming headset or have a 5.1 or 7.1 computer speaker system, then you will definitely want to buy a separate sound card, which pops right into a PCI slot. I chose the Creative Sound Blaster Audiology card, which will improve your sound experience quite a bit for only $27.99. For an additional $30, you can get the gaming version, which offers an even better sound targets specifically at the in-game sound.
Computer Case
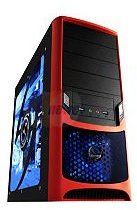
Finally, we need a case to put all of these nifty components in. Make sure that the case you select supports the size motherboard that you chose, in this case, ATX. The design and style are up to you. Beware of the really cheap cases that run between $15-30. I have read that many of them transmit static electricity much easier, and there are horror stories of people shorting their motherboard out through simply touching the case on those dry, winter mornings. I chose the RAIDMAX Tornado ATX-238WR model, at $44.99, as it seems to have everything that I need.
Conclusion
When you add the prices of all of these part up, the total is $531.91. In many cases, you can find free shipping online; otherwise, it will add some extra cost to your total. Your price could be cheaper than this if you shop around, which is something I didn’t really do for this article.
The other thing you need to think about is how you are going to put Windows on it. If you have a copy of Windows that you are able to use, then you are set. If you need to buy a copy, then that is going to cost you a few hundred more. Try to get an OEM version from an online computer retailer.
You’ll also have to think about a gaming mouse and keyboard, if you don’t already have one. If you are replacing a computer, you should be able to use those peripherals from that.
Overall, this will be a great gaming machine with power, reliability, and speed. Make sure that you keep all of your warranty material together, as you will need it in case there are any issues within the first year.
For up-to-date recommendations of parts lists to build your own home or office computer, file server, or gaming PC, see our list of build guids here.