Mass Effect Rogue VI Guide

The Rogue VI Assignment in Mass Effect is probably one of the most challenging. Unlike most of the other side-quests that you’ll be assigned through-out your Mass Effect experience, this particular assignment requires you to infiltrate buildings full of enemies. Each one is more challenging than the next, and one mistake can prove fatal.
You’ll find everything you need to know in order to successfully complete Rogue VI.
Getting Started
First and foremost, you need to be level 20 or higher for this assignment to accessible. Once you’ve reached level 20 and travel to a different system on your Normandy ship, Admiral Hackett of Alliance Command will contact you and ask for assistance.
Hackett will explain that something very strange has happened to a VI at an Alliance training ground on Luna. The VI has turned hostile, and attempts to shut it down have failed. You will be asked to take it out.
After you accept, the Local Cluster will appear on the Galaxy Map, along with the Sol system.
Landing
Travel to the now accessible Local Cluster. Once there, head over to the Sol system – it’s the only system in the Cluster. Locate planet Earth, and look for its moon – Luna.
Once you’ve touched down on the moon with your Mako, have a look at your map in order to locate the training facility’s position. Travel there.

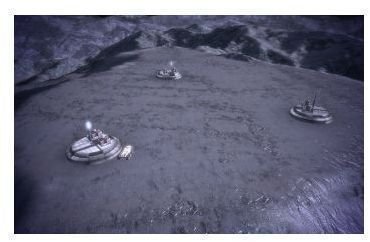
As you approach, you’ll see that there are three buildings – you will be required to clear out all of them. All three of them have two turrets each, and have extremely high shields. There are two ways you can go about taking them out. The first is more dangerous, and has you circling around each building while firing upon its turrets.
The second way, which is advisable, has you staying at a distance from the turrets and taking them out from there. The reason why this way is advised is simply because at a distance, dodging the turrets’ rocket-shots are much easier.
Once all of that has been taken care of, enter any one of the facilities – it doesn’t matter which one.
The First VI Bunker
Upon entering you will find an empty room. Proceed until you find a door to the left. Once you’re past that door – it’s time for you to get ready for combat. The main room –the room the above directions lead you to– contains, in total, nine Advanced Assault Drones.
These Assault Drones can be very tricky to deal with, so it’s recommended that you don’t just rush into the main room with guns blazing. Instead, you should think tactically. You’re going to need your squad members to stay alive or else you’ll quickly become overwhelmed. You should also make full use of your abilities – this includes your squad members abilities. If you can, try using Sabotage as much as possible.
Once the Assault Drones have been taken of, head on over to the end of the room. You should see eight “!” marks on your map. These marks represent the VI conduits that you need to destroy – simply shoot them until they explode.
Once you’ve done this, you’ll be notified that toxic gas is present. You can now leave this bunker.
Note: When you are given the notification of toxic gas, each VI junction that you blow up will inflict toxic damage to anyone or anything near it – this includes the Assault Drones.
The Second VI Bunker
The second bunker that you will enter is going to be a bit more challenging. The rooms are all shaped the same, but this time around you will encounter seven Advanced Assault Drones and two Advanced Rocket Drones.
The presence of Advanced Rocket Drones changes everything. You should now focus more on cover. It’s advised that you get the drones’ attention by shooting at them, then fall back and hide behind a crate – make sure your squad isn’t out in the open either.
Once you’ve done this, the Assault Drones should be making their way through the extremely small hall-way. Now is the time to use every possible ability that will effect them – including squad members. If your character has this ability; use Carnage. Ordering your squad to shoot at certain drones as they make their way through is also a good idea, just make sure you time it correctly.
If you’re being overwhelmed –which is extremely easy for any of the bunkers– fall back further. To avoid this, constantly use healing abilities and Medi-Gel. Once the drones have been taken care of, proceed to the end of the room and –once again– destroy the eight VI conduits.
Note: Once again, another defence mechanism will activate after destroying the conduits. This time, it will be Kinetic Barriers. They will appear in-front of each doorway, and every VI conduit. They are, however, pretty easy to destroy.
The Third VI Bunker
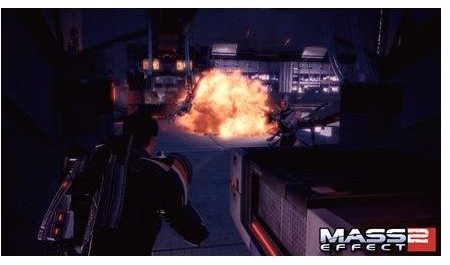
The third bunker will be your most challenging to get through. The enemies you must pass this time are four Advanced Assault Drones and five Advanced Rocket Drones. Like the second bunker, you should focus on luring the drones into the narrow hall-way by shooting at them and running back – making sure to seek cover as you do so.
After completing the second bunker, I don’t need to tell you how difficult the Rocket Drones can be – a direct hit from them could kill you instantly.
This time around –given the amount of Rocket Drones– you should really focus on abilities that disable their weapons and shield before launching a full-scale attack against them with your squad. Again, be sure to make your squad focus on certain targets, this will bring them down quicker.
Once you have dealt with the drones, head over to the next room and –for the last time– destroy the eight VI conduits. Upon destroying the first four, more Assault Drones will be activated in the next room. They shouldn’t be too hard to take out, but it’s still advised that you take cover.
Assignment Complete
Once you’ve done everything mentioned above, you should get a message giving some information about the VI’s “final moments”, along with a message coded in binary. Once de-coded, the message reveals one simple word: HELP.
Upon completing the assignment, you will be granted a specialization class that advances your current class depending on what it is.
This post is part of the series: Mass Effect Assignments Guide
In this series of articles, you’ll learn how to complete the many Assignments in Mass Effect.