Ultimate Collectable Guide and Walkthrough for Gears of War 3 - Act 1

Gears of War 3’s Epic Campaign
This walkthrough will assume you’re looking for collectables, playing on any difficulty you want, and that you don’t mind spoilers too much. We’ll try to avoid spoilers as much as possible but, as with any guide, it’s inevitable that some will slip through. To stay on the safe side, use this for your second playthrough, or use it with the knowledge that you’re probably going to be spoiled. That, or try to keep to the parts you’re on, and do not read too far ahead.
This Gears 3 walkthrough will be split up into Acts and Chapters. Acts are in separate articles, linked together at the bottom of the page. Chapters will be different sections of the article.
Good luck, have fun, and don’t forget: the fate of the planet rests on your shoulders! Unless you’re looking for something more multiplayer, in which case you can check out our guide to Horde Mode.
Prologue - Troubled Past
The game opens with a scene very much like Gears 1, with Marcus sitting in his jail cell waiting to be set free. Then you follow Anya and walk through the light to meet Marcus’s father, who is a scientist dealing with some swirly monstrous event. There’s a COG tag sitting in one of the rooms for you to find.You need to go in a door to your right at the very start.
You get your “tutorial” for the game as the world builds itself around you, while you fight some Locust. A few bullets later and a chopper will appear, and soon disappear. Then you wake up. How’s that for an intro?
Chapter 1 - Anchored

Once Marcus is up, you have your first chance to find a collectable. Before even leaving the room, look around. You should find a $20 bill to pick up. It’s the first of three collectables in Anchored. The second collectable is mere seconds away. In the hallway, turn right and check the room to your left. You should find Dom’s psyche report on the table.
Go to the room indicated on your screen and you’ll have a little scene with Dom. Once Dom is following you, check the next room down the hall. You should find a Requisition Form on the table. It’s the third and final collectable of the chapter.
You’re introduced to Points of Interest here, showing you an empty Lambent stalk. Those aren’t ominous at all, certainly you can ignore them. Instead, take a look at the game table in the middle of the room. Want an Onyx medal? Interact with it 2,000 times and you’ll earn it. That’ll take a while, so maybe you can stop around 1,500 and hope to get 500 more as you play the game.
Time to meet Jace. Get him to stop obsessing over a decade-old pack of mints and he’ll follow you to CIC. Meet up with Anya, decked out in COG armor, and learn that you’re here to meet up with Prescott, who ran out on you a year and a half ago. What does that jerk want? Guess you’ll find out.
You didn’t think it would all be this easy, did you? Soon, the Lambent will attack and it’s your job to blast them while you make your way to the deck. Once you’re there you get to blow up some bigger Lambent and make your way to the deck controls. Flip the switch and the Raven can land. Prescott strides in and takes command as fast as he can, and hands a disk to Fenix. On the deck you can find a box marked with the COG logo. There’s a body behind it that, if you shoot it, it drops COG tags for you.
On your way to check out the disk, more Lambent show up. Be careful if you’re going to blast them with the shotgun, since they explode and can be pretty painful. Take them out and make your way up to view the message. Marcus, it’s your father! He’s alive! So that’s what you’ll be doing in Gears 3 – tracking down Marcus Fenix’s father, trying to get his ‘solution’ to the Lambent, and dealing with the Locust as you go.
Now you have to make your way to the captain’s cabin and rescue Prescott. They introduce you to spotting here, a new feature. Be sure to use it a lot – it points out enemies for your allies to target. It’s also something to do to get an Onyx Medal. Fight your way to the captain’s quarters and rescue Prescott. The chapter ends when you find him.
Chapter 2 - Abandon Ship
Now you have to get to the choppers to help get them airborne. Polyps in the pipes try to stop you, so take them out. By the way, there’s only one collectable in this chapter, so don’t worry about missing anything during the fighting.
Make your way to and through the shooting gallery that is the storeroom. Lambent are everywhere and it’s your job to kill them. If you need cover and a good angle, the catwalk to the left should offer both. The lift is down and you need to raise it to let the chopper lift off. Meanwhile, even more Lambent attack. Cut your way to the control room to and get the chopper in the air. One chopper up, one more to go. Of course, there’s more Lambent to kill along the way.
The chopper won’t make it, and you now have bigger – much bigger – problems to worry about. For one thing, the deck is on fire. Make your way through the Lambent attack and turn the valves to put out the fire. There’s three in all, and Marcus will shout to keep you abreast of the situation.
Before you get to the third valve, something attacks. Is that a Lambent Leviathan? You’re knocked down to Engineering, and have to make your way back up. Next up? Defend the Raven’s nest. Fend off enough Lambent and Polyps and you’ll get to press on.
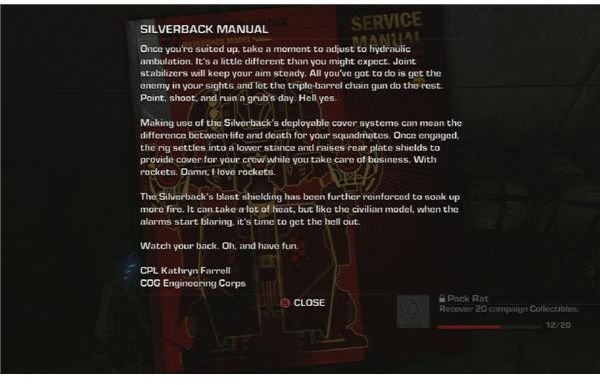
Make your way to the maintenance bay to pick up a Silverback. These mechs are fantastic. Wait! Don’t immediately jump into one. Your one collectable is the user manual for the Silverback. Pick it up, then hop in the mech.
Note, that while your mech has a huge life bar, it can be broken. Also, your gun overheats, so fire in bursts to keep it cool. Fend off the Leviathan three times and it’ll finally be in the right position. In between fending it off, you need to take out waves of Lambent that rush the deck. This shouldn’t be too hard for your mech. Once the Leviathan is in position, you’ll have the brilliant idea to blow it up. Unfortunately, Lambent already explode, and a giant Lambent like that, well…
Chapter 3 - Homecoming
This is Cole’s turf, Cougar territory. An hour earlier while flying over Hanover, scouting for supplies, you get to see what Carmine, Cole, Baird and the token female Sam get to explore. It used to be a Stranded outpost.
A spotlight comes on, and some survivors show up. Before you step into the light, head to the left and kick your way through a door. Next to a dead body is a Journal collectable. After that warm welcome, you get to take off towards the Shopping Center. So far so good! Keep your guard up though, things are ominous.
Here they introduce you to stalk pods, which are like Locust holes, in that they act as spawn points for you to destroy. Stalks pop up all over and new forms of Lambent appear for you to destroy. In the playground, head near the slide (which you can use) after you’ve taken out the Lambent. A Child’s Diary is there to collect. Fight you way past that and get to a checkpoint in the form of a razor barrier. Get past that and… more Lambent! What a surprise. Don’t forget to target the spawn pods, or you’re letting more enemies get to you than you have to.
Once you’re in the grocery store, find the cash registers and pick up your final collectable for this area, the Grocery List. It makes you wonder why the COGs are wasting time and inventory space picking up all this scrap. Anyway, fight your way through the mostly stripped grocery store. Once you’re through to the back room, bust apart some boxes and you’ll find a Loader to pilot. It’s like the silverback, but worse! Knock away the locker and back to your right is a hidden room with a COG tag in it.
Now you need to get the supplies to the chopper smoke. Feel free to hop out of the Loader long enough to fight, since it’s not very good on its own, but however you manage it, that’s your goal.
Chapter 4 - Homecoming
Now rather than do the smart thing and flee, Cole decides to lead your team to the Warehouse and the Stadium. So, that’s where you get to go. Pass through a partly-collapsed tunnel and you’ll encounter Stranded fighting Lambent. Give them a hand! The Lambent have some pretty heavy artillery, so be careful. Cover won’t always cover you from their shots. Getting close won’t help either, since they have a melee attack with a really long range that will almost kill you.
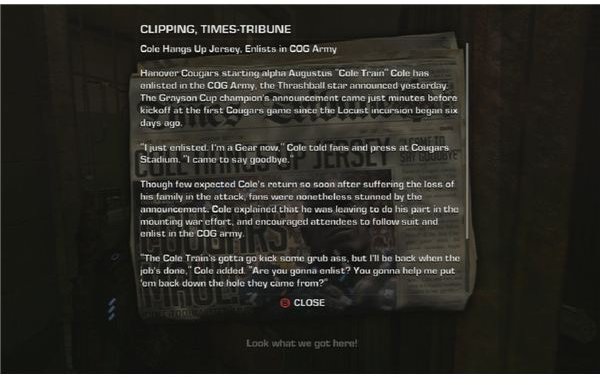
After Carmine gets shot and you meet with the leader of the survivors, you get to head for the warehouse. Once you’re able to use your gun again, look for two things. First, behind the cargo hold, you can find the Clipping, Times-Tribune collectable. Second, keep an eye out for a COG logo on a brick wall. A body nearby will have your next COG tag.
Predictably, on your way to the Stadium, Lambent attack. Fend them off, as usual. At this point you’ve gotten all of the Chapter 4 collectables, so you’re set on that front. Make your way towards the stadium and the bridge that’s taking potshots at your chopper.
Chapter 5 - MVP
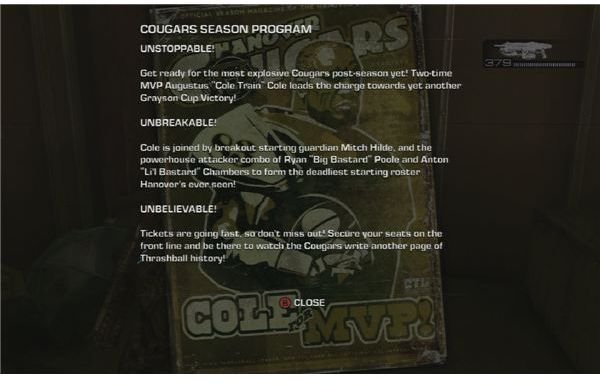
Time to go into the Stadium. Soon you’ll be given the choice of taking the lower path or the upper path. Take the upper path and you can find a shop full of umbrellas. Clear the Lambent out and you can find a Courgars Season Program. Collectable number one down.
Once you’ve cleared out the main lobby area, find a vending machine to the right of the south gate. You can find a Courgar’s handbook, for collectable two. Then, Cole gets a touching scene in his old locker room. After his trip down memory lane, and before you leave the stadium, be sure to locate the dead woman who is holding Cole’s Championship Ring.
There’s really not that much new or interesting in this chapter. The fights with Lambent should be familiar by now, and the only thing changing is the number and position of the enemy. You can take them down the same way you always do – with force.
Chapter 6 - Hanging By a Thread
Fun zipline action time! Shoot as much as you can on the way down so you have less to deal with when you land. Secure the bridge and fight your way through to the toll booths. To the north-east of the area you can find Toll Booth Tokens. You’ll know you’re in the right place when Locust snipers are taking shots at you.
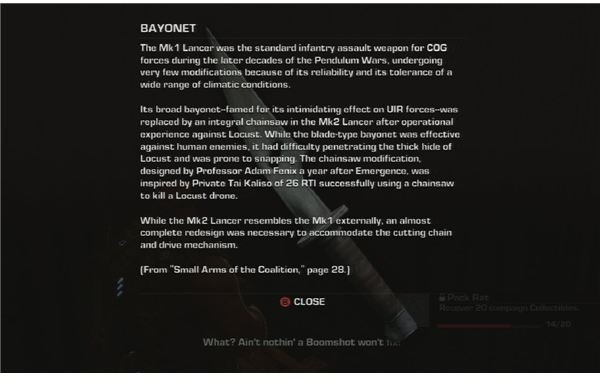
Soon after that, you can find a wooden box that you can break to find the Bayonet. Not a chainsaw bayonet, just a regular one. Not all that useful for fighting these folks. In fact, that’s exactly why the chainsaw is featured.
Take out the savage Locust that show up, which should be interesting compared to fighting the Lambent. For one thing, they don’t explode. For another, they’re more used to using bullets rather than sprays of Imulsion. Once you’re in the outpost, you can find a van with a COG logo painted near it. Take a ladder down to find another set of COG tags.
Continuing onwards you come across a Gas Barge. Take it down and go through the tunnels until you find the Tickers that you need to drop on the Leviathan. You can find the last collectable for the chapter here, the Sightseeing book.
Blow up the Leviathan with the crate full of Tickers and you finally reunite the two halves of your team…in an explosion.
References
- Images of Gears of War 3 Copyright of Epic Games
- Source: User’s Own Experience
- Collectable Item Locations from Cheat.cc
This post is part of the series: Ultimate Gears of War 3 Walkthrough and Collectable Guide
This guide will point you in the right direction to find each collectable item in the game, locate all of the COG tags to remember your fallen friends, and fight your way past all the tough boss battles and new enemies. Tips and Tricks for every chapter within!