FEAR 2: Walkthrough Of Interval 03 - Replica
Interval 03 – Replica
After all the chaos at the end of the last chapter, that is pipes being blown off the wall and the platform collapsing, you will begin the level immersed in water. You’re still in the outer-shell and the objective is still to get out of here in one piece, since you haven’t managed it in the previous chapter; the major problem is you can’t make your way through the pipes that have already burst.
1. The Way To The T.A.C.
Climb the ladder and exit through the door on your right. Snake-fist will mention that Alma is very much active, the lovable trickster, and you will experience strange goings on as usual. The game eased off the supernatural activity at the beginning of the chapter (see our guide on ‘Recognition’), where it was mostly sections of tunnels and shooting Black-ops.
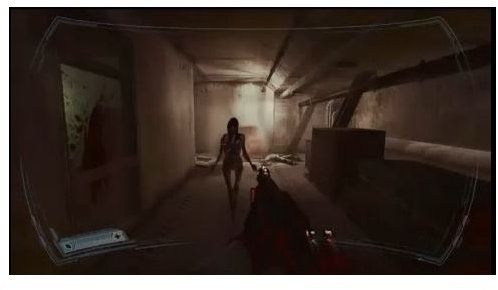
As you go through, you will see a door straight across which you’ll take. As mentioned, you can’t go anywhere else since there are gas-flames blocking your way. Keep on your left and go through another door, then head right and follow the corridor until you come up to glass doors. Open the doors and follow the corridor, you will see Alma and she’ll greet you as she knows best; you need to press your melee button repeatedly when she grabs you (mouse2 standard, but you can change it) otherwise you’ll die.
Ignore the door straight ahead and turn left instead. Turn left again to go through a door to a vast control room. In the control room head right and go up the stairs, then crouch to get through a space of the shattered door and head left again. Head through the door, then right and follow the corridor; you’ll need to jump when there is an obstruction, but then keep going and go downstairs. Go through the door and there will be another room with computers. You’ll need to activate the computer with the security screen, on the far right, in order to open another door.
2. The T.A.C (Telesthetic Attunement Chamber)
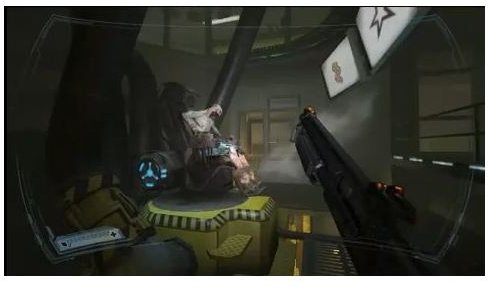
Go back upstairs then as you exit turn right and jump down, which will allow you to go to the open door. Follow the circular-chamber but be aware there will be an abomination jumping at you at one point. Keep going until you will come to a door, which you’ll go through. Go straight ahead then turn right into the ‘media room’; be aware of nasties in here though. Take out the goon being brainwashed in the chair, then head straight onto the stairs. Turn right, then right again following the small corridor around and head up the other flight of stairs: watch out for more monsters up here.
Keep going ahead, there is a medi-kit on a desk, and you will see an open door which you can go through. Head left then left again and get ready for a few abominations coming at you. Take the armor on a crate and turn right to go down a flight of stairs. Keep alert still. As you reach the lower floor, take a combat shogun and armor and head right through to a steel-door. Turn right again and always be aware of your surroundings, these things are not human (not anymore anyway) and are fairly quick in gripping you and holding you to the floor; in case this happens just keep hitting your melee button. At the end of a corridor turn right one more time and go through one of the small spaces onto another section. Go past the generators and move ahead to go up a steel ladder.
Forget the fence and turn right to move round onto a door into some kind of operation room. Be careful as it’s infested with those crawlers still. After the way it’s clear you can pick up combat-shotgun ammo and be off through the door ahead. Turn right then left through a door, then through another door which will get you past the obstruction. Now turn right, head for the freight-elevator and take a ride. Look up as the elevator is moving: It seems you have a friend.
3. The Replica Soldier Area
As you exit, if you explore the right hand side there are quite a lot of supplies, including armor, a reflex injector and medi-kits which are never too few. Take those if you wish and move ahead. You’ll need to turn left into a large room, not take the stairs; this room is a set-up by Vanek and you will be locked in. You can take an armor plate and a medi-kit on top of the busted car. Hear Vanek out, and be ready to take on some replica soldiers. This part can be quite tricky, since it’s an open space and they will keep on coming; I suggest you use an automatic weapon and try to take cover behind one of the training walls, or right at the corner of the room. Definitely use slow-motion if you can.
Pick up supplies around this area and move toward the screen, where Vanek put on his show, to find a hatch you can drop down to. This is where one container has fallen over and has left the hatch open leading to underneath the replica facility. You’ll drop all the way down and you can then head left to follow the corridor, whilst still keeping alert for more of these guys. There is an armor plate and a few reflex injectors on crates. Keep following the corridor (and shooting) until you come to a ladder on your left side. Go up and it is pretty much straight ahead all the way here, until you come to a section with a larger area where more replica soldiers will come out. Take cover and start shooting.
Once it’s okay to move on, go forward into the large space where they were attacking you and turn right. There is a blocked door but you can press your action button to move whatever container is blocking it. Go through the door and to your right there is a medi-kit. Move through the larger door and turn left, you will be attacked again shortly. Go straight ahead and turn into a door on your right, where mayhem ensues. Take out the baddies and once it’s clear you can head up to the steel ladder where there is a medi-kit waiting. Follow the platform and head down the stairs onto your right, to another set of stairs. Keep moving then turn right (you’ll see a crawler going past) and follow the big pipe letting off steam.
4. The Lift Out Of Here, And The Powered-Armor Unit
You’ll come to a larger section, where you can pick up ammo and other useful bits. You need to turn right to go through the big door where more fighting ensues. The replica will mostly come out from the top of the staircase, right at the bottom of the room you just entered. Watch out, clear the way and head up onto that staircase. Enter through the open vent, on your right, and follow the pipe once again. You’ll come to a raised platform so keep going and head down the ladder. Turn right then right again and you can see a much larger section; it looks like there’s more shooting going on.
You can drop down from the barrier, and there is a terminal you need to activate on your left; before that you may want to clear the area and shoot the ops. The terminal will subsequently activate the elevator, but only to suddenly halt. It seems you now need to turn some gas valves to get any further; you can spot the gas valves by the steam escaping and the red lights flashing. Before that however, stack up on armor and health kits and get ready for a powered armor soldier.
Once you’ve done that another objective becomes available: ‘Defeat the powered armor unit’. Ok, these guys aren’t friendly as you may have guessed and have a healthy constitution, so you will have to be on the move and use a heavy weapon. Use frag-grenades if they are available to you (they should be). Eventually, it will be reduced to scrap heap material as you’ll see by the black smoke. Once you’ve sent him back to mama, get back to the terminal, activate the lift, and you are out of there.
As a last note, although the objectives in this last section are clear they may not be happening in the order you see above. The powered-armor unit may appear before you’ve turned all the valves, depending how much time you spent down there.
This post is part of the series: Do Not Fear: Walkthrough of Intervals 02 - 03 and 04
Here we look at the Interval 02 - Withdrawal, plus Interval 03 and 04. Interval 03 consists of chapters ‘Recognition and Replica’ whilst 04 of ‘Ruins and Top’