Baldur's Gate II Walkthrough: Umar Hills
Baldur’s Gate II Walkthrough – Mysterious Deaths in Umar Hills
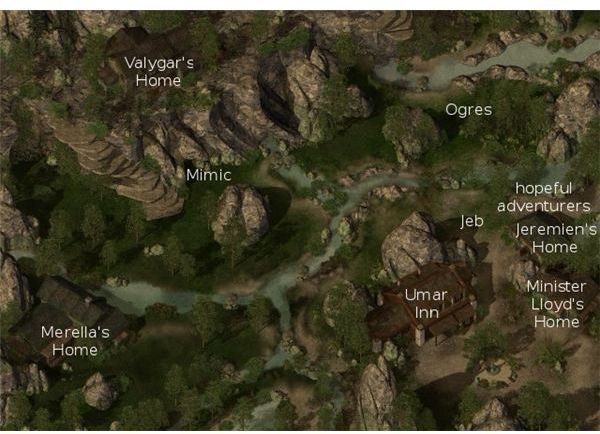
When you first arrive in Umar Hills, you’ll witness a town meeting. Afterwards, talk to Minister Lloyd in his home near the town square. He’ll mention three suspects: Wolves, Ogres and the Umar Witch. You can find out more about the Umar Witch from the Inkeeper, who has dozens of copies of the journal “The Umar Witch Project.”
Proceed to Merella’s cabin in the southwest. Her journal and a note from Mazzy will point to strange goings-on in the Temple Ruins, the area north of Umar Hills.
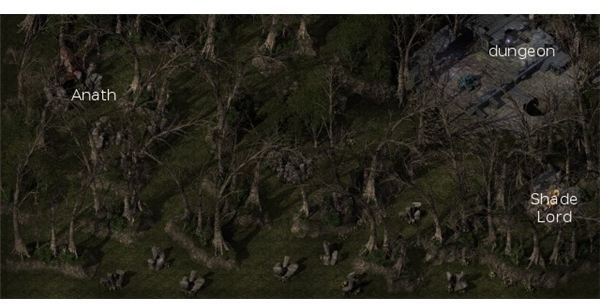
In a cave in the northeast Temple Ruins, you’ll meet a Werewolf, Anath, who will warn you about the Shade Lord in the ruins to the east. When you reach the dungeon entrance, a group of shades will ambush you. Turn the mirror near the entrance so it reflects the light from the gemstone, which will kill the shades.
Baldur’s Gate II Walkthrough – Temple Ruins Maps
Baldur’s Gate II Walkthrough – Umar Hills Temple
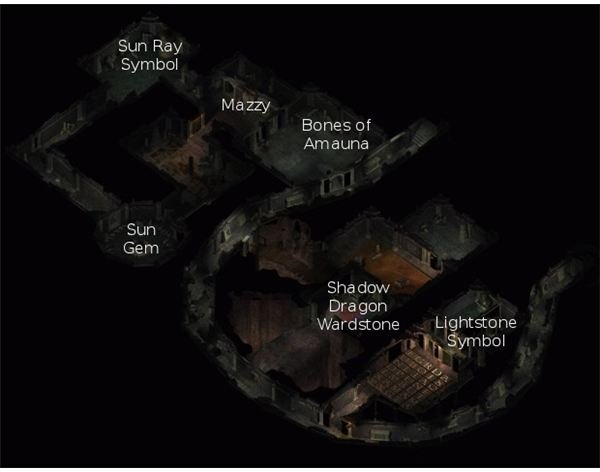
In the jail inside the temple, you’ll find Mazzy, a halfling fighter and a member of the original party sent to investigate the ruins. She’ll join your party if you like. You should also pick up the Bones of Amauna in a tomb in the first room.
Talk to the statue in the next room; he’ll ask you about the rituals of the sun god Amunator. You’ll find some clues around the level, but here are the answers: Morning Ritual: 2, 3, 1; Noontide Ritual: 3, 1, 1; Evening Ritual: 1, 3, 2. Afterwards you’ll receive the Sun Ray Symbol. The Sun Gem, which you’ll also need to progress through the level, is located in a pillar in a nearby room.
Further down the corridor, you’ll find a room filled with lava. It will deal you damage when you walk on it, but it’s worth it to pick up some good loot. Give the Bones of Amauna to the ghosts in the next room to receive the Shadow Dragon Wardstone.
Next, you’ll come to a room with letter tiles on the floor. Spell out the name “Amunator” to pass. The statue holds a sun gem and a Sling +3: Dragonsbane.A Shadow will ask you to take him across the trapped floor, but then will attack you. Kill him to get the Lightstone Symbol.
Baldur’s Gate II Walkthrough – Shade Lord
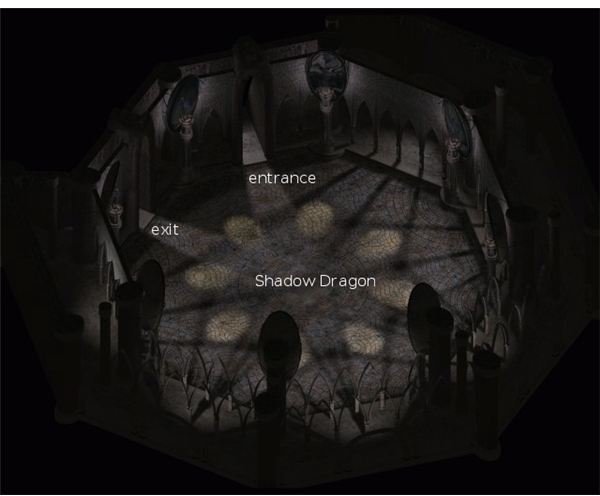
When you exit the temple, you’ll enter a large room where Thaxll’ssillyia the Shadow Dragon lies in wait. This is a difficult fight, but you can avoid it if you have the Shadow Dragon Wardstone.
Exit the dragon’s chamber to confront the Shade Lord and his minions. Kill them and destroy the altar to complete the quest. You can also pick up some great loot, including Darkmail +3, a Halberd +2: Duskblade and a Cloak of the Stars.
Return to Minister Lloyd to receive your reward: the leather armor The Night’s Gift +5, which gives the wearer +20% to hide in shadows. If you’re a Ranger, he’ll also offer you Merella’s cabin and her job as the Umar Hills protector. In addition, Rangers can return to the Temple Ruins for a class-specific quest to retrieve some lost Mithril for Lord Igen Tombethen.
Baldur’s Gate II Walkthrough – Umar Hills Map
Baldur’s Gate II Walkthrough – Umar Hills Side Quests
For some added XP and rewards, check out these side quests in Umar Hils:
- If you’ve completed the serial killer quest in the Bridge District, buy the book “History of the Zhentarim” from Fael outside the Umar Inn. He can help you forge the Human Flesh into the powerful evil armor Human Flesh +4. If you accuse him of working with the tanner, however, he’ll disappear and not come back.
- Help the wizard Jermien finish his Stone Golem by retrieving some Mimic Blood from the cave in the northwest. After the Stone Golem attacks Jermien, he’ll allow his daughter and her lover to be together. (He’ll also leave his house, allowing you to loot it.)
- Talk to Jeb behind the Umar Inn to learn about a farmer nearby with a treasure hidden in his chicken. Buy the chicken to obtain the Beljuril, which you can use to upgrade the Bronze Horn of Valhalla at the Waukeen’s Promenade Weaponsmith.
- Help the Ogres to the northeast work out a trade agreement with the town. In return, they’ll give you the Shield of the Lost +2.
- Talk to Valygar in his cabin to the northwest to learn about the Planar Sphere in the Slums District. He’ll also join your party, if you want him.
- Buy some swords and ale for some would-be adventurers near Jermien’s house. This will make the townspeople upset that you’re corrupting the youth, however. If you’re a Ranger, make sure you do this before you finish the main quest, or Minister Lloyd will get upset and kick you out of your stronghold.
This post is part of the series: Baldur’s Gate II Walkthroughs
Check out these “Baldur’s Gate II” walkthroughs to help find your way through the RPG “Baldur’s Gate II: Shadows of Amn.”